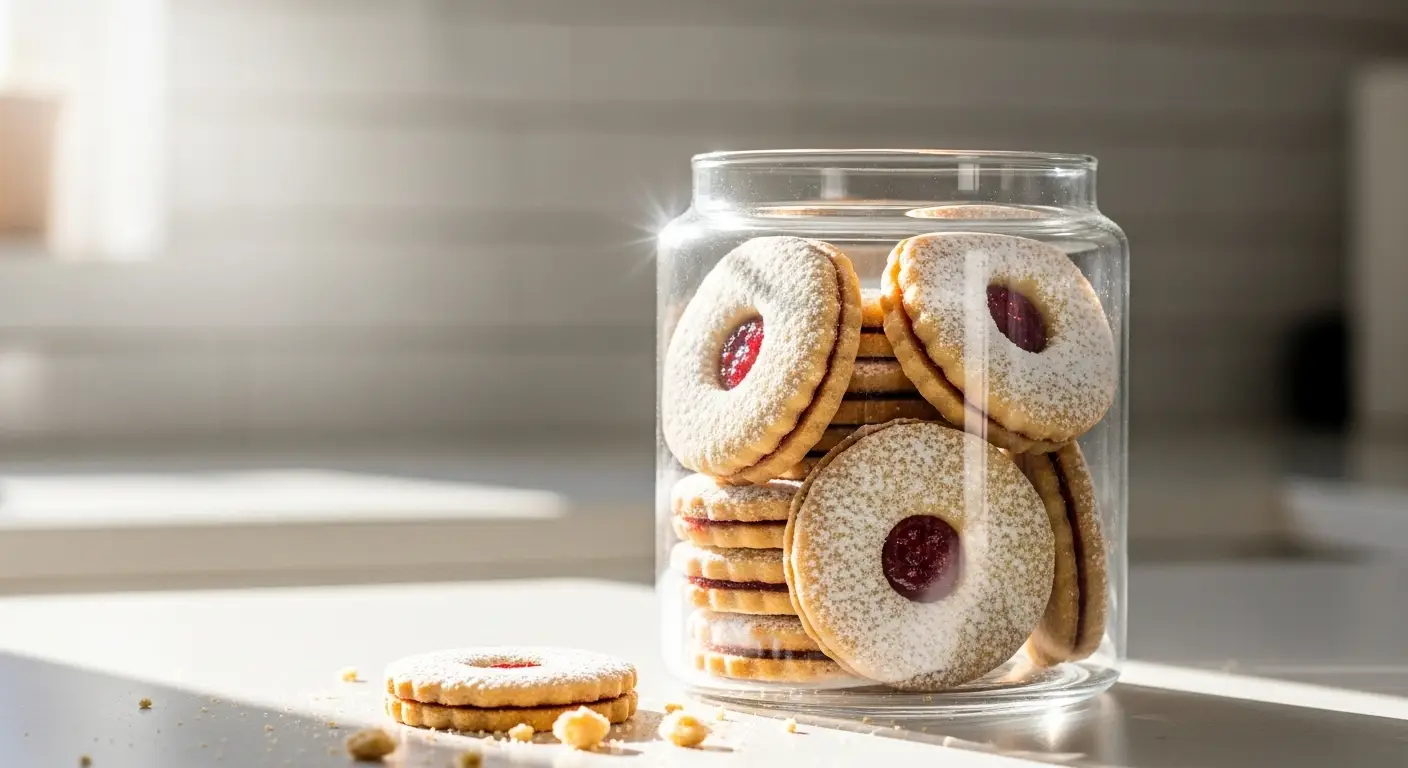
Traditional Linzer Cookies with Raspberry Jam
Making cookies is one of my favorite things to do. There is something special about the smell of butter and sugar in the oven. Today, I want to show you how to make traditional Linzer cookies. These are those pretty sandwich cookies with a little window in the middle. You can see the bright red jam peeking through, and they look like little pieces of art.
I first tried these at a small bakery in the city. They were so soft and nutty that I knew I had to learn the secret. It took me a few tries to get the dough just right. At first, my dough was too sticky, and the cookies lost their shape. But I practiced and found a way that works every time. These cookies are great for holidays, but they are also perfect for a simple afternoon snack with tea.
In this guide, you will learn how to make the dough from scratch. I will show you how to cut the shapes and how to bake them so they stay soft. We will talk about the best jam to use and how to put them together. By the end, you will be able to make a batch of cookies that look like they came from a professional shop.
Want to see how easy it is to bake these at home?
Getting Ready to Bake Your Cookies
Before we start mixing, we need to talk about why these cookies are different from regular sugar cookies. Linzer cookies use ground nuts in the dough. This gives them a rich flavor and a texture that melts in your mouth. Most people use almonds, but you can also use hazelnuts if you like a deeper taste. It is very important to have your butter at room temperature so it mixes well with the sugar.
I once tried to make these with cold butter because I was in a rush. That was a big mistake! The dough had lumps, and the cookies came out crunchy instead of soft. Now, I always take my butter out of the fridge an hour before I start. It makes a huge difference in how the dough feels. You also want to make sure your jam is smooth so it spreads easily between the layers.
The Ingredients You Will Need

To make these cookies, you need a few basic things from your pantry. The main parts are flour, butter, and sugar. But the secret is the almond flour. If you cannot find almond flour at the store, you can grind whole almonds in a blender until they look like sand. Just be careful not to blend too long, or you will get almond butter!
- 1 cup of unsalted butter (softened)
- 2/3 cup of white sugar
- 1 large egg yolk
- 1 teaspoon of vanilla extract
- 1 cup of almond flour (finely ground)
- 2 cups of all-purpose flour
- 1/2 teaspoon of ground cinnamon
- 1/4 teaspoon of salt
- 1/2 cup of raspberry jam (no seeds is best)
- Powdered sugar for dusting on top
Special Tools for the Job

You do not need a lot of fancy gear, but a set of Linzer cookie cutters helps. These are round cutters that come with smaller shapes to cut out the middle. If you do not have them, you can use a regular round glass and a small soda bottle cap for the center hole. It works just as well and saves you money! You will also need a rolling pin and some parchment paper so the dough does not stick to your counter.
Recipe Quick Info
- Prep Time: 30 minutes (plus chilling)
- Cook Time: 10 minutes
- Servings: 24 cookies
- Difficulty: Medium
How to Make the Perfect Dough
The dough is the most important part of this recipe. It needs to be handled with care because the ground nuts make it a bit fragile. My trick is to keep the dough cool. If the butter gets too warm while you are working, the cookies will spread out too much in the oven. They might lose those pretty edges you worked hard to cut. I like to split the dough into two flat discs before putting them in the fridge. This helps them chill faster and makes it easier to roll out later.
When you are mixing the flour into the butter and sugar, do not overdo it. If you mix too much, the cookies will be tough. Stop mixing as soon as you do not see any more white flour. It is okay if the dough looks a little crumbly at first. Once you press it together with your hands, it should stay in a ball. If it feels too dry, you can add a tiny splash of milk, but usually, the egg yolk and butter provide enough moisture.
Mixing the Wet and Dry Ingredients

Start by beating the butter and sugar together until they look fluffy and light. I use a hand mixer for this, but you can use a sturdy spoon if you want a workout! Then, add the egg yolk and the vanilla. Mix those in well. In a different bowl, whisk the flour, almond flour, cinnamon, and salt together. Adding cinnamon is a small touch that makes the cookies smell amazing while they bake.
Slowly add the dry flour mix to the butter mix. I usually do this in three parts. This helps the dough stay smooth. Once it forms a soft ball, wrap it in plastic wrap. Put it in the fridge for at least one hour. This step is a must! If you skip it, the dough will be a sticky mess and you will get frustrated. Trust me, I have tried to skip it and it never ends well.
Rolling and Cutting the Shapes

Take one disc of dough out of the fridge. Let it sit for five minutes so it is not like a rock. Sprinkle a little flour on your counter and your rolling pin. Roll the dough until it is about 1/4 inch thick. Try to keep it even so they all bake at the same time. If the dough starts to stick, just add a tiny bit more flour. IMO, using two sheets of parchment paper to roll the dough is the best way to keep things clean.
Cut out an even number of circles. On half of those circles, cut out a small shape in the middle. These will be the tops of your sandwiches. The solid circles will be the bottoms. Move them carefully to a baking sheet lined with paper. If the shapes get a bit wonky, you can pop the whole tray back in the fridge for ten minutes before they go into the oven. This helps them keep their sharp edges.
Pro Baker Tips
- Keep it Cold: If the dough gets soft while cutting, put it back in the fridge for a bit.
- Even Pairs: Always count your tops and bottoms to make sure they match!
Baking and Putting Them Together
Baking these cookies does not take long. You want to watch them closely. They should not turn dark brown. Instead, they should just be a very light golden color around the bottom edges. They will still feel a little soft when you take them out, but they will firm up as they cool on the tray. If you leave them in too long, they will become dry and crispy, which is not what we want for a Linzer cookie.
Once the cookies are cold, it is time for the fun part. This is when the cookies really start to look beautiful. You get to play with the jam and the powdered sugar. I find that using a small spoon or even a piping bag makes putting the jam on much cleaner. You don’t want the jam to go all the way to the edge, or it will squeeze out the sides when you put the top on. Just a little dollop in the center is perfect.
Baking the Cookies to Perfection

Heat your oven to 350 degrees. Bake the cookies for about 10 to 12 minutes. I usually rotate the pan halfway through the time. This helps if your oven has hot spots. The cookies with the holes in the middle might bake a little faster than the solid ones, so keep an eye on them. Once they are done, let them sit on the pan for five minutes before moving them to a wire rack to cool completely.
Do not try to add the jam while they are warm! The jam will melt and turn into a runny mess. Plus, the cookies are very fragile when they are warm and might break. Patience is key here. While you wait, you can clean up your kitchen or have a cup of coffee. FYI, these cookies actually taste better the next day after the jam has softened the cookie a little bit.
The Final Assembly and Decoration

First, lay out all your “window” cookies (the ones with holes) on a plate. Sift powdered sugar over them until they look like they are covered in snow. Do this before you put them on the bottoms! If you do it after, the sugar will cover up the pretty red jam. Now, take a solid cookie and spread about half a teaspoon of jam on it. I like to use raspberry, but strawberry or apricot jam works great too.
Place a sugared top cookie onto a jam-covered bottom cookie. Press very gently so they stick together. The jam will fill up the little window in the middle. They look so professional! If you have extra jam, you can put a tiny drop right in the center hole to make it look extra shiny. These cookies are now ready to be served or shared with friends. They look fancy, but you know how simple they really were to make.
How to Store Your Cookies

If you have any cookies left over, you need to store them right. Put them in an airtight container. You can keep them at room temperature for about two days. If you want them to last longer, put them in the fridge for up to a week. Just remember that the longer they sit, the softer they get because of the moisture in the jam. Some people like them super soft, but others like a little crunch.
You can also freeze the baked cookies without the jam. They stay fresh in the freezer for a month. When you want a treat, just thaw them out, add your jam, and dust them with sugar. This is a great way to prep for a big party without doing everything on the same day. Just make sure to put a piece of wax paper between layers so they don’t stick together in the container.
Common Questions About Linzer Cookies
Can I use a different type of nut?
Yes! You can use ground hazelnuts or walnuts instead of almonds. It will change the flavor a little bit but they will still taste great.
Why did my cookies spread so much?
Your dough was likely too warm. Make sure to chill the dough for at least an hour before rolling and cutting the shapes.
Can I use jelly instead of jam?
Jelly is often too thin and might run off the cookie. A thick jam or preserves works best to keep the sandwich together.
Do I have to use an egg yolk?
The yolk makes the cookie very rich and soft. If you use the whole egg, the cookie will be a bit crispier and tougher.
How do I get the sugar to stay white?
Make sure the cookies are 100% cold before dusting. If they are even a little warm, the sugar will melt and disappear.
Enjoy Your Homemade Treats
You have made beautiful Linzer cookies! These treats are buttery, nutty, and sweet. They are perfect for sharing or keeping all to yourself. I hope you had fun baking with me today. Remember, the best part of baking is the love you put into it. Enjoy every bite of your sweet success!