Cool Pink Mojito Ice Cream with Lime and Mint
I love ice cream more than almost any other food. When the weather gets hot, I want something cold and sweet. But sometimes, plain vanilla or chocolate feels a bit boring. I wanted to make something that tasted like a fancy drink but in a bowl. That is how I came up with this pink mojito ice cream. It is bright, zingy, and very pretty to look at.
In this post, you will learn how to make a no-churn ice cream that tastes just like a mojito. We use fresh lime juice and mint leaves to get that classic flavor. To make it pink, we add some sweet raspberries. You do not need a big, expensive machine to make this. It is a simple recipe that anyone can do at home with just a few tools and some patience.
Ready to make the most refreshing dessert of the summer? Let’s get started!
What Makes This Pink Mojito Ice Cream Special
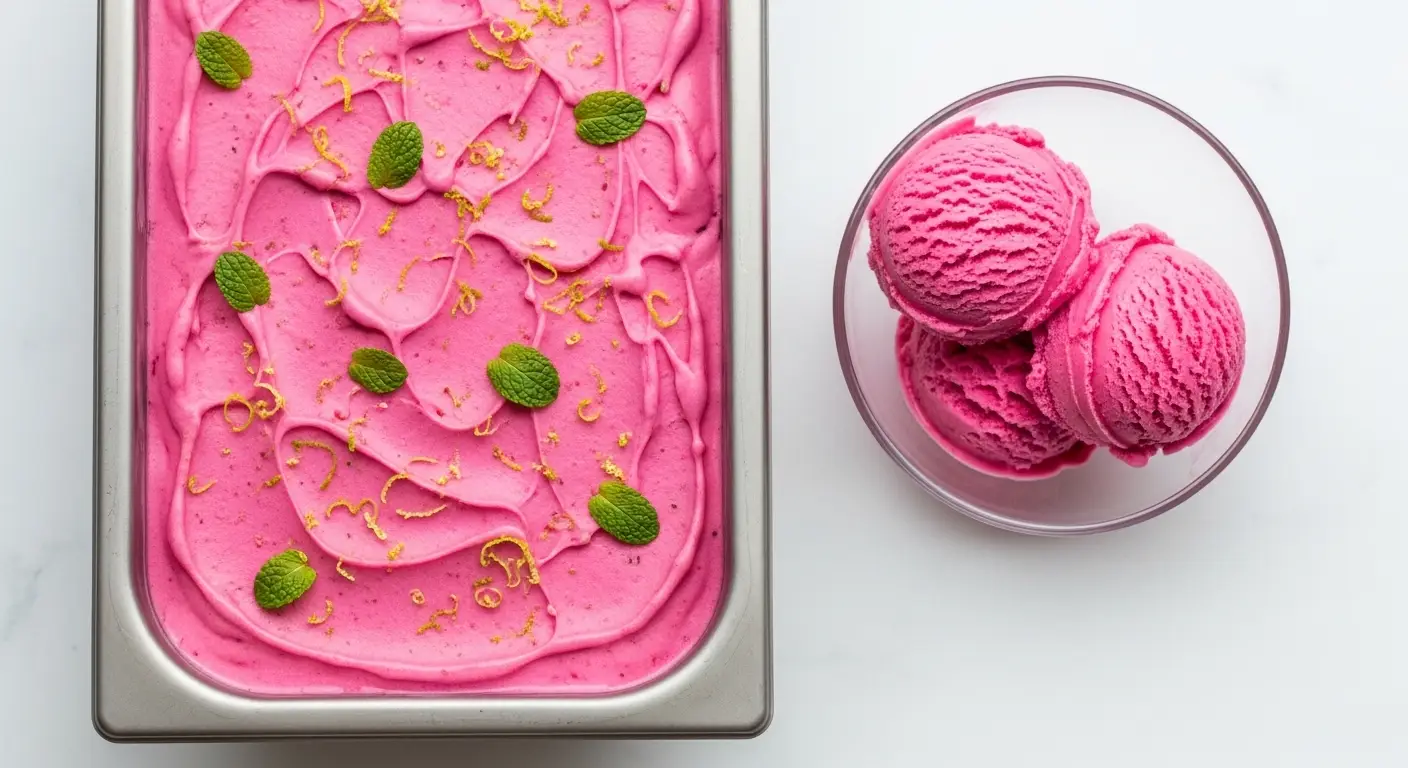
This is not your average grocery store ice cream. Most lime ice creams are green or white. By adding berries, we turn it a beautiful shade of pink. It looks amazing on a cone or in a glass bowl. The flavor is a mix of tart lime, cool mint, and sweet cream. It feels light even though it is very rich.
The best part is the texture. Because we use heavy cream and condensed milk, it stays soft. You won’t break your wrist trying to scoop it out of the container. It has a smooth mouthfeel that melts perfectly. Plus, the pink color comes from real fruit, not fake food dye. That makes me feel much better about serving it to my friends and family.
The Ingredients You Will Need

To make this ice cream, you only need a few simple things. You likely have some of these in your kitchen right now. First, you need two cups of heavy whipping cream. This must be very cold. If the cream is warm, it will not whip up into fluffy peaks. You also need one can of sweetened condensed milk. This provides all the sweetness and keeps the ice cream soft in the freezer.
For the mojito flavor, grab three large limes. We will use both the juice and the green skin, which we call zest. You also need a big handful of fresh mint. Don’t use dried mint from a jar; it won’t taste right. Finally, you need one cup of fresh or frozen raspberries. These are what turn the ice cream pink. If you don’t like raspberries, strawberries work too, but the pink might be a little lighter.
How to Prepare the Lime and Mint

We start by getting the flavor out of the limes and mint. First, wash your limes well. Use a small grater to rub the green part of the skin into a bowl. Stop when you hit the white part under the skin. The white part is bitter, and we don’t want that. Next, squeeze the juice out of the limes. You should get about half a cup of juice. If your limes are dry, you might need an extra one.
Take your mint leaves and pull them off the stems. Throw the stems away. Chop the leaves very small. I learned a lesson once: if you leave the mint leaves too big, they feel like pieces of grass in your mouth when you eat the ice cream. Chop them until they look like tiny green dots. Mix the lime zest, lime juice, and chopped mint in a small bowl. Let them sit for ten minutes so the flavors can get to know each other.
Making the Pink Berry Base

Now we make the pink color. Take your raspberries and put them in a blender or food processor. Blend them until they are a smooth liquid. If you hate seeds, you can push this liquid through a fine metal strainer. I usually do this because I like my ice cream to be very smooth. It takes a few extra minutes, but it is worth it.
Once you have your raspberry juice, mix it with the sweetened condensed milk. Stir it together until the whole bowl is a bright, beautiful pink. Then, stir in your lime and mint mixture. At this point, the smell will be amazing. It will smell just like a fresh drink at a beach. FYI, this pink milk is very sweet, but don’t worry. It will balance out once we add the heavy cream.
Recipe Quick Info
- Prep Time: 25 minutes
- Cook Time: 0 minutes (needs 6 hours to freeze)
- Servings: 8 people
- Difficulty: Easy
Whipping the Cream to Perfection

This is the most important part of no-churn ice cream. Put your cold heavy cream into a big bowl. Use a hand mixer or a stand mixer to beat the cream. Start on a low speed so you don’t splash cream all over your shirt. Once it starts to get bubbly, turn the speed up to high. You want to whip it until it looks like thick clouds. These are called stiff peaks.
You will know it is ready when you lift the mixer up and the cream stays standing in a little point. Do not over-mix it! If you keep mixing after it is stiff, it will turn into butter. I have done that before, and it is a sad mistake. Just watch it closely. As soon as it looks like the stuff you put on top of a sundae, you are done. This air in the cream is what makes the ice cream fluffy instead of a solid block of ice.
Folding Everything Together Gently

Now we have to combine our pink milk and our white whipped cream. Do not just dump them together and stir fast. If you are too rough, you will pop all those tiny air bubbles we just made. Instead, we use a move called folding. Pour about one-third of the pink milk into the whipped cream bowl. Use a rubber spatula to gently cut through the middle and turn the cream over the milk.
Keep doing this slow circular motion until most of the pink is mixed in. Then add the rest of the pink milk and repeat. It is okay if there are a few white streaks left. In fact, it looks pretty that way! This step requires a bit of patience. IMO, taking your time here makes the difference between a dense ice cream and a light, professional one. Once it is all one soft pink color, you are ready for the final step.
Step-by-Step Freezing Instructions

- Find a metal loaf pan or a plastic container that holds about two liters. Metal is better because it gets cold faster.
- Pour your pink mojito mixture into the pan. Use the back of a spoon to make the top flat and even.
- Cover the top of the pan with plastic wrap. Make sure the plastic actually touches the surface of the ice cream. This stops ice crystals from growing on top.
- Place the pan in the coldest part of your freezer. This is usually the back of the bottom shelf.
- Wait at least six hours. Leaving it overnight is even better. I know it is hard to wait, but the middle needs time to get firm.
- Before you want to eat it, take the pan out and let it sit on the counter for five minutes. This makes it easier to scoop.
Tips for the Best Results

If you want the best ice cream, always use the highest fat cream you can find. Low-fat cream has more water, and water turns into ice. This can make your dessert feel crunchy or icy. Also, make sure your limes are at room temperature before you squeeze them. You will get much more juice out of a warm lime than a cold one. Just roll them on the table with your hand first to loosen them up.
One limitation of this recipe is that it melts faster than store-bought ice cream. Since it doesn’t have chemicals to keep it solid, you should serve it right away. If you are having a party, keep it in the freezer until the very last second. Another tip is to chill your bowl and beaters in the freezer for ten minutes before whipping the cream. This helps the cream stay cold and whip up faster.
Pro Ice Cream Tips
- Cold Tools: Put your mixing bowl in the freezer for 15 minutes before using it.
- Zest First: Always grate the lime skin before you cut the lime in half to juice it.
- No Seeds: Use a strainer for the berry juice to keep the ice cream perfectly smooth.
Serving Suggestions and Ideas

There are many ways to serve this pink mojito ice cream. The simplest way is in a plain white bowl so the pink color really pops. You can add a few fresh raspberries on top for extra crunch. If you want to be fancy, serve it in a martini glass. This makes it look like the cocktail that inspired it. Put a little lime wedge on the side of the glass to make it look professional.
For a fun party idea, make ice cream sandwiches! Use two sugar cookies or shortbread cookies and put a big scoop of pink ice cream in the middle. The buttery taste of the cookies goes great with the tart lime. You could even drizzle a little white chocolate over the top. Since this is a mojito flavor, it also tastes great served alongside a slice of coconut cake or a simple vanilla wafer.
Your Questions Answered
Making ice cream at home can be a little scary if you have never done it. You might worry about it being too hard or not freezing right. Don’t worry! I have answered some of the most common questions people ask me about this recipe below. It is much easier than it looks, and even if it isn’t perfect, it will still taste like a dream.
Can I make this without alcohol?
Yes! This recipe is already alcohol-free. It uses lime and mint to get the mojito flavor. It is safe for kids and adults to enjoy anytime.
What if I don’t have a hand mixer?
You can use a hand whisk, but it will take a long time and your arm will get very tired. A mixer is much better for getting the cream thick.
How long does it stay fresh in the freezer?
It is best if you eat it within two weeks. After that, it might start to get ice crystals or lose some of its fresh mint flavor.
Can I use lemons instead of limes?
You can, but it will taste more like a pink lemonade than a mojito. It will still be very tasty, just a different flavor profile.
My ice cream is too hard to scoop. What did I do wrong?
Nothing! Homemade ice cream often gets very firm. Just leave it on the counter for 5 to 10 minutes and it will soften up perfectly.
Enjoy Your Pink Summer Treat
This pink mojito ice cream is the best way to beat the heat. It is easy to make, looks beautiful, and tastes like a tropical vacation. I hope you have as much fun making it as I do. Now, go grab some limes and start whipping!