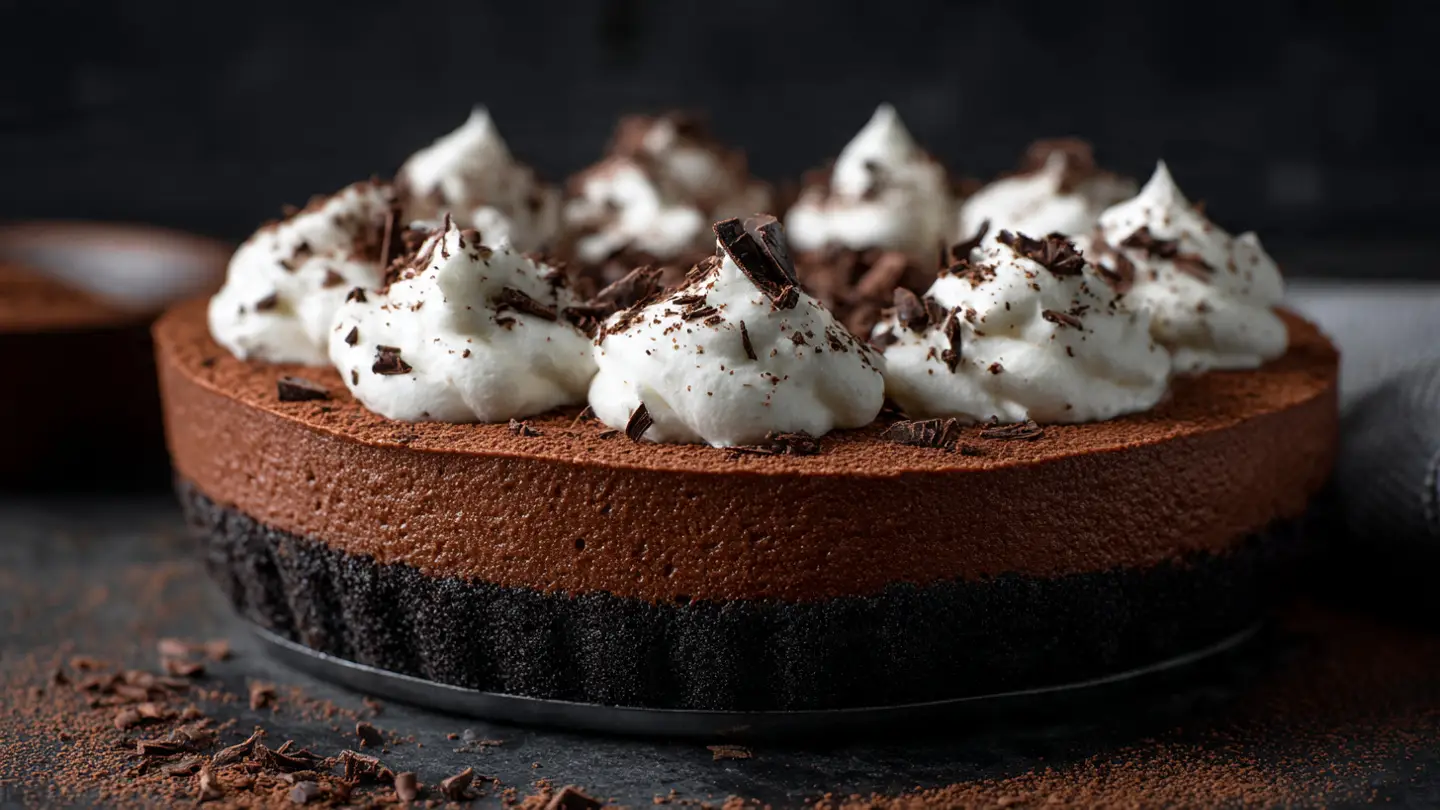
Silky Smooth Chocolate Mousse Pie
Making a chocolate mousse pie is a great way to show love to your family. I love how the soft cream feels when you take a big bite. This pie looks very fancy, but it is actually quite easy to put together in your own kitchen. You do not need to be a pro cook to get this right. I will show you how to make a pie that tastes like it came from a bakery.
In this article, you will learn how to build a crunchy crust and a fluffy chocolate filling. I will also share my favorite ways to decorate the top so it looks beautiful. This dessert is perfect for birthdays, holidays, or just because you want something sweet. Let us get into the kitchen and start baking this tasty treat together.
Want to see how easy it is? Check out the steps below!
Getting Ready for Your Chocolate Adventure
Before we start mixing, we need to talk about what makes this pie so good. The secret is in the layers. A good pie needs a base that stays crunchy and a middle that stays light. I learned this the hard way when I once used a crust that was too soft. It turned into a big mess! Now, I always make sure my crust is nice and firm before I add the mousse. It makes a huge difference in how the pie feels when you eat it.
I also want to tell you about the chocolate. You can use chips or bars, but try to find ones that you really like the taste of. If the chocolate tastes good on its own, the pie will taste even better. Cooking is all about using things that make you happy. This pie is a bit rich, so a small slice goes a long way. This is good because it means you can share it with more friends! IMO, sharing dessert is the best part of the day.
Gather Your Pie Ingredients

You will need a few simple things to make this pie. Most of these items are probably already in your pantry. If not, a quick trip to the store will fix that. For the crust, we use cookies and butter. For the filling, we need chocolate, cream, and a little bit of sugar. It is a simple list for such a big flavor.
- 24 chocolate sandwich cookies (like Oreos)
- 5 tablespoons of melted butter
- 2 cups of heavy whipping cream
- 1 cup of semi-sweet chocolate chips
- 2 tablespoons of powdered sugar
- 1 teaspoon of vanilla extract
- A pinch of salt to balance the sweet
Making the Perfect Cookie Crust

The crust is the foundation of our pie. I like using chocolate cookies because they match the mousse so well. First, you need to crush the cookies into very small bits. You can use a blender or put them in a bag and hit them with a rolling pin. This is a fun way to let out some energy! Once they look like sand, mix them with the melted butter. The butter acts like glue to hold everything together.
Press the mix into your pie pan very hard. Use the bottom of a flat cup to make it smooth and even. If you do not press hard enough, the crust might crumble when you try to cut a slice later. I usually put my crust in the fridge for about 30 minutes while I work on the next part. This helps the butter get hard again so the crust stays strong. FYI, you can also bake the crust for 8 minutes if you want it extra crunchy.
How to Melt Chocolate Safely

Melting chocolate can be tricky if you go too fast. If chocolate gets too hot, it becomes dry and lumpy. I always use a bowl over a pot of hot water. This is called a double boiler. The steam gently warms the bowl and melts the chocolate slowly. You can also use a microwave, but you must stop it every 20 seconds to stir. Stirring helps the heat move around so nothing burns.
One mistake I made once was getting a tiny drop of water in my melting chocolate. The whole bowl turned into a thick, grainy clump. It was so sad! Make sure your bowl and spoon are totally dry. Once the chocolate is smooth and shiny, let it sit on the counter for a few minutes. It needs to cool down a little bit before we mix it with the cream. If it is too hot, it will melt our fluffy whipped cream.
Whipping the Cream to Soft Peaks

This step is what makes the mousse feel like a cloud. You want to beat the heavy cream until it gets thick. I use a hand mixer because it is much faster than doing it by hand. Start slow so the cream does not splash all over your shirt. As it gets thicker, you can turn up the speed. You are looking for “soft peaks.” This means when you lift the whisk, the cream stands up but the tip curls over gently.
Be careful not to mix for too long. If you keep going past the thick stage, you will end up making butter! That is great for toast, but bad for pie. I like to add the vanilla and powdered sugar right at the end. This keeps the cream stable and gives it a nice, light sweetness. If you want a less sweet pie, you can use less sugar. The chocolate already has plenty of sugar in it most of the time.
Folding the Mousse Together

Now we combine the melted chocolate and the whipped cream. This is the most important part of the recipe. We do not want to stir fast. Instead, we use a move called “folding.” Use a big spoon or a spatula to go down to the bottom of the bowl and fold the bottom over the top. Turn the bowl as you go. This keeps the air bubbles inside the cream so the mousse stays light and fluffy.
Keep folding until you do not see any more white streaks of cream. It should all be a beautiful, light brown color. My first time doing this, I stirred too hard and the mousse turned flat. It still tasted good, but it was not airy. Take your time here. It feels like a slow dance with your food. Once it is mixed, pour it into your chilled cookie crust and smooth out the top with your spoon.
Waiting for the Pie to Set

The hardest part of this recipe is waiting. The pie needs to sit in the fridge for at least 4 hours. Over night is even better! The cold air helps the chocolate and cream firm up. If you try to cut it too soon, the mousse will just slide out like a thick sauce. I know it smells amazing and you want to eat it right away, but stay strong! The wait makes the first bite feel like a big reward.
I usually cover my pie with some plastic wrap or a lid. This keeps it from picking up smells from other food in the fridge. Nobody wants a chocolate pie that tastes like onions! This is a great dessert to make the day before a party. It saves you time on the day of the event. You can just pull it out of the fridge and it is ready to go. IMO, make-ahead desserts are the best for busy people.
Recipe Quick Info
- Prep Time: 30 minutes
- Cook Time: 0 minutes (No-bake!)
- Servings: 8 people
- Difficulty: Easy
Taking Your Pie to the Next Level
Once your pie is firm, you can think about how to make it look special. A plain brown pie is fine, but a decorated pie is exciting! You can use things you already have in your kitchen. I like to keep it simple so the chocolate is still the star of the show. You can also think about how you serve the pie. A cold plate helps keep the mousse firm while you eat it on a warm day.
Different people like different toppings. Some like it crunchy, and some like it extra creamy. I will give you a few ideas on how to finish your masterpiece. Remember, there is no wrong way to decorate a pie as long as you think it looks good. If you make a mistake and a topping looks messy, just cover it with more whipped cream! That is my favorite kitchen secret for fixing almost any dessert problem.
Adding Fun Toppings and Decorations

There are so many ways to decorate! My favorite way is to add big swirls of whipped cream around the edge. You can use a spoon to make little clouds or a piping bag to make fancy stars. After that, I like to use a vegetable peeler on a bar of chocolate. This creates little chocolate curls that look very pretty. It makes the pie look like it cost a lot of money at a fancy shop.
You could also add fresh berries like raspberries or strawberries. The sour taste of the fruit goes perfectly with the sweet chocolate. If you like a bit of crunch, try sprinkling some crushed nuts or extra cookie crumbs on top. I once added a little sea salt on top, and it was a total game-changer for the flavor. Just a tiny bit of salt makes the chocolate taste even deeper and more delicious.
Serving the Perfect Slice

When it is time to eat, you want your slices to look neat. A messy slice still tastes good, but a clean slice looks great in photos! The trick is to use a sharp knife and some hot water. Dip your knife in hot water and wipe it dry before every cut. The heat from the metal will slide through the cold mousse like butter. This prevents the mousse from sticking to the knife and pulling away from the crust.
I like to serve my pie on small white plates. The white color makes the dark chocolate stand out. If you are having a party, you can put a little extra chocolate sauce on the plate before you put the pie down. It looks very professional! This pie is quite filling, so start with a small slice. People can always come back for seconds if they have room in their tummies. Sharing this pie always makes my friends very happy.
Storing Your Leftover Pie

If you have any pie left over, you need to keep it cold. It will stay good in the fridge for about 3 to 4 days. Make sure it is covered tightly so it stays fresh. The crust might get a little softer after a few days, but it will still taste yummy. I sometimes even eat a slice for breakfast because, hey, life is short! It is a great treat with a cup of milk or coffee.
You can also freeze this pie if you want it to last longer. Wrap it really well in plastic and then foil. It can stay in the freezer for up to a month. When you want a piece, just let it sit in the fridge for an hour to soften up. Some people even like eating it while it is still a bit frozen. It tastes like a chocolate ice cream pie that way! It is a very flexible dessert for any time of year.
Pro Tips for Success
- Cold Bowl: Put your metal bowl in the freezer for 10 minutes before whipping cream. It goes much faster!
- No Water: Make sure no water touches your chocolate while melting, or it will clump up.
- Deep Crust: Push the cookie crumbs high up the sides of the pan to hold more mousse.
Common Questions About Mousse Pie
Can I use milk chocolate instead?
Yes, you can! Milk chocolate is sweeter and less bitter than semi-sweet. Just know the pie will be much sweeter overall.
What if I don’t have a mixer?
You can use a whisk and your arm muscles! It will take a long time, about 10 minutes of fast whisking, but it works.
Can I make this crust-free?
Totally! You can just put the mousse into small glass cups. It makes a great pudding-style dessert without the cookies.
How do I make it vegan?
Use dairy-free chocolate and coconut cream instead of heavy cream. Use vegan cookies and melted coconut oil for the crust.
Why is my mousse runny?
You might not have whipped the cream enough, or the chocolate was too hot when you mixed it in. Make sure it chills long enough!
Enjoy Your Homemade Treat
This chocolate mousse pie is a real winner for anyone who loves sweets. It is simple to make but looks very fancy. I hope you have a lot of fun making this and sharing it with your favorite people. Enjoy every single bite!