Best Ever Fudgy Chocolate Lava Cakes Baked in a Muffin Tin
I love chocolate more than almost anything. There is something so special about a cake that has a warm, melty center. Many people think you can only get these fancy desserts at a big restaurant. That is not true at all. I am going to show you how to make the best chocolate lava cakes right in your own kitchen. You do not even need special bowls or fancy tools. We are going to use a simple muffin tin that you likely already have in your cupboard.
In this post, you will learn the secret to getting that perfect gooey middle. I will walk you through every step of the process. We will talk about the best chocolate to buy and how to know when the cakes are done. By the time you finish reading, you will be ready to bake a dessert that will make everyone smile. These cakes are rich, sweet, and very fun to eat. Let us get your oven preheated and your apron on because it is time to bake something amazing.
Check out the full list of steps below to get started on your chocolate treat.
The Magic of the Muffin Tin Method
When I first tried making lava cakes, I thought I needed those small ceramic cups called ramekins. I went to the store to buy them, but they were too expensive. I decided to try my muffin tin instead. It worked perfectly! The metal tin actually heats up faster than ceramic. This helps the outside of the cake set quickly while the inside stays soft and melty. It is a great trick for anyone who wants a fast dessert without buying new gear.
Using a muffin tin also makes it easy to serve a crowd. You can bake six or twelve cakes at once. Most people have a muffin pan, so this recipe is very accessible. One thing I learned the hard way is that you must grease the tin very well. If you do not, the cakes will stick and break open before they reach the plate. I once had a whole batch turn into a chocolate mess because I was lazy with the butter. Now, I make sure every nook and cranny is coated.
Gathering Your Simple Ingredients

You only need a few basic things to make these cakes. The main star is the chocolate. I always suggest using a good quality baking bar or high-quality chips. If the chocolate tastes good on its own, it will taste even better in the cake. You will also need butter, eggs, sugar, and just a tiny bit of flour. The small amount of flour is what keeps the center from getting solid like a normal muffin.
Don’t forget a pinch of salt and some vanilla. Salt might sound weird for a sweet cake, but it actually makes the chocolate flavor pop. Most of these items are probably in your pantry right now. FYI, I like to use dark chocolate with about 60% cocoa. It is not too bitter but has a deep flavor that balances the sugar perfectly. If you use milk chocolate, the cake might end up being too sweet for some people.
Preparing the Muffin Tin Properly

Preparation is the most important part of this recipe. Since we want the cakes to come out of the tin whole, we have to be careful. First, take some softened butter and rub it all over the inside of each muffin cup. Make sure you get the bottom edges and the sides. If you miss a spot, the cake will grip the pan and tear. I like to use my fingers to make sure the coating is even and thick.
After the butter, I dust the cups with cocoa powder. Usually, people use flour for this, but flour leaves white streaks on a dark chocolate cake. Cocoa powder blends right in and adds more flavor. Shake the tin around to coat the butter, then tap out the extra powder. This creates a non-stick shield. It is a small step that saves you from a big headache later when you try to flip the tin over.
Melting the Chocolate and Butter

To get that silky texture, you must melt the butter and chocolate together. You can use a microwave or a double boiler. If you use a microwave, go slow. Heat it for 30 seconds, stir, and repeat. Chocolate can burn very fast, and burnt chocolate smells terrible and tastes worse. I prefer the double boiler method because it is gentler. Just put a glass bowl over a pot of hot water and let the steam do the work.
Once the mixture is smooth, let it cool for a few minutes. You do not want it to be boiling hot when you add the eggs. If it is too hot, you might cook the eggs instantly, and nobody wants scrambled egg bits in their dessert. The mixture should look like a shiny chocolate lake. It is hard not to lick the spoon at this stage, but try to wait! This base is the foundation for that fudgy, lava-like center we are aiming for.
Whisking the Eggs and Sugar

In a separate bowl, you need to beat your eggs, extra egg yolks, and sugar. Use a whisk or an electric mixer for this part. You want to beat them until they look thick and light yellow. This adds air to the batter. That air helps the cake rise up in the oven. Even though we want a gooey middle, we still want the cake to have a little bit of structure so it holds its shape on the plate.
I usually whisk for about two or three minutes. It might make your arm a little tired, but it is worth it. When you lift the whisk, the mixture should fall back into the bowl in a slow ribbon. This is a sign that you have enough air inside. This step is what makes the difference between a dense brownie and a light, airy lava cake. It is a simple technique that yields professional results every time.
Combining the Batter Carefully

Now comes the fun part. Gently pour your melted chocolate into the egg mixture. You want to use a folding motion. This means you go around the bottom of the bowl and over the top with a spatula. Do not stir it like crazy or you will pop all those nice air bubbles you just made. Fold until the color is even and there are no more yellow streaks. It should look like thick, dark velvet.
Lastly, fold in the flour and salt. Only use a tiny bit of flour. If you add too much, you will just have a regular chocolate muffin. The goal is to have just enough flour to hold the outside walls together. I usually sift the flour in to make sure there are no lumps. Lumps are the enemy of a smooth lava cake. Once the flour disappears into the dark batter, stop mixing immediately. Over-mixing can make the cake tough, and we want it to stay soft.
Setting the Perfect Baking Time

Baking is the trickiest part because every oven is a little bit different. You need a hot oven, usually around 425 degrees Fahrenheit. The high heat cooks the outside of the cake very fast while leaving the inside raw. For a standard muffin tin, this usually takes between 8 and 10 minutes. You have to watch them like a hawk. If you leave them in for 12 minutes, the middle will cook through and the “lava” will disappear.
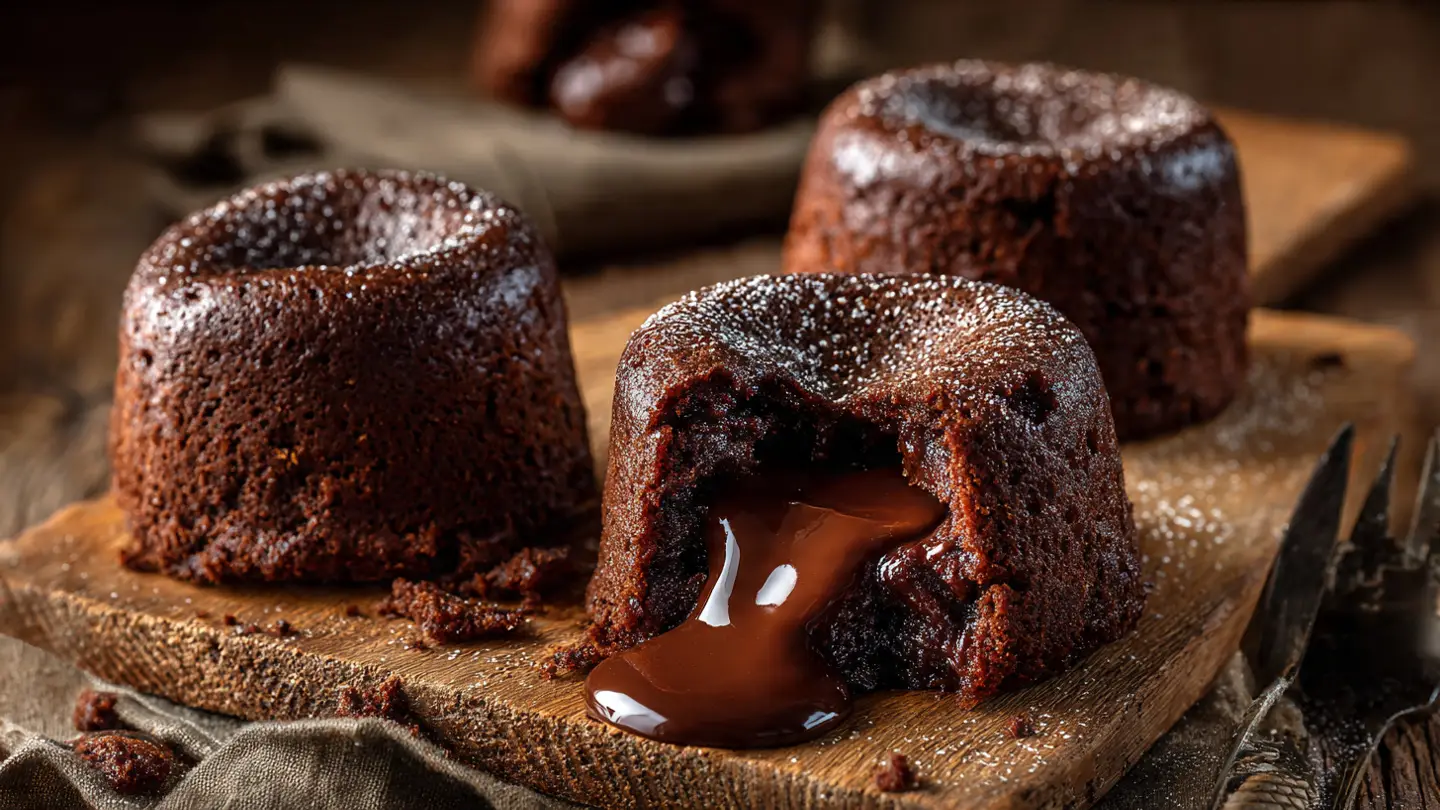
Look for the edges to be firm and the tops to be set. The very center should still look a little bit soft or even slightly jiggly when you move the pan. That jiggle is a good thing! It means the chocolate is still liquid inside. In my experience, it is better to take them out a minute early than a minute late. You can always eat a slightly underdone cake with a spoon, but a dry overdone cake is just sad. IMO, the perfect timing is the secret sauce of this whole recipe.
Removing the Cakes Without Breaking

Once you take the tin out of the oven, let it sit for about one or two minutes. Do not let it sit too long, or the heat from the pan will keep cooking the center. After a minute, run a thin knife around the edge of each cake to make sure it is loose. This is the moment of truth. Place a flat tray or a large board over the top of the muffin tin. Hold them together tightly and flip the whole thing over in one quick motion.
Lift the tin up slowly. If you greased it well, the cakes should slide right out onto the board. They will be very delicate and hot, so be careful. Use a spatula to move each cake to a serving plate. I remember the first time I did this, I was so nervous I dropped one. It still tasted good, but it didn’t look very pretty. Take your time and keep a steady hand. The steam coming off the fresh cakes smells like a chocolate heaven.
Serving and Topping Ideas

A lava cake is great on its own, but toppings make it a Five-Star dessert. I always suggest a big scoop of cold vanilla ice cream. The way the cold cream melts into the hot chocolate sauce is purely magical. You can also add fresh berries like raspberries or strawberries. The sour taste of the fruit cuts through the richness of the chocolate. It makes the whole dish feel balanced and fancy.
Another simple idea is a dusting of powdered sugar. Just put a little sugar in a small strainer and shake it over the cakes. It looks like fallen snow on a dark mountain. Some people like a drizzle of salted caramel or a dollop of whipped cream. There are no wrong answers here. These cakes are meant to be eaten while they are warm, so have your toppings ready before the cakes come out of the oven. Your friends and family will think you spent hours on this!
Recipe Quick Info
- Prep Time: 15 minutes
- Cook Time: 10 minutes
- Servings: 6 cakes
- Difficulty: Easy
Common Questions About Lava Cakes
Cooking with chocolate can be a little scary if you have never tried it before. You might worry about the middle being raw or the cake sticking. Don’t worry, I have been there too. These questions cover the most common things people ask when they make this recipe for the first time. It is a very forgiving recipe once you get the hang of the timing.
Is the middle of the cake safe to eat?
Yes. The high heat of the oven cooks the eggs enough to make them safe. The middle is just a mixture of melted chocolate, butter, and sugar that has not turned solid yet.
Can I make the batter ahead of time?
You can make the batter and put it in the tin. Keep it in the fridge for up to 2 days. Just add an extra minute or two to the baking time since the batter will be cold.
What if I do not have cocoa powder for the tin?
You can use flour instead. Just know that you might see some white dust on the outside of your dark cakes. It does not change the taste, only how it looks.
Can I use milk chocolate instead of dark?
You can, but it will be very sweet. If you use milk chocolate, I suggest adding a little extra salt to the batter to help balance the sugar levels.
Why did my lava cake not have a liquid center?
This usually happens because the cake stayed in the oven too long. Even one extra minute can cook the center through. Try baking for a shorter time next time.
Enjoy Your Homemade Chocolate Treat
You now have all the tools to make a perfect chocolate lava cake in a muffin tin. It is a simple dessert that looks very impressive. Just remember to grease your pan well and keep an eye on the clock. Whether you are celebrating a birthday or just want a sweet snack on a Tuesday, these cakes are the perfect choice. Happy baking!