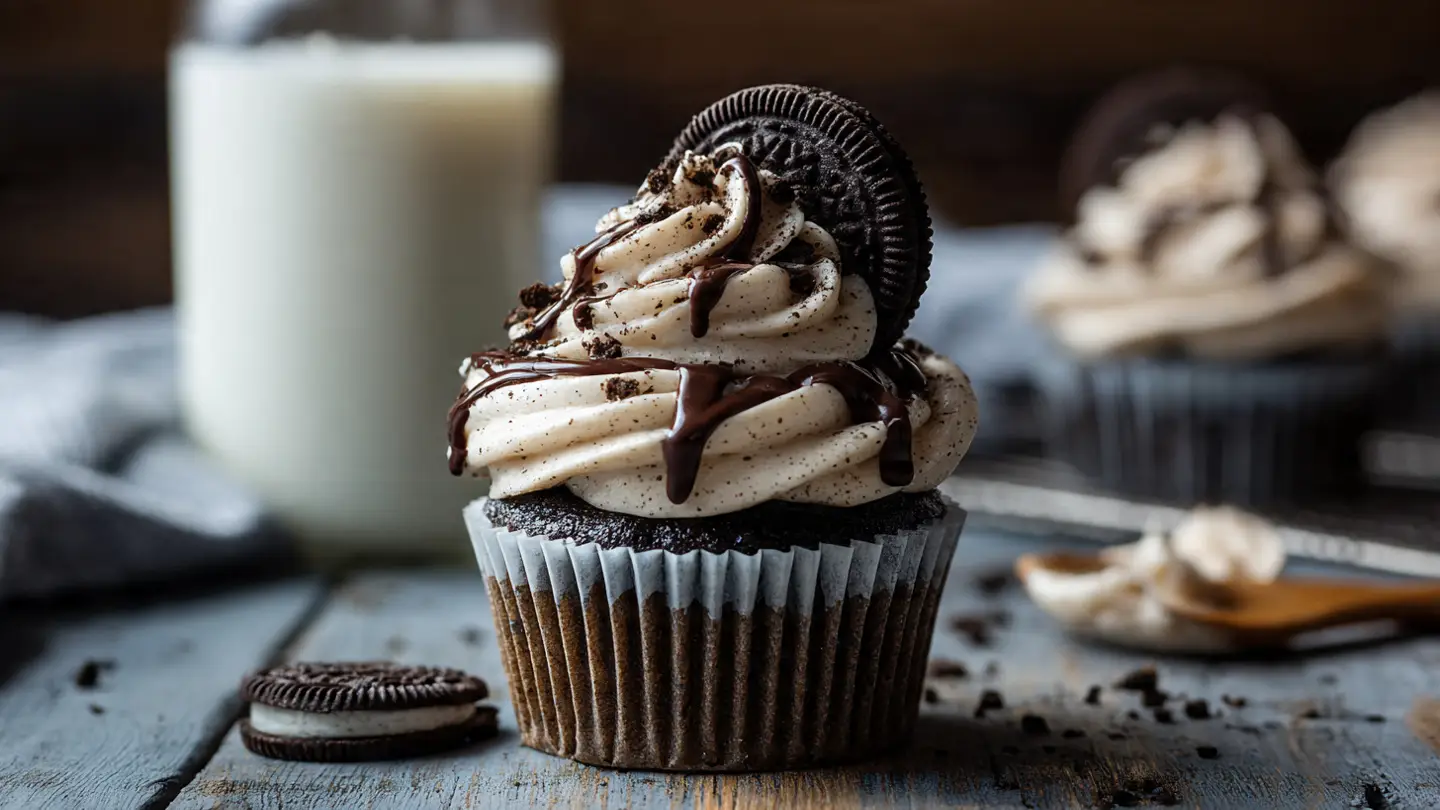
Decadent Oreo Cupcakes with Extra Cookie Crunch
Everyone loves a good cookie. Everyone loves a soft cupcake. Why not put them together? I remember the first time I tried to make these. I just dropped a whole cookie into some cake batter and hoped for the best. It was okay, but it was not great. The cookie got a bit soft and the cake felt plain. I knew I could do better. I wanted that crunch in every single bite. After trying many times, I finally found the perfect way to make them. These are not just chocolate cakes with a bit of white frosting. These are special treats that will make your friends and family very happy.
In this guide, you will learn how to build the perfect Oreo cupcake from the bottom up. We will start with a crunchy base that stays crisp. Then, we will make a dark chocolate cake that is light and moist. Finally, we will whip up a frosting that tastes just like the middle of the cookie. It is a lot of fun to make and even more fun to eat. I will share all my secrets so you do not make the same mistakes I did. Let us get our aprons on and start baking together.
Are you ready to see how easy it is to bake like a pro?
Setting Up Your Kitchen for Success
Before you start mixing, you need to get your space ready. Baking is like a science experiment. If you have everything in its place, things go much smoother. I once forgot the sugar because I was rushing to find a bowl while mixing. It was a very sad day for my taste buds! Now, I always line up my bowls and tools first. This helps me stay calm and enjoy the process. You do not need fancy tools, just the basics like a muffin tin and a good whisk.
Gathering Your Sweet Ingredients

You will need a few key items from your pantry to start. For the cake, grab some all-purpose flour, white sugar, and unsweetened cocoa powder. I like using dark cocoa powder because it looks like the cookie. You also need baking powder and a pinch of salt to help things rise and taste balanced. For the wet parts, get some milk, vegetable oil, and a large egg. Using oil instead of butter in the cake part makes it stay soft for a long time. It is a trick I learned from my grandma!
The most important part is the cookies. You will need about two big packs. One pack is for the bottom of the cupcakes and the batter. The other pack is for the frosting and the decorations on top. Make sure they are the classic kind. The double-stuffed ones are great for eating, but the regular ones work best for the crunchy base. Having everything ready means you won’t have to run to the store with flour on your face! FYI, room temperature eggs mix much better than cold ones.
- 24 Oreo cookies (keep them whole for the base)
- 1 and 1/2 cups all-purpose flour
- 1 cup white sugar
- 1/2 cup dark cocoa powder
- 1 teaspoon baking powder
- 1/2 teaspoon baking soda
- 1/2 teaspoon salt
- 1 large egg (room temperature)
- 1/2 cup whole milk
- 1/2 cup vegetable oil
- 1 teaspoon vanilla extract
- 1/2 cup boiling water
Tools and Equipment You Need

You do not need a giant machine to make these. A simple hand whisk and a big bowl work just fine. In fact, I often prefer mixing by hand so I do not overwork the batter. You will also need a muffin tin that holds 12 cakes. I suggest using black paper liners. They look really cool with the dark chocolate cake. A rubber spatula is also helpful for scraping the sides of the bowl. You want every drop of that chocolate goodness!
If you have a food processor, it is great for crushing the cookies for the frosting. If you do not have one, don’t worry! You can just put the cookies in a plastic bag and hit them with a rolling pin. It is actually a great way to get out some energy. Just make sure the bag is closed tight, or you will have cookie dust all over your kitchen. I learned that the hard way when a bag popped open on me. It took me an hour to clean up!
Creating the Perfect Cupcake Base and Batter
The secret to a great Oreo cupcake is the surprise at the bottom. Most people just put batter in the tin. We are going to do something better. We are going to create a crust that makes people go “wow” when they take a bite. This part is very easy but makes a huge difference. Then, we will make a batter that is thin and dark. Do not be scared if the batter looks watery. That is the secret to a moist cake!
Recipe Quick Info
- Prep Time: 20 minutes
- Cook Time: 20 minutes
- Servings: 12 cupcakes
- Difficulty: Easy
The Secret Crunchy Bottom

This is the best part of the recipe. Before you add any batter, place one whole Oreo cookie at the bottom of each paper liner. This creates a solid base. When the cupcake bakes, the cookie softens just a little bit but keeps its shape. It feels like a hidden treasure. I used to try and crush them for the bottom, but keeping them whole is much better. It saves time and tastes amazing. It also keeps the bottom of the cupcake from getting greasy.
Make sure the cookie is sitting flat. If it is tilted, your cupcake might grow a bit crooked. This is a very simple step, but it is the one everyone will talk about. It makes the cupcake feel like it came from a fancy bakery. IMO, this is the most important step in the whole recipe. It turns a normal cake into a “decadent” treat. Kids love helping with this part too because it is like building a tower of cookies.
Mixing the Dark Chocolate Batter

Start by mixing your dry ingredients in a big bowl. Use your whisk to get rid of any lumps in the cocoa powder. Lumps are the enemy of a smooth cake! In another bowl, mix the egg, milk, oil, and vanilla. Pour the wet stuff into the dry stuff and whisk it together. It will look thick at first. Now, here is the magic trick: pour in the boiling water. The hot water “blooms” the cocoa powder. This means it makes the chocolate flavor much stronger and deeper.
The batter will be very thin and runny. This is normal! Do not add more flour. If you add more flour, the cake will be dry like a desert. We want it to be like a soft cloud. Carefully pour the batter over the cookies in the muffin tin. Fill them about three-quarters of the way up. This gives them room to grow without spilling over the sides. If you fill them to the top, they will make a big mess in your oven. I have cleaned burnt chocolate off my oven floor many times, and it is no fun at all.
Baking and Cooling for Perfection

Put your tin in the oven at 350 degrees. They usually take about 18 to 22 minutes. You can tell they are done when you poke a toothpick into the cake and it comes out clean. If there is wet batter on the stick, they need a few more minutes. Be careful not to overbake them. Even two extra minutes can make them lose that soft feel. I usually start checking at the 18-minute mark just to be safe.
Once they are done, let them sit in the tin for five minutes. Then, move them to a wire rack. They must be completely cool before you put the frosting on. If the cake is even a little bit warm, the frosting will melt and slide right off. It will look like a sad puddle. I know it is hard to wait when the house smells like a chocolate factory, but patience is key here. While they cool, we can start making the best frosting you have ever tasted.
The Ultimate Cookies and Cream Frosting
The frosting is where we put the “cream” in cookies and cream. It needs to be thick, fluffy, and full of cookie bits. This is not the time to be shy with the cookies. We want it to look like a speckled dream. I like using real butter for this because it holds up better than margarine. It also tastes much richer. This frosting is so good you might want to eat it with a spoon, but try to save some for the cupcakes!
Whipping Up the Buttercream Base

Start with softened butter. It should be soft enough that you can press your finger into it, but it shouldn’t be melting. Beat the butter by itself for a few minutes until it turns pale and fluffy. Then, add powdered sugar one cup at a time. This keeps the sugar from flying all over your kitchen. Add a splash of heavy cream and some vanilla. This makes the frosting smooth and easy to spread. It should look like a white cloud when you are done.
If your frosting feels too soft, add a little more sugar. If it feels too stiff, add a tiny bit more cream. You want it to hold its shape when you pipe it onto the cake. This is a basic vanilla buttercream, but we are about to make it much better. This is the foundation of our cupcake masterpiece. I always taste a little bit here to make sure the salt and vanilla are just right. A tiny pinch of salt actually makes the sugar taste better!
Adding the Extra Cookie Crunch

Now we add the stars of the show. Take about 10 Oreo cookies and crush them into very fine crumbs. You want them to look like dark sand. If the pieces are too big, they will get stuck in your piping tip. This is a common mistake that causes a lot of frustration! Fold the crumbs into the white frosting gently. The frosting will turn a lovely grey color with dark spots. It looks just like the inside of an Oreo!
This is where the “extra crunch” comes from. Every bite of frosting will have tiny bits of chocolate cookie. It provides a great texture against the soft cake. If you want even more crunch, you can add some bigger chunks too, but only if you are spreading the frosting with a knife. For piping beautiful swirls, keep the crumbs fine. This is my favorite part of the process because the frosting starts to look so professional. It is truly the icing on the cake!
Baker’s Pro Tips
- Crumb Size: Use a blender to get cookie dust so your piping bag never clogs.
- Moisture Trick: Don’t skip the boiling water; it makes the cake way softer.
- Cookie Base: Press the bottom cookie down firmly so batter gets underneath it.
Decorating Like a Pro

Now comes the fun part! Put your frosting into a piping bag with a large star tip. Start in the middle of the cupcake and spiral outward, then back up to the center to make a tall swirl. If you don’t have a piping bag, you can just use a big spoon and make a thick layer on top. It will still taste amazing! To finish them off, I like to stick a mini Oreo on top or half of a regular one. It tells everyone exactly what flavor is inside.
For a final touch, you can drizzle a little chocolate syrup over the top. Or, you can sprinkle some more cookie crumbs. These cupcakes look so good people won’t believe you made them at home. I love seeing the look on people’s faces when they bite through the cake and hit that whole cookie at the bottom. It is a double win! These are perfect for birthdays, school bake sales, or just a rainy Tuesday afternoon when you need a treat.
How to Store and Serve Your Treats
You might have some cupcakes left over, though that doesn’t happen often at my house! Knowing how to keep them fresh is important. Chocolate cake can dry out if left in the open air. The frosting also acts like a seal to keep the moisture in, but you still need a plan. These cupcakes are quite rich, so one is usually enough for a person. They go great with a cold glass of milk or a cup of coffee.
Keeping Them Fresh and Tasty

Store your cupcakes in an airtight container. You can keep them on the counter for about two days. If your kitchen is very hot, the frosting might get too soft, so you can put them in the fridge. If you do put them in the fridge, take them out 30 minutes before you want to eat them. Cold buttercream can feel like a stick of butter, but at room temperature, it is soft and creamy. The cake also tastes better when it isn’t cold.
You can even freeze these! I like to freeze them without the frosting if I am making them ahead of time. Just wrap each cake in plastic wrap and put them in a bag. When you are ready for a party, thaw them out and whip up some fresh frosting. It makes party day much less stressful. I once made 50 of these for a wedding, and freezing the cakes saved my life! Just make sure the container is strong so the frosting doesn’t get squished.
Serving Suggestions for Parties

If you are serving these at a party, try putting them on a tall stand. It makes them look very fancy. You can also serve them with little shots of milk. It is a classic combo that everyone loves. These are heavy treats, so I suggest using small plates. They are a big hit at kid’s parties because of the cookie theme. But honestly, adults usually eat more of them than the kids do! They are just that good.
You can also change the theme easily. Use golden Oreos for a vanilla version, or use the mint ones for a chocolate-mint treat. The steps are exactly the same. This recipe is like a base that you can play with. Once you master this one, you can make almost any kind of cookie cupcake. It is a great skill to have in your baking pocket. I hope you enjoy making these as much as I do!
Cookie Cupcake Questions Answered
Can I use a box cake mix instead?
Yes! Just follow the box instructions and add the cookie at the bottom. Use the frosting recipe here to make it taste homemade.
Why did my cookies at the bottom get soggy?
This happens if the batter is too thin or they sit too long before eating. Eat them within 2 days for the best crunch!
My frosting is too runny to pipe, what do I do?
Add more powdered sugar, one tablespoon at a time. You can also chill it in the fridge for 10 minutes to help it firm up.
Can I make these gluten-free?
Yes! Use a gluten-free flour blend and gluten-free chocolate sandwich cookies. They taste just as good.
Do I have to use dark cocoa powder?
No, regular cocoa works fine. The cake will just be a lighter brown color instead of deep black.
Happy Baking and Cookie Crushing
Making these Decadent Oreo Cupcakes is a fun way to bring a smile to anyone’s face. You now know the secret of the hidden cookie crust and the perfect speckled frosting. Remember to keep your crumbs fine and your oven eye sharp. Go share these with someone you love and enjoy every single crunchy bite!