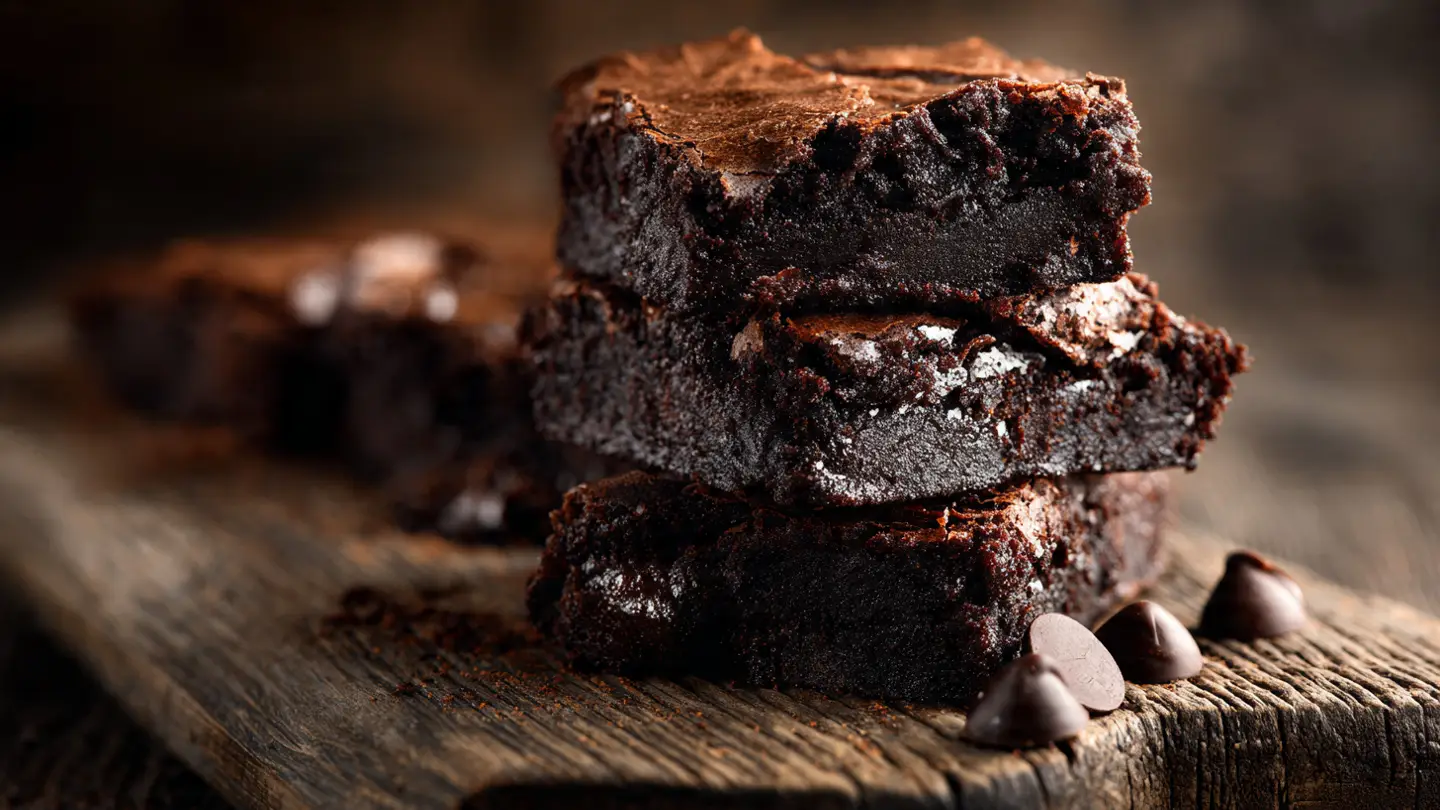
Fudgy Chocolate Brownies
Everyone loves a good brownie. I have spent many years trying to find the perfect one. Some brownies are too dry and feel like bread. Others are too oily and thin. My goal was to make a brownie that is thick, soft, and very dark. This recipe is the result of many trials in my small kitchen. You will learn how to make brownies that melt in your mouth every single time.
Making treats from scratch can feel scary if you are new to baking. I used to be afraid of burning chocolate or making a mess. But these brownies are very easy to get right. You only need a few bowls and a spoon. You do not even need a big mixer. By the end of this guide, you will be the star of every bake sale and party. Kids and adults will ask you for the secret to these gooey squares.
Check out the simple steps below to start baking right now!
The Secret to Perfect Brownies
Most people think a box mix is the best way to get a fudgy texture. I used to think that too. One day, I ran out of the box stuff and tried to make my own. I made a huge mistake and added too much flour. They came out like dry rocks! I learned that the secret is in the fat and the sugar. You want more fat than flour to keep things soft. Using real butter makes a big difference in how they taste. It gives a rich flavor that oil just cannot match.
Temperature also matters a lot. If you bake them too long, they turn into cake. If you take them out too soon, they are just soup. We want to find the middle spot. I like to use a tooth pick to check my brownies. For these, a few wet crumbs should stay on the stick. If it comes out clean, you cooked them too long. Don’t worry though, even overcooked brownies taste good with a big scoop of cold milk or ice cream. This recipe is very forgiving for beginners.
Recipe Quick Info
- Prep Time: 15 minutes
- Cook Time: 25 minutes
- Servings: 16 squares
- Difficulty: Easy
What You Need to Get Started

Gathering all your items first is a smart move. It stops you from searching the pantry with messy hands. You likely have most of these things in your house already. This recipe uses cocoa powder for deep color and real chocolate for a gooey bite. Using both is my favorite trick. The cocoa makes it dark, and the melted chocolate makes it chewy. It is the best of both worlds for chocolate lovers.
- 1 cup of melted butter (unsalted is best)
- 2 cups of white granulated sugar
- 4 large eggs (room temperature works better)
- 1 tablespoon of vanilla extract
- 1 cup of unsweetened cocoa powder
- 1 cup of all-purpose flour
- 1/2 teaspoon of salt
- 1 cup of semi-sweet chocolate chips
Make sure your eggs are not cold from the fridge. Cold eggs can make the melted butter turn hard again. If you forget to take them out, just put the eggs in a bowl of warm water for five minutes. This is a quick fix that saves a lot of time. FYI, using high-quality cocoa powder will make these taste like they came from a fancy shop. It is worth the extra dollar if you can find the good stuff.
Mixing the Wet Ingredients

The first step is mixing the butter and sugar. I like to melt the butter in a microwave-safe bowl first. Let it cool for a minute so it does not cook the eggs. Pour the sugar into the butter and stir well. You want it to look like wet sand. This part is important because the sugar needs to start melting into the fat. This helps create that shiny, crackly top that everyone loves on a brownie.
Next, add your eggs one by one. Whisk them in until the batter looks smooth. I found that whisking the eggs for a full minute makes the brownies lighter and gives them a better crust. Add your vanilla now too. Vanilla is like salt for sweets; it makes the chocolate flavor stand out more. Even though it is a chocolate treat, the vanilla does a lot of heavy lifting. It smells amazing when it hits the warm butter.
Adding the Dry Goods

Now it is time for the dry ingredients. Sift the cocoa powder if it has big lumps. Lumps are annoying because they don’t always break up in the oven. Stir in the cocoa, flour, and salt. Do not use a mixer for this part. A big spoon or a spatula is much better. You want to stir just until you don’t see any more white streaks of flour. If you stir too much, the brownies will get tough like bread. We want fudgy, not tough!
I learned the hard way that over-mixing is the enemy of a good brownie. One time I used a power mixer and the brownies were so bouncy I could almost play catch with them. Stick to your hand and a spoon. It is a little bit of a workout, but the result is worth it. Once the batter is thick and dark, fold in your chocolate chips. These chips stay as little pockets of melted joy after the brownies cool down. IMO, you can never have too many chocolate chips.
Preparing the Baking Pan

Preparing the pan is a step many people skip. Do not just spray it with oil and hope for the best. Brownies are sticky and love to get stuck to the bottom. I always use parchment paper. I cut a long strip and lay it across the pan so the edges hang out like handles. This lets you lift the whole block of brownies out once they are cool. It makes cutting them into perfect squares much easier and less messy.
If you do not have paper, use butter and then a dusting of cocoa powder. Do not use flour to coat the pan because it leaves a white film on the bottom of your dark brownies. Cocoa powder blends right in. Spread the thick batter into the pan. Use your spoon to push it into the corners. The batter will be very thick, almost like frosting. Level off the top so it bakes evenly across the whole pan. This ensures every piece is the same thickness.
The Baking Process

Heat your oven to 350 degrees before you start. It must be hot when the pan goes in. Slide the pan onto the middle rack. This spot gets the most even heat. Bake them for about 25 to 30 minutes. Every oven is a bit different. My old oven took 32 minutes, but my new one only takes 26. Start checking at the 25-minute mark. You want the edges to look firm and the middle to look set but still slightly soft.
The smell will fill your whole house. It is the best part of baking! When you think they are done, do the toothpick test. Remember, we want moist crumbs. If the stick is dripping with liquid, they need five more minutes. If it comes out dry, get them out fast! Let the pan sit on a wire rack or a cool counter. Do not try to cut them yet. This is the hardest part of the whole recipe. They need time to finish setting up as they cool down.
Pro Baker Tips
- Cool Completely: Wait at least one hour before cutting for clean lines.
- Salt Trick: Sprinkle a tiny bit of sea salt on top right after baking.
- Metal vs Glass: Metal pans bake more evenly than glass ones.
How to Cut Perfect Squares

Cutting brownies can be a disaster if you are in a rush. If they are still warm, the knife will just pull the center out and make a mess. For the cleanest edges, wait until they are totally cold. I sometimes put the whole pan in the fridge for 30 minutes to make them firm. Use the parchment paper handles to lift them out of the pan and onto a cutting board. This gives you plenty of room to move your knife.
Use a long, sharp knife. Wipe the knife with a wet paper towel after every single cut. This keeps the sticky brownie bits from building up on the blade. If the blade is clean, the next cut will be clean too. I usually cut them into 16 squares, but you can make them smaller if they are very rich. These brownies are quite heavy, so a small square goes a long way. Serve them on a pretty plate or wrap them up for friends.
Serving and Storing Your Brownies

Brownies are great on their own, but you can dress them up. I love to serve mine warm with a scoop of vanilla bean ice cream. The cold cream melts into the warm chocolate and creates a sauce. You can also drizzle some caramel or peanut butter over the top. If you like a crunch, add some chopped walnuts or pecans to the batter before you bake. This recipe works well with many different toppings.
If you have leftovers, keep them in an airtight container. They stay fresh at room temperature for about three days. If you want them to last longer, put them in the fridge for up to a week. They actually get even fudgier when they are cold! You can also freeze them. Wrap each square in plastic wrap and put them in a freezer bag. They will stay good for two months. Just let them thaw on the counter for an hour when you have a chocolate craving.
Common Questions About Baking
Can I use butter instead of oil?
Yes! This recipe uses butter for a richer taste. It makes the brownies much more flavorful and gives them a better texture than vegetable oil does.
Why are my brownies cakey?
You might have used too much flour or too many eggs. Be careful not to whisk too much air into the batter, as this makes them rise like a cake.
How do I get a shiny top?
The secret is dissolving the sugar in the warm butter and whisking the eggs well. This creates a thin layer of meringue on top during baking.
Can I add nuts to this recipe?
Of course! Fold in half a cup of walnuts or pecans at the same time you add the chocolate chips for a nice crunch.
Happy Baking Everyone
I hope you enjoy making these fudgy brownies as much as I do. They are the perfect treat for any day of the week. Remember to watch your oven closely and let them cool before eating. You now have a foolproof recipe for the best chocolate dessert. Go share some with your neighbors or keep them all for yourself! Either way, you did a great job today.