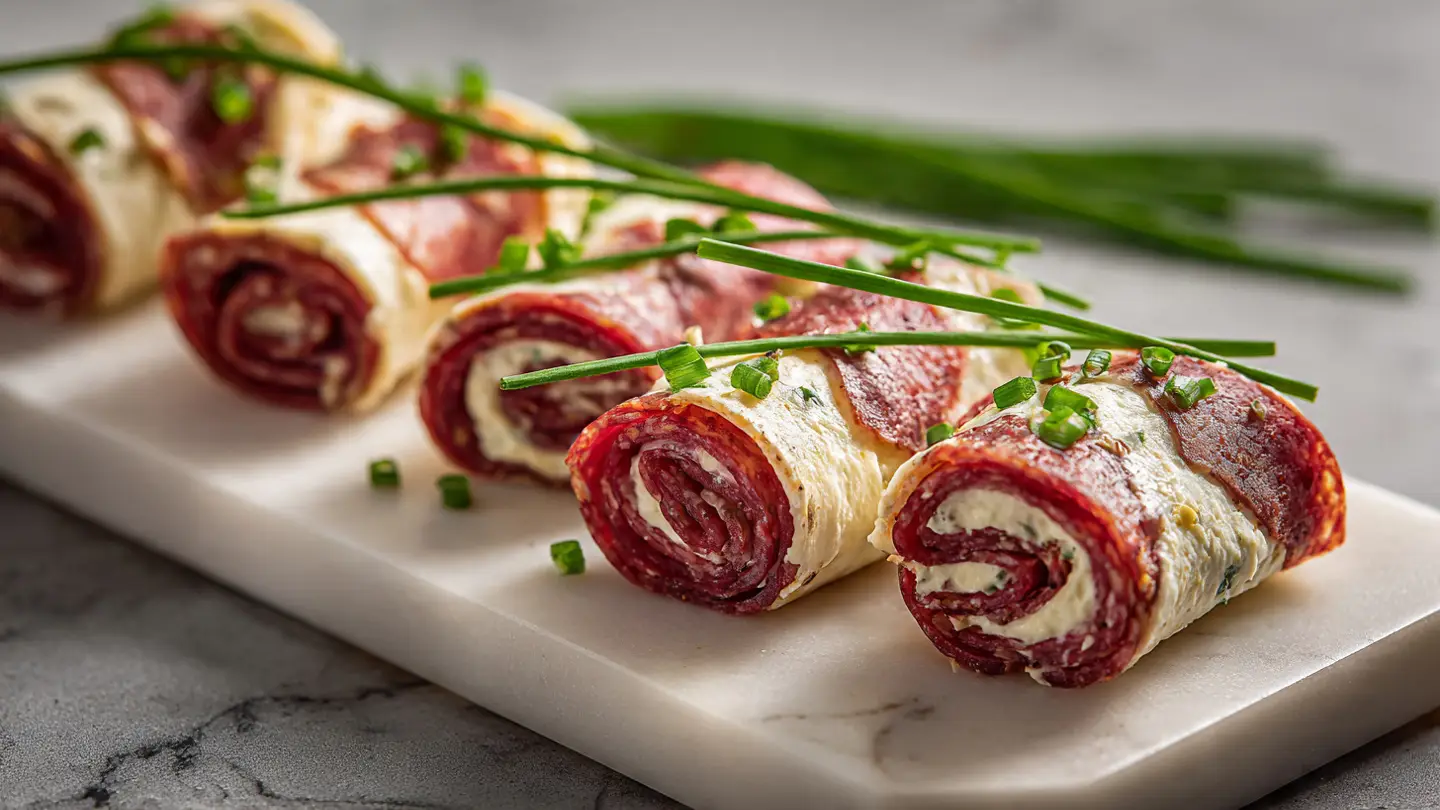
Easy Salami Cream Cheese Roll Ups
Are you looking for a snack that tastes great and takes almost no time to make? I have the perfect answer for you today. These salami cream cheese roll ups are a huge hit at my house every single time I make them. They are salty, creamy, and have just the right amount of crunch. You only need a few things from the store to get started.
I first made these when I had friends coming over and I forgot to buy food. I looked in my fridge and found a pack of salami and a box of cream cheese. I rolled them together and everyone loved them! Now, I make them for every party and even for my own lunch. They are so simple that even a kid can help you put them together in the kitchen.
In this article, you will learn how to pick the best meat and cheese for your rolls. I will show you the easy steps to roll them up so they do not fall apart. We will also talk about fun things you can add inside to make them taste even better. Let us get into the kitchen and make something delicious!
Check out the recipe details below to start your snack making.
Everything You Need for This Snack
Before you start cooking, you need to make sure your workspace is ready. I like to clear off my big cutting board and get all my tools out first. You do not need an oven or a stove for this recipe. That is one reason why I love it so much! It keeps the kitchen cool and saves a lot of energy. Plus, clean up is very fast since you only have a knife and a board to wash.
Picking the right ingredients is the most important part of this recipe. Since there are only a few items, you want them to be good ones. I usually go to the deli counter to get my meat. It tastes fresher than the meat in the plastic bags. You can also ask them to slice it exactly how you want. If the meat is too thick, it will crack when you try to roll it. If it is too thin, it might rip. Finding that middle spot is the secret to a pretty snack.
The Ingredient List

To make these roll ups, you will need a few simple things. First, get a pack of round salami. I like the Genoa kind because it is not too spicy. You also need a block of plain cream cheese. Make sure it is the kind that comes in a box, not the soft kind in a tub. The tub kind is too runny and will squish out the sides when you take a bite. It makes a big mess that no one wants to clean up.
- One 8-ounce block of cream cheese
- 20 to 24 slices of thin salami
- Fresh chives or green onions
- A little bit of black pepper
- Small pickles or peppers if you want a crunch
These items are easy to find at any grocery store. I always keep a box of cream cheese in my fridge just in case I need to make a fast snack. It lasts a long time! Salami also stays fresh for a while, so this is a great recipe for when you have not gone shopping in a few days. You can use turkey or ham if you do not like salami, but the saltiness of the salami really makes this dish special.
Kitchen Tools You Will Need

You do not need fancy machines for this job. A simple butter knife is the best tool for spreading the cheese. I tried using a spoon once, but it just made a hole in the meat. A butter knife is flat and smooth. It helps you get the cheese all the way to the edges. This is important because the cheese acts like glue to keep the roll together. If you miss the edges, the salami will unroll on the plate.
You will also want a sharp knife if you plan to cut the rolls into smaller pieces. Small pieces look like little sushi rolls and are easy to pop in your mouth. A dull knife will squash the rolls and make the cheese leak out. I learned that lesson the hard way! Now, I always make sure my knife is nice and sharp before I start slicing. A cutting board is also a must to keep your counters clean and safe.
Recipe Quick Info
- Prep Time: 15 minutes
- Cook Time: 0 minutes
- Servings: 6 people
- Difficulty: Very Easy
How to Put the Roll Ups Together
Now that you have your tools, it is time to start building. The biggest tip I can give you is to let your cream cheese sit out on the counter for a bit. If it is cold from the fridge, it will be hard like a rock. You will end up tearing your meat trying to spread it. I usually take mine out about thirty minutes before I start. This makes it soft and easy to move around with your knife. It should feel like soft butter.
Once the cheese is soft, you can add flavors to it. I like to mix in some herbs or pepper. You do not need salt because the meat is already very salty. If you add more salt, it might be too much for your taste buds. This is where you can get creative and make the recipe your own. Every time I make these, I try a new spice to see how it tastes. It is a fun way to learn what flavors go well together.
Step by Step Instructions

Follow these steps to make the perfect roll up every time. It is very easy and you will get faster as you go. IMO, the first three are always the hardest, then you get into a rhythm. Do not worry if they are not perfect at first. They will still taste great even if they look a little funny.
- Lay one slice of salami flat on your cutting board.
- Take a small scoop of soft cream cheese.
- Spread the cheese in a thin layer over the whole slice of meat.
- Sprinkle a few chopped chives or some pepper on top of the cheese.
- Starting at one side, roll the meat up tightly like a small sleeping bag.
- Press the edge down so the cheese holds it shut.
- Repeat with the rest of the meat and cheese.
If you want them to look fancy, you can cut each long roll into three small pieces. This makes them look like little pinwheels. I like to put a toothpick through each one so they stay together on a big tray. It also makes it easier for people to grab them at a party without getting their fingers messy. Use colorful toothpicks if you want to be extra festive!
Making the Perfect Roll

To make the roll look good, try to keep the cheese away from the very top edge until the end. As you roll, the cheese will naturally push forward. If you put too much at the start, it will pour out the sides like a volcano. I make this mistake a lot when I am in a hurry. Just use a small amount and spread it evenly. A thin layer is better than a thick one for this snack.
Another trick is to pat the salami dry with a paper towel before you start. Sometimes the meat can be a little oily or wet from the package. If the meat is wet, the cream cheese will slide right off. It is like trying to glue two wet pieces of paper together. It just does not work well. Drying the meat takes two seconds and makes the whole process much easier. You will be happy you took that extra step.
Tips for the Best Snacks
I have made these hundreds of times and I have learned some cool tricks. These snacks are very flexible. You can change them to fit what you like. If you want a big crunch, you can put a whole baby pickle in the middle before you roll. This is often called a “midwest sushi” roll. It is a classic snack that people love because it is so satisfying to bite into.
You can also use different kinds of cheese. Sometimes I use goat cheese for a tangy flavor. Other times I use a flavored cream cheese from the store, like garden vegetable or chive and onion. Just make sure the cheese is thick enough to hold the roll. If you use a very soft cheese, the roll might get soggy if it sits out for too long. Always think about how long the food will be on the table before people eat it.
Fun Ways to Change It Up

Variety is the spice of life! You do not have to stick to just plain meat and cheese. I like to add a thin slice of bell pepper for color. It makes the tray look like a rainbow. You could also use spicy salami if you like a little heat in your mouth. Just be careful if you are serving these to kids, as they might not like the spice as much as grownups do.
One of my favorite things to add is a little bit of ranch seasoning powder. I just stir it into the cream cheese before I spread it. It gives it a zingy flavor that everyone recognizes. You can also use large pieces of pepperoni instead of salami for a pizza-style snack. The possibilities are endless! Take a look at what you have in your pantry and see what might taste good inside a roll.
How to Serve Your Roll Ups

Presentation makes a big difference. I like to serve these on a big wooden board with some crackers and grapes. The grapes help clean your palate because the salami is very rich and salty. It creates a balanced snack plate that looks like it came from a restaurant. You can also add some nuts or olives to the side to fill up the empty spaces on the board.
If you are taking these to a potluck, keep them in a cold bag. The cheese needs to stay cool so it stays firm. If they get too warm, they might start to sag or look oily. I usually put mine in the fridge for an hour before I leave the house. This helps them “set” and stay in their shape. They are best when eaten cold or at room temperature, not hot.
Pro Snack Tips
- Dry the Meat: Always use a paper towel to remove extra oil from the salami.
- Cold Storage: Keep the rolls in the fridge until 10 minutes before serving.
- Sharp Knife: Use a very sharp blade to get clean cuts without squishing the cheese.
Storing Your Leftovers

If you have any roll ups left, you can save them for later. I put mine in a plastic container with a tight lid. They stay good in the fridge for about two to three days. After that, the meat might start to get a bit soft from the moisture in the cheese. It is best to eat them fresh, but they make a great snack the next day too. I often pack them in my lunch for work!
Do not freeze these snacks. When cream cheese freezes and thaws, the texture changes. It becomes crumbly and watery, which is not very tasty. It only takes a few minutes to make a fresh batch, so it is better to just make what you need. If you are worried about having too many, you can easily cut the recipe in half. Just use half a block of cheese and ten slices of meat. This is a great way to avoid wasting food.
Questions People Ask Often
I get a lot of questions about these little rolls. Most people want to know how to make them ahead of time for big parties. You can totally make them the night before! Just keep them covered so they do not dry out. The meat can get a little dark around the edges if air gets to it for too long. Wrap the plate tightly with plastic wrap to keep them looking fresh and pink.
Some people ask if they can use low-fat cream cheese. You can, but it is usually much softer than the full-fat kind. It might not hold the shape as well. If you are on a diet, it works, but the rolls might be a little floppy. FYI, the taste is still great, so do not let that stop you from trying it. Just be prepared for a slightly different texture when you take a bite.
Can I make these without a fridge?
No, you must keep these cold. The cheese and meat can spoil if they sit out in the heat for more than two hours. Always use a cooler if you go on a picnic.
What is the best salami to use?
I recommend Genoa salami. It has a mild flavor and is usually the right size. Hard salami also works well if it is sliced very thin so it does not break.
Can I use pre-spreadable cream cheese?
It is not the best choice. The kind in the tub is whipped with air or water. It is too soft and will leak out of your rolls very fast. Use the block kind instead.
How do I stop them from unrolling?
Make sure you spread the cheese all the way to the edge of the meat. The cheese acts like glue. Pressing the seam down firmly for a few seconds also helps it stay shut.
Time to Enjoy Your Snack
These salami cream cheese roll ups are a fast way to make people happy. They are simple, cheap, and taste amazing. Whether you are at a party or just hanging out at home, they are the perfect bite. Give them a try today and see how easy it is!