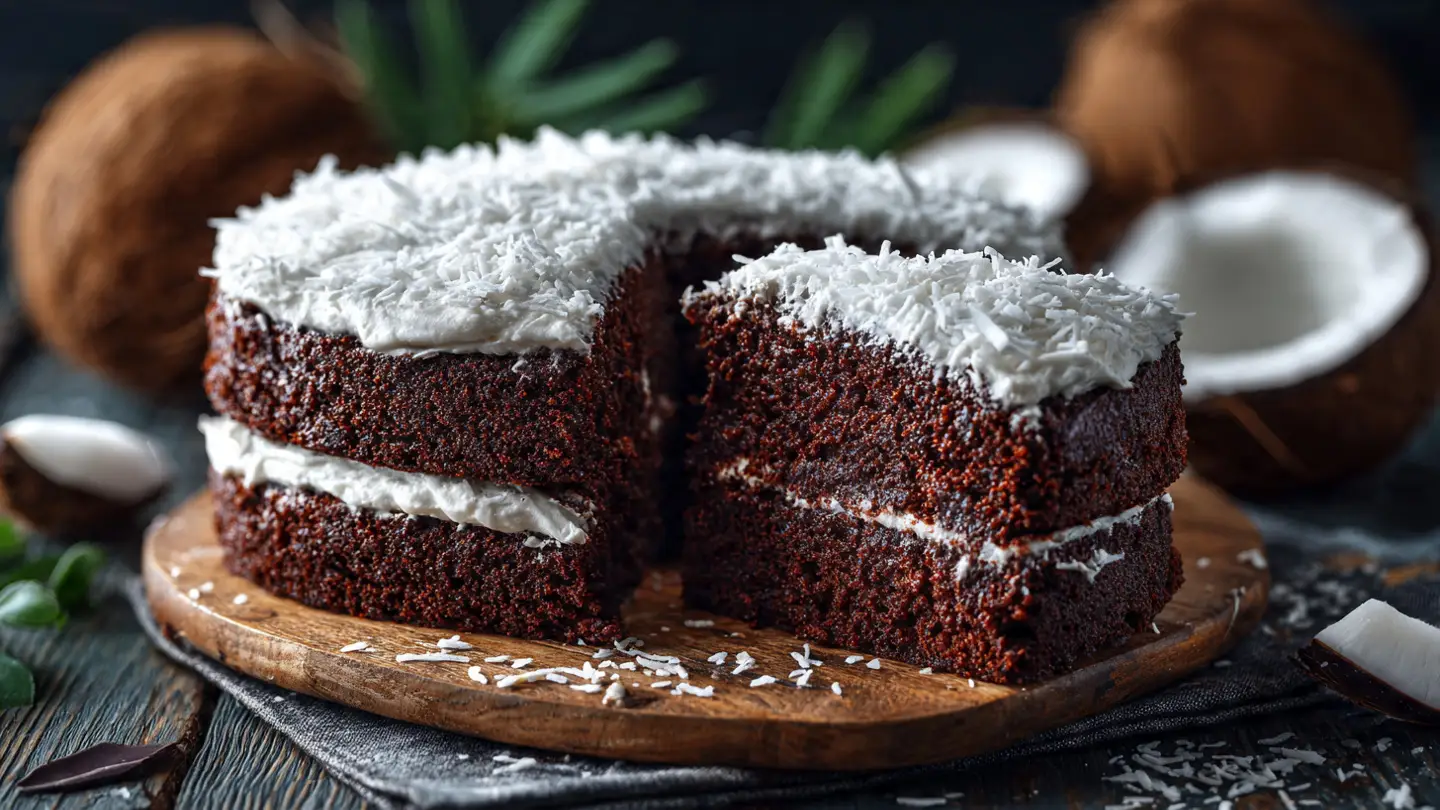
Coconut Chocolate Cake
I love cake. Who doesn’t? But sometimes a plain chocolate cake feels a bit boring. One day, I found a bag of shredded coconut in the back of my pantry. I thought, why not put these together? That was the best choice I ever made in my kitchen. This coconut chocolate cake is very soft and tastes like a candy bar but better. It is the kind of cake you make when you want to feel special without working too hard.
You will learn how to mix a rich chocolate batter with sweet coconut milk. I will show you how to bake it so it stays moist. We are also going to make a simple frosting that uses even more coconut. This cake is great for birthdays or just a quiet Sunday at home. It is easy enough for kids to help with too. Let’s get our bowls ready and start baking something yummy.
Check out the steps below to make your own tropical treat!
Gathering Your Cake Supplies
Before you turn on the oven, you need to get everything ready. It is much easier to bake when you have all your items on the counter. I used to forget the salt or the baking soda all the time. One time, I forgot the sugar! The cake tasted like bread and was not good at all. Now, I line everything up like a little army. It helps me stay calm while I work.
The Main Ingredients List

You do not need fancy stuff for this cake. Most of these things are likely in your kitchen right now. You will need all-purpose flour and unsweetened cocoa powder. Make sure the cocoa is the dark kind for a big chocolate taste. You also need white sugar, baking powder, baking soda, and a little bit of salt. Salt is important because it makes the chocolate taste stronger. Don’t skip it!
For the wet parts, you need eggs, vegetable oil, and vanilla. The most important part is the coconut milk. Use the kind from a can, not the kind you drink like dairy milk. Can coconut milk is thick and creamy. It makes the cake very rich. You also need some hot water at the very end to make the batter smooth. FYI, the hot water helps the cocoa powder wake up and smell great.
- 2 cups all-purpose flour
- 2 cups white sugar
- 3/4 cup unsweetened cocoa powder
- 2 teaspoons baking soda
- 1 teaspoon baking powder
- 1 teaspoon salt
- 1 cup canned coconut milk (full fat is best)
- 1/2 cup vegetable oil
- 2 large eggs
- 2 teaspoons vanilla extract
- 1 cup hot water
- 1 cup shredded coconut
Recipe Quick Info
- Prep Time: 20 minutes
- Cook Time: 35 minutes
- Servings: 12 slices
- Difficulty: Easy
How to Mix the Batter

Mixing this cake is very simple. You do not even need a big electric mixer if you have strong arms. First, put all the dry things in a big bowl. Use a whisk to stir the flour, sugar, cocoa, soda, powder, and salt. It should look like a light brown powder. Make sure there are no big lumps of cocoa. If the cocoa is lumpy, you might get a bite of bitter powder later, which is gross.
Next, add the eggs, coconut milk, oil, and vanilla. Stir it until it is smooth. Now comes the funny part. You add the hot water. The batter will look very thin and watery. Do not panic! This is supposed to happen. The hot water helps the cake stay moist and airy. Stir in the shredded coconut last. It adds a nice crunch and flavor to every single bite. IMO, the coconut texture is the best part.
Baking and Frosting Your Creation
Baking is where the magic happens. Your house will start to smell like a chocolate factory. I love that smell more than anything. But you have to be careful. Every oven is a little bit different. My oven at home runs a bit hot, so I always check my cakes five minutes early. It is better to check early than to have a burnt cake that looks like a brick.
Step By Step Baking Guide

- Heat your oven to 350 degrees. Grease two round cake pans with butter or oil.
- Pour the thin batter into the two pans. Try to make them even.
- Put them in the oven for 30 to 35 minutes.
- Poke a toothpick in the middle. If it comes out clean, the cake is done.
- Let the cakes sit in the pans for 10 minutes. Then, turn them out onto a wire rack to cool.
Wait until the cake is totally cold before you put frosting on it. If the cake is even a little bit warm, the frosting will melt and slide right off. I learned this the hard way when I was younger. I was too hungry to wait. My cake ended up in a puddle on the plate. It still tasted good, but it looked like a mess! Be patient and let it cool down.
Making the Coconut Frosting

While the cake cools, we can make the frosting. This is a simple buttercream but with a twist. Use soft butter, powdered sugar, and a little more coconut milk. Beat it until it is fluffy and white. It looks like a cloud! If it is too thick, add a drop more milk. If it is too runny, add more sugar. It is very easy to fix mistakes with frosting.
I like to add a tiny bit of coconut extract if I have it. It makes the smell even better. But if you don’t have it, don’t worry. The coconut milk does a lot of work. You can also toast some extra shredded coconut in a pan for a minute. It turns golden brown and smells like heaven. You can sprinkle that on top at the end for a fancy look.
Baker Secrets
- Room Temp Eggs: Take your eggs out 30 minutes before you start. They mix better when they are not cold.
- The Tap Test: Tap your cake pans on the counter before baking to get rid of air bubbles.
- Full Fat Milk: Only use the thick white part of the coconut milk for the best flavor.
Tips for Success and Variations

This cake is very forgiving, but here is a tip most blogs skip: grease your pans and then dust them with cocoa powder. Usually, people use flour. But if you use flour on a chocolate cake, you get white marks on the sides. Cocoa powder keeps the cake looking dark and beautiful. It is a small trick that makes a big difference in how the cake looks.
You can also change this recipe to fit what you like. If you don’t like shredded coconut texture, you can blend the coconut milk until it is perfectly smooth. This may not work if you use the cheap, watery coconut milk from a carton. Stick to the canned stuff! If you want a darker cake, use extra dark cocoa. You could even add some chocolate chips to the batter for a double chocolate surprise.
How to Serve and Store the Cake

Once your cake is frosted, it is time to eat! This cake is very rich, so small slices are best. It goes great with a glass of cold milk or a cup of hot coffee. If you have leftovers, you can keep them in a container with a lid. It stays fresh on the counter for about two days. If you want it to last longer, put it in the fridge for up to five days.
If you put it in the fridge, the butter in the frosting will get hard. Just take the cake out about an hour before you want to eat it. This lets it get soft again. You can even freeze slices of this cake. Wrap them tightly in plastic wrap. When you are sad and want cake, just pull a slice out and let it thaw. It is like a gift to your future self!
Frequently Asked Questions
Can I use low-fat coconut milk?
You can, but the cake won’t be as moist. Full-fat canned coconut milk gives the best texture and flavor. Low-fat milk makes it a bit dry.
What if I do not have cocoa powder?
This recipe really needs cocoa powder for the structure. If you don’t have it, it’s better to wait until you can go to the store and get some.
Can I make this as cupcakes?
Yes! Fill cupcake liners about halfway. Bake them for 18 to 22 minutes. They are perfect for parties and easy to share.
How do I toast the coconut for the top?
Put shredded coconut in a dry pan over medium heat. Stir it constantly until it turns light brown. It happens fast, so don’t walk away!
Can I use butter instead of oil?
Oil makes this cake very soft and moist. You can use melted butter, but the cake might be a little more firm when it is cold.
Enjoy Your Homemade Cake
Making a cake from scratch is a great feeling. You mixed the flour and the cocoa. You watched it rise in the oven. Now you get to eat a slice of Coconut Chocolate Cake that is better than anything from a box. This cake is simple, sweet, and full of tropical flavor. I hope you share it with someone you love. Happy baking!