Cheesy Buffalo Cauliflower Wings
I love snacks that taste like junk food but are actually good for me. These cheesy buffalo cauliflower wings are exactly that. They have a spicy kick from the buffalo sauce and a creamy, salty finish from the melted cheese. You will learn how to make them extra crispy without using a deep fryer. This is one of my favorite ways to eat more vegetables while still feeling like I am having a treat.
Making these is very easy and takes less than an hour. I first tried this when I wanted wings but had a big head of cauliflower in the fridge. Now, it is a staple for my weekend movie nights. If you want a snack that will make everyone happy, this is the one for you. Get your apron on and let us get started.
Want more easy veggie recipes? Just keep reading to see how I make these magic little bites.
Everything You Need to Get Started
Before we start cooking, we need to gather all our things. Having everything ready on the counter makes life so much easier. I always forget the salt if I do not put it out first. You will need a large head of cauliflower, some flour, and your favorite buffalo sauce. The cheese is the secret part that makes these stand out from regular cauliflower wings.
I like to use fresh cauliflower for this. Frozen cauliflower can get a bit mushy when it bakes. We want that crunch! You also need a baking sheet and some parchment paper. The paper stops the cheese from sticking to the pan. Believe me, you do not want to scrub melted cheese off a metal tray for twenty minutes. I learned that the hard way during my first try.
The Ingredients List

- 1 large head of cauliflower
- 1 cup of all-purpose flour
- 1 teaspoon of garlic powder
- 1 teaspoon of onion powder
- 1/2 teaspoon of salt
- 1/2 teaspoon of black pepper
- 1 cup of milk (dairy or plant-based)
- 1 cup of buffalo wing sauce
- 1/2 cup of shredded mozzarella cheese
- 1/4 cup of blue cheese crumbles (optional)
- Green onions for garnish
These simple items create a massive amount of flavor. I use garlic and onion powder because they stick to the cauliflower better than fresh pieces. If you do not like blue cheese, you can just use more mozzarella. The milk helps the flour stick to the veggie pieces so they get that breaded wing feel. It works every time!
How to Prepare the Cauliflower

First, you need to cut the cauliflower into small pieces. We call these florets. Try to make them all about the same size. If some are huge and some are tiny, the small ones will burn before the big ones are soft. I aim for pieces that are about the size of a golf ball. This size is perfect for dipping and eating in one or two bites.
Wash the cauliflower well after you cut it. Then, make sure you dry it with a clean towel. If the cauliflower is wet, the batter will slide right off. This is a common mistake I made when I was learning. Dry cauliflower is the secret to a crispy wing. Take your time with this step to get the best results.
Mixing the Magic Batter

Now we make the coating. In a big bowl, whisk together the flour, garlic powder, onion powder, salt, pepper, and milk. You want it to look like thick pancake batter. If it is too thin, add a little more flour. If it is too thick to stir, add a splash more milk. This batter acts like a jacket for the cauliflower and keeps it juicy inside while the outside gets hard.
Once the batter is ready, toss the cauliflower pieces in. I use my hands for this part because it is faster, but you can use a large spoon. Make sure every single piece is covered in the white mixture. You do not want any bald spots on your wings! This coating is what gives the sauce something to grab onto later in the process.
The First Bake for Crunch

Place the coated cauliflower on your baking sheet. Space them out so they are not touching. If they are too close, they will steam instead of roast. We want roasting! Put them in an oven heated to 400 degrees. Let them bake for about 20 minutes. You will see the edges start to turn a light golden brown.
Halfway through, I like to flip them over. This ensures the bottom does not get too dark while the top stays soft. It is a bit of work, but it makes the texture much better. I usually use a pair of tongs to do this quickly. When they come out of the oven after this first bake, they should feel firm and look slightly crispy.
Adding the Buffalo Sauce

This is where the flavor happens. Put your warm cauliflower into a clean bowl and pour the buffalo sauce over them. Stir them gently so you do not knock the breading off. Every piece should be bright red and shiny. The spicy smell will start to fill your kitchen now, and it is wonderful.
I sometimes add a tablespoon of melted butter to my buffalo sauce. This makes it a bit richer and less sharp. If you like things very spicy, you can add a pinch of cayenne pepper here too. FYI, some sauces are saltier than others, so I usually taste the sauce before I pour it on. It helps to know what you are getting into!
The Cheesy Final Step

Put the saucy cauliflower back on the baking sheet. Now, sprinkle the shredded mozzarella cheese over the top. I like to be very generous with the cheese. Put the tray back in the oven for another 5 to 8 minutes. You are waiting for the cheese to melt and start to bubble. This binds the sauce and the cauliflower together into one cheesy masterpiece.
If you have blue cheese, sprinkle it on during the last 2 minutes of baking. Blue cheese melts differently than mozzarella and can get very oily if it cooks too long. I love the contrast between the sharp blue cheese and the spicy buffalo sauce. It is a classic combo for a reason. Once the cheese is gooey, take them out of the oven.
Garnishing and Serving

Let the wings sit for a minute before you move them to a plate. This lets the cheese set a little bit so it stays on the wing. Sprinkle some chopped green onions on top for a pop of color and a fresh crunch. I always serve these with a side of cold ranch dressing or more blue cheese dip. The cold dip feels great against the hot, spicy wings.
These are best eaten right away while they are hot and crispy. IMO, they are just as good as real chicken wings but leave you feeling much lighter. I usually make a double batch because they disappear so fast. If you are serving a crowd, put them on a big platter with celery and carrot sticks on the side.
Recipe Quick Info
- Prep Time: 15 minutes
- Cook Time: 30 minutes
- Servings: 4 people
- Difficulty: Easy
Secrets for Success and Variations
You can change this recipe to fit what you like. If you do not like spicy food, use BBQ sauce instead of buffalo sauce. It is just as tasty and very kid-friendly. I have also tried this with a honey garlic sauce, and it was a huge hit at my last party. The method stays exactly the same, only the sauce changes.
One limitation of this dish is that it does not stay crispy for a long time. If you leave them out for two hours, the cauliflower will start to get soft. If you are having a party, I suggest baking them right before people arrive. They are definitely a “serve immediately” kind of food. However, they are so good that they rarely last long enough to get soft anyway!
Common Mistakes to Avoid

The biggest mistake is skipping the parchment paper. Cheese and buffalo sauce become like glue when they bake. If you put them directly on the metal, you will lose half the breading when you try to pick them up. Always use paper or a silicone mat. It makes cleanup a breeze and keeps your wings looking perfect.
Another mistake is over-crowding the pan. I know I mentioned this, but it is very important. If the pieces touch, they stick together and stay soggy. Give each floret its own little space to breathe. If you have a very large head of cauliflower, use two baking sheets instead of trying to cram everything onto one. Your patience will be rewarded with much better texture.
Storage and Reheating Tips

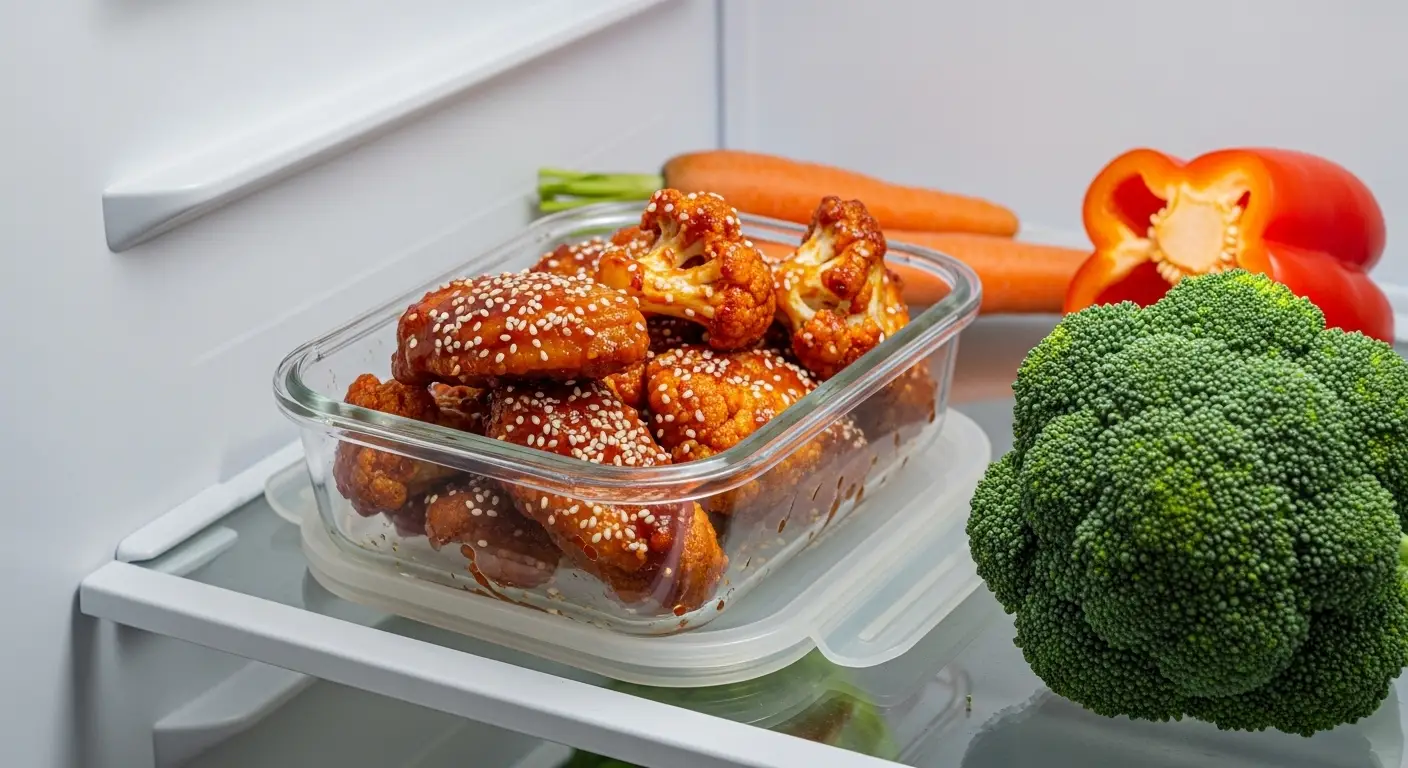
If you have leftovers, you can keep them in the fridge for up to three days. Use an airtight container so they do not make everything else smell like buffalo sauce. When you want to eat them again, do not use the microwave. The microwave will make them very soggy and sad. Nobody wants a soggy wing!
Instead, use an air fryer or your oven. Put them in at 350 degrees for about 5 minutes. This will crisp up the outside and melt the cheese again. They will not be quite as perfect as the first time, but they are still a great lunch. I actually like eating the cold leftovers in a salad the next day for a spicy kick.
Pro Tips for Extra Crunch
- Dry Well: Use a paper towel to dry the cauliflower after washing.
- High Heat: Make sure your oven is fully preheated before the tray goes in.
- Double Coat: If you want a thicker crust, dip the florets in the batter twice.
Common Questions About Cauliflower Wings
Can I use frozen cauliflower for this recipe?
I do not recommend it. Frozen cauliflower holds too much water. It will turn out mushy instead of crispy. Fresh is always best for wings.
Is this recipe gluten-free?
You can make it gluten-free by using a gluten-free flour blend. The rest of the ingredients are usually safe, but check your sauce label.
Can I make these in an air fryer?
Yes! Cook the battered pieces at 375 degrees for 15 minutes. Add sauce and cheese, then cook for 3 more minutes until melted.
How do I make them less spicy?
Mix the buffalo sauce with a little bit of honey or extra melted butter. This lowers the heat while keeping the great flavor.
What kind of cheese works best?
Mozzarella is best for the melty pull. Sharp cheddar or blue cheese adds a lot of flavor. I like to use a mix of both!
Enjoy Your Cheesy Buffalo Cauliflower Wings
You now know how to make a snack that everyone will love. These wings are crispy, spicy, and very cheesy. They are a great way to eat more veggies without missing the meat. I hope you enjoy making these in your own kitchen very soon!