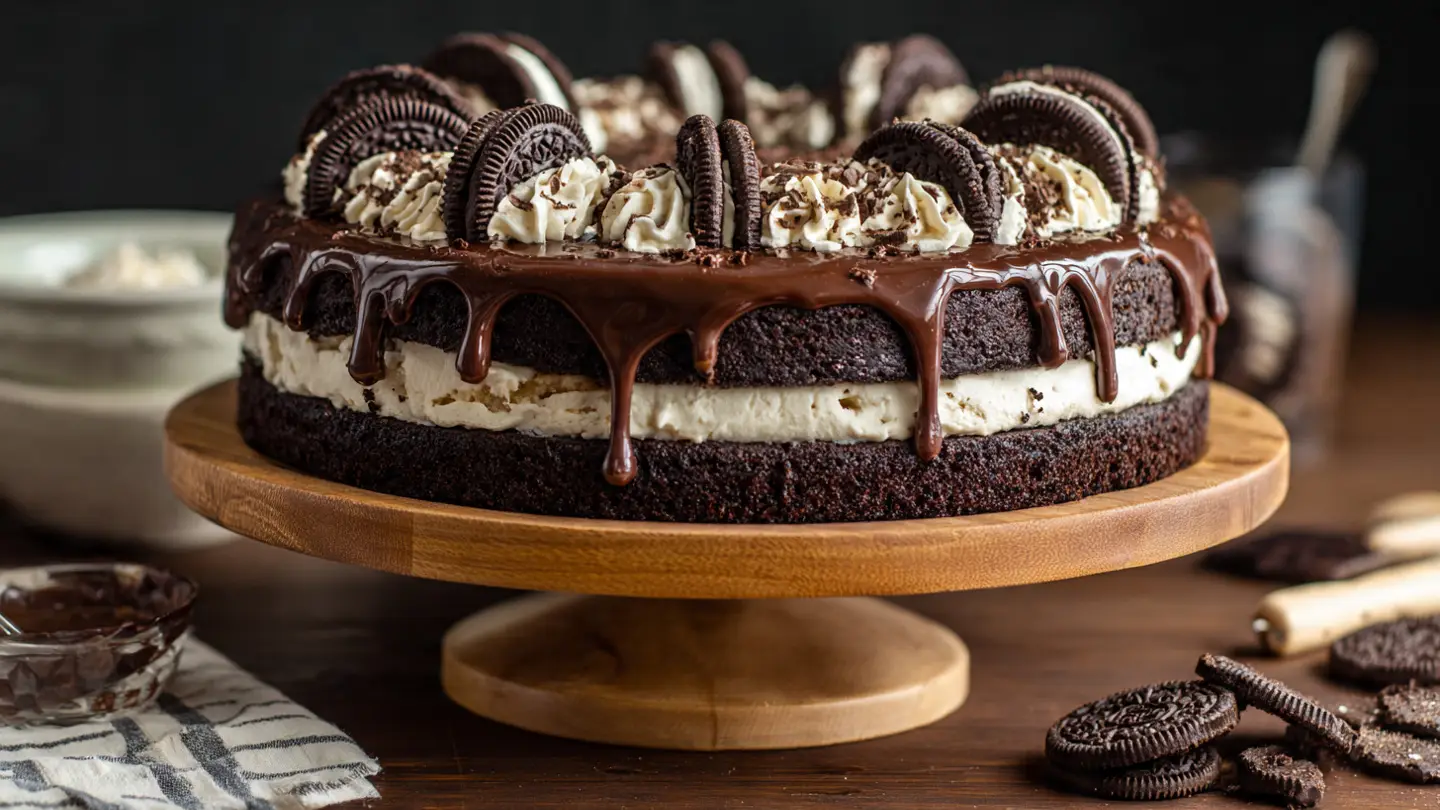
Oreo Cookie Cake
I love cookies. I love cake too. One day I thought, why not put them together? That is how I started making this Oreo cookie cake. It is a giant chocolate cookie that is soft like a cake. It has lots of white frosting and crunchy cookie bits inside. If you like the little black and white cookies from the store, you will love this big version. It is very easy to make at home.
Today you will learn how to bake this special cake from start to finish. I will show you the exact items you need. You will also see the steps to make it look and taste great. This is a big hit at birthday parties or just on a rainy Saturday. Everyone always asks me for the recipe when I bring it to a potluck. It is just that good.
Get your mixing bowls ready because we are going to have some fun. Make sure you have a glass of milk nearby for later! Let us get baking.
Check out the steps below to make your own masterpiece.
What Makes This Cake Special
This cake is not just a regular chocolate cake. It has a very specific taste. I use a lot of dark cocoa powder to make it taste like the real cookie. The texture is also different. It is thicker than a sponge cake but softer than a hard cookie. It is like the best of both worlds. I spent a lot of time trying to get this right. One time I made it too dry, and it felt like eating a giant cracker. That was not fun! Now I know exactly how to keep it moist.
Another thing that makes it great is the cream. The frosting inside the real cookies is very sweet and stiff. I make a buttercream that feels the same way. When you take a bite, you get that sweet cream and the dark chocolate together. It is a classic flavor that everyone knows. You do not need to be a pro baker to do this. I will keep it simple for you.
Recipe Quick Info
- Prep Time: 20 minutes
- Cook Time: 25 minutes
- Servings: 12 people
- Difficulty: Easy
The Ingredients You Need

You do not need anything too fancy for this cake. Most of these items are probably in your kitchen right now. I always check my pantry before I start. It is no fun to be halfway through and find out you have no eggs! Here is what you should grab from the store.
- 2 cups of all-purpose flour
- 3/4 cup of dark cocoa powder (this is the secret for the color)
- 1 teaspoon of baking soda
- 1/2 teaspoon of salt
- 1 cup of softened butter
- 3/4 cup of white sugar
- 3/4 cup of brown sugar
- 2 large eggs
- 2 teaspoons of vanilla
- 1 pack of Oreo cookies (you will crush these up)
Getting Your Tools Ready

Having the right tools makes baking much faster. I used to try and mix everything with a small spoon. My arm would get so tired! Now I use a hand mixer or a big whisk. You will also need two round cake pans. I like the 8-inch ones because they make the cake nice and tall. If you only have 9-inch pans, that is fine too. The cake will just be a little thinner.
Make sure you have some parchment paper. This is paper you put at the bottom of the pan. It stops the cake from sticking. One time I forgot this and the cake broke into ten pieces when I tried to take it out. I cried a little bit! Learn from my mistake and use the paper. It saves a lot of trouble later.
How to Mix the Batter

First, you need to mix the dry stuff. Put the flour, cocoa, soda, and salt in a bowl. Whisk it until it looks like one color. In another big bowl, beat the butter and both sugars. You want it to look fluffy and light. This takes about three minutes. Add the eggs one at a time and then the vanilla. It will smell very good at this point.
Slowly add the dry stuff into the wet stuff. Do not mix it too fast or the flour will fly everywhere! Once it is mostly mixed, fold in the crushed cookies. I like to leave some big chunks so you get a crunch. The batter will be very thick. It is almost like cookie dough. That is exactly what we want for this recipe. Put the batter into your pans and smooth the tops.
Baking to Perfection

Turn your oven to 350 degrees before you start. It needs to be hot when the pans go in. Put the pans on the middle rack so they cook evenly. Bake them for about 20 to 25 minutes. Every oven is a bit different. I always check mine at the 20-minute mark. You can stick a toothpick in the middle. If it comes out clean, the cake is done.
Do not overbake this cake! Since it is dark, you cannot see it turning brown. If you leave it in too long, it will get hard. It should feel soft when you touch the top. Let the cakes sit in the pans for ten minutes after they come out. Then move them to a wire rack to cool all the way down. FYI, trying to frost a warm cake is a disaster. The frosting will just melt and slide off.
Making the Creamy Filling

While the cakes cool, you can make the frosting. This is the part that tastes like the middle of the cookie. You need soft butter, powdered sugar, a little milk, and more crushed cookies. Beat the butter until it is smooth. Add the sugar slowly so you do not make a white cloud in your kitchen. I have done that many times and it is messy!
Once it is fluffy, add the cookie crumbs. I use a food processor to make these crumbs very tiny. That way, you can still use a piping bag if you want to make pretty swirls. If the frosting is too thick, add a tiny bit of milk. If it is too runny, add more sugar. It should be stiff enough to hold its shape on a spoon. This frosting is very sweet and perfect with the dark cake.
Pro Baking Tip
- Cold Butter Hack: If you forgot to take your butter out of the fridge, grate it with a cheese grater. It will soften in minutes!
Putting It All Together

Now comes the fun part. Put one cake layer on a plate. Spread a big pile of frosting on top. Make sure it goes all the way to the edges. Place the second cake on top of that. You can cover the whole cake in frosting, or just the top. I like to leave the sides open so you can see the dark layers. This is called a naked cake. It looks very cool and modern.
To finish it off, stick some whole Oreo cookies into the top. You can also sprinkle more crumbs over everything. If you want to be extra, drizzle some chocolate sauce over the edges. IMO, more chocolate is always better. Let the cake sit for 30 minutes before you cut it. This helps the layers stay together when you slice it with a knife.
Tips for the Best Results

One thing I learned is to use room temperature eggs. They mix into the batter much better than cold eggs. Just put them in a bowl of warm water for five minutes if you are in a rush. Also, make sure you measure your flour correctly. Do not scoop it with the cup. Use a spoon to fill the cup and then level it off. This keeps the cake from being too heavy.
If you want a different flavor, you can use Golden Oreos or even the mint ones. The steps are all the same. The mint version is great for holidays! This cake stays fresh for about three days if you keep it covered. You can even freeze the cake layers before you frost them. Just wrap them in plastic wrap really well. This is great for planning a party ahead of time.
Serving Your Cookie Cake

When it is time to eat, use a sharp knife dipped in hot water. This gives you very clean slices. This cake is very rich, so you only need a small piece. It goes perfectly with a big glass of cold milk or a scoop of vanilla ice cream. I love serving this at kids’ parties because they recognize the cookies right away. It makes them very excited!
You can also turn this into a giant cookie cake by using a pizza pan instead of cake pans. Just bake it for a shorter time. It will be like a big cookie you can slice like a pizza. There are so many ways to enjoy this. No matter how you serve it, people will love the crunch and the cream. It is a total crowd-pleaser every single time.
How to Keep Your Cake Fresh
You worked hard on this cake, so you want it to last. If you have leftovers, put them in a container with a lid. You can keep it on the counter for two days. If your house is very hot, put it in the fridge. The fridge can make the cake a little dry, so take it out 20 minutes before you eat it. This lets the butter in the frosting soften up again. No one likes hard frosting!
If you want to make this long before a party, you can. You can bake the cakes and freeze them for a month. Just wait to put the frosting on until the day you want to eat it. I often bake the layers on a Monday and frost them on a Friday. It makes the day of the party much less stressful. Plus, the flavor actually gets better after a day as the cookies inside the batter soften up a bit.
Your Oreo Cake Questions Answered
Can I use regular cocoa powder?
Yes, you can. The cake will just be lighter in color and taste more like milk chocolate instead of a dark Oreo cookie.
What if I do not have a mixer?
You can use a wooden spoon. Just make sure the butter is very soft so you can mix it easily by hand.
How do I stop the cookies from getting soggy?
The cookies inside the cake will naturally soften. If you want crunch, add fresh cookies on top right before you serve it.
Can I make this recipe as cupcakes?
Yes! Fill cupcake liners 3/4 full and bake for about 15 to 18 minutes. It makes about 24 cupcakes.
My frosting is too sweet, help!
Add a tiny pinch of salt to the frosting. It helps cut the sugar and brings out the vanilla flavor.
Enjoy Your Homemade Treat
Making a giant Oreo cookie cake is a fun way to celebrate anything. It looks amazing and tastes even better than it looks. Remember to use dark cocoa and plenty of cookies. Now go share a slice with someone you love and enjoy the chocolatey goodness!