Homemade Healthy Pop Tarts with a Fresh Fruit Filling
I remember eating toaster pastries every single morning when I was a kid. They were sweet, crunchy, and came in a silver foil wrap. But as I got older, I noticed those store-bought treats had a lot of sugar and things I could not pronounce. I wanted that same yummy taste but with better ingredients. That is why I started making these homemade healthy pop tarts in my own kitchen. They use real fruit and a crust that feels like a treat but is much better for you.
In this post, you will learn how to make a flaky dough from scratch. You will also see how to cook down fresh fruit into a thick jam. These are perfect for kids who need a quick breakfast or for anyone who wants a snack that feels special. I have spent a lot of time testing this recipe to make sure the crust does not fall apart and the filling stays inside. It is easier than you think to get that perfect golden-brown look without using a box.
Ready to make your kitchen smell like a bakery? Let us get started on these delicious treats. Check out the full list of what you need below!
Getting Your Kitchen Ready for Baking
Before you touch any flour or fruit, you need a clear space. Baking is a lot more fun when you have room to move. I like to clear off my big wooden table and get my rolling pin ready. You do not need fancy tools to make these. A simple bowl, a fork, and a baking sheet will do the job. Make sure your oven is empty so you can preheat it soon. Having everything in one spot helps you stay calm while you cook.
I find that reading the whole recipe first is a big help. It stops me from getting surprised halfway through. These pop tarts take a little bit of time because the dough needs to rest. You cannot rush a good crust! If you try to roll it out while it is warm, it will stick to everything. Trust me, I have made that mistake before and it was a sticky mess. Taking your time makes the final result much better.
Gathering Your Simple Ingredients

To make the crust, you need a few basic things from your pantry. I use whole wheat pastry flour because it is light but still has good fiber. You will also need cold butter. The butter must be very cold! This is what makes the crust flaky. For sweetness, I use a little bit of honey or maple syrup instead of white sugar. A pinch of salt helps bring out all the flavors. You also need a few spoons of ice-cold water to bring the dough together.
For the fruit filling, you can pick your favorite berry. I love using fresh strawberries or blueberries. You will also need a little bit of lemon juice to keep the colors bright. A tiny bit of cornstarch or chia seeds helps thicken the fruit juice so it does not leak out. If your fruit is very sweet, you might not even need extra honey. It is always best to taste your fruit first to see how much sweetness it needs.
Making the Perfect Flaky Crust

Start by putting your flour and salt in a large bowl. Take your cold butter and cut it into small cubes. Drop the butter into the flour. Use a fork or a pastry tool to mash the butter into the flour. You want it to look like small peas or crumbs. Do not over-mix it! If the butter melts, your crust will be tough like a cracker instead of flaky. This is the most important part of the whole process. Keeping those little bits of butter solid is the secret to a great pop tart.
Slowly add your cold water one tablespoon at a time. Mix it gently with a spoon. You only want to add enough water so the dough stays together when you squeeze it with your hand. If it is too dry, it will crumble. If it is too wet, it will be sticky. Once it forms a ball, wrap it up and put it in the fridge. I usually let mine sit for at least thirty minutes. This lets the flour soak up the water and helps the butter stay cold. FYI, you can even make the dough the night before if you are busy.
Cooking the Fresh Fruit Filling

While your dough rests, you can make the filling. Put your fresh fruit in a small pot on the stove. Turn the heat to medium. As the fruit gets hot, it will start to pop and release juice. Use a spoon to mash the berries until they are soft. I like to leave a few small chunks for a good bite. Add your lemon juice and a tiny bit of honey if you want it sweeter. This is where the fruit starts to smell amazing.
To make the filling thick, add a little bit of cornstarch or chia seeds. If you use cornstarch, mix it with a tiny bit of water first so it does not clump. If you use chia seeds, they will swell up and make the filling thick like jam. Cook it for a few more minutes until it looks thick and shiny. Once it is ready, take it off the stove. You must let the filling cool down completely. If you put hot filling on cold dough, the dough will melt!
Recipe Quick Info
- Prep Time: 40 minutes
- Cook Time: 25 minutes
- Servings: 8 pop tarts
- Difficulty: Intermediate
Rolling and Cutting the Dough

Now that your dough is cold, take it out of the fridge. Put a little flour on your table and on your rolling pin. Roll the dough out slowly until it is a big rectangle. You want it to be about one-eighth of an inch thick. If it is too thick, it will be hard to eat. If it is too thin, the fruit will leak out. Try to keep the edges as straight as you can. I use a ruler to help me cut even rectangles.
Cut the dough into smaller rectangles. You will need two pieces for each pop tart. I usually make mine about three inches wide and four inches long. If you have extra dough scraps, you can roll them back up and cut more pieces. Do not overwork the dough, though, because it will get tough. Once you have your rectangles, put them on a baking sheet lined with parchment paper. This keeps them from sticking to the pan.
Filling and Sealing Your Pop Tarts

Take a small spoonful of your cooled fruit filling. Put it right in the center of one dough piece. Leave about half an inch of space around the edges. If you put too much filling, it will ooze out of the sides! Take a little bit of water or a beaten egg and brush it around the edges of the dough. This works like glue to hold the top and bottom together. I found this tip in a baking book and it works like a charm.
Place a second dough rectangle on top of the filling. Use a fork to press the edges together. This is called crimping. It makes a pretty pattern and seals the fruit inside. Make sure you press firmly but not so hard that you cut through the dough. Use a toothpick or the fork to poke a few tiny holes in the top of each pop tart. This lets steam escape while they bake so they do not puff up too much or explode in the oven.
Baking to Golden Perfection

Put your pop tarts into a preheated oven at 375 degrees. I usually bake mine for about twenty to twenty-five minutes. You want the edges to look golden and crispy. Every oven is a little bit different, so keep an eye on them! Check them at the fifteen-minute mark to make sure they are not getting too dark. If you like them extra shiny, you can brush a little bit of egg wash on top before they go into the oven.
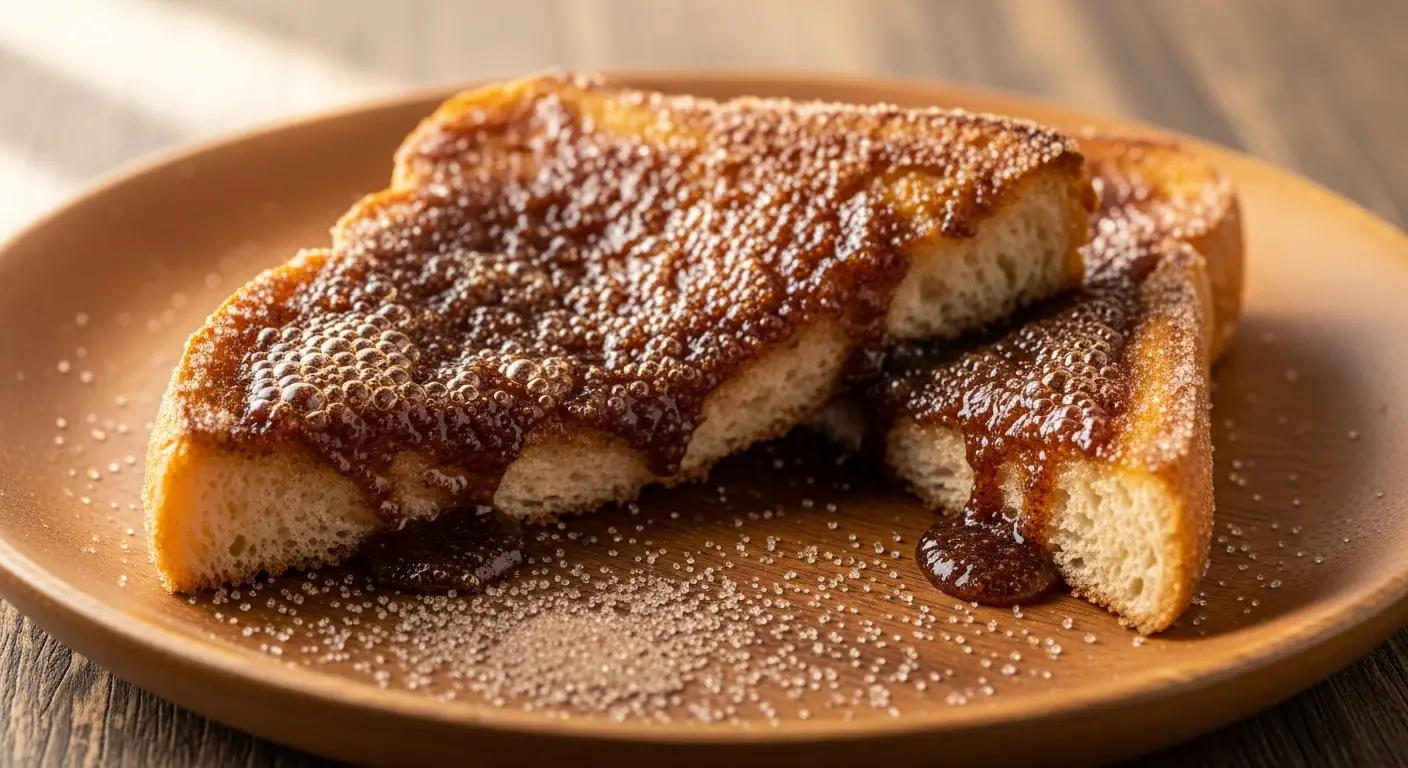
Once they are done, let them cool on the baking sheet for a few minutes. If you try to move them while they are hot, they might break. Transfer them to a wire rack to finish cooling. This helps air move around them so the bottom does not get soggy. IMO, they taste best when they are still a little warm from the oven. The fruit filling stays gooey and the crust is very light and crispy.
Adding a Natural Glaze

If you want your pop tarts to look like the ones from the store, you can add a simple glaze. I make mine with a little bit of greek yogurt and honey. You can also use a tiny bit of powdered sugar and milk if you want a classic look. Whisk them together until they are smooth and easy to pour. Use a spoon to drizzle the glaze over the cooled pop tarts. It adds a nice sweetness and makes them look beautiful.
For extra fun, you can top the glaze with more crushed berries or a few seeds. My kids love it when I add a few colorful sprinkles on top. Just remember to wait until the pop tarts are completely cool before adding the glaze. If they are warm, the glaze will melt and run off. I have made that mistake many times! Taking your time at the end is just as important as the beginning. A beautiful glaze makes it feel like a real bakery treat.
Healthy Baking Tips
- Cold Butter: Use butter straight from the fridge for the best crust.
- Don’t Overfill: Only use one big spoon of fruit so it stays inside.
- Cool the Fruit: Always let your jam cool before filling the dough.
- Seal the Edges: Use a fork and a little water to lock the filling in.
Ideas for New Toppings and Flavors
Once you know the basic steps, you can try all sorts of things. You do not have to stick to just strawberries. I love using peaches in the summer or apples in the fall. You can even mix different fruits together to make a mixed berry filling. The best part about baking at home is that you can choose whatever you like. It is your kitchen and your rules! You can also try adding different spices to the dough like cinnamon or a little bit of cocoa powder for a chocolate treat.
Changing the toppings is also a fun way to mix things up. Instead of a glaze, you could sprinkle a little bit of coarse sugar on top before baking. Or you could leave them plain and dip them in peanut butter for a protein-packed snack. I have even tried a savory version with a little bit of jam and a tiny bit of cheese. It sounds weird but it tastes great! There are so many ways to make these your own. Just have fun and keep trying new things in your kitchen.
Storing Your Fresh Pop Tarts
If you have any leftovers, you can store them in an airtight container. They stay fresh on the counter for about two days. If you want them to last longer, put them in the fridge. They will keep for up to five days that way. I like to put a little piece of parchment paper between each one so they do not stick together. This is a great tip for meal prepping for the week ahead.
To warm them up, you can put them back in the oven for a few minutes. You can also use a toaster oven on a low setting. I do not recommend a microwave because it can make the crust soft and soggy. If you want to make a big batch, you can freeze them before you bake them. Just put the raw pop tarts on a tray and freeze them until they are hard. Then put them in a bag. When you are ready to eat, you can bake them right from the freezer for a few extra minutes.
Serving Your Healthy Treats
These pop tarts are great for a fast breakfast on the go. You can grab one and head out the door. But they are also lovely for a slow weekend morning. I like to serve mine on a pretty plate with a big glass of cold milk. If you are having friends over, you can make mini versions and serve them on a big platter. They always disappear very fast because they look and taste so good. Everyone will be surprised that you made them yourself!
I think they go perfectly with a little bit of extra fruit on the side. You can also serve them with a dollop of yogurt for some extra protein. These treats are not just for breakfast either. They make a great after-school snack or even a light dessert after dinner. No matter how you serve them, your family will love the fresh fruit taste. Making these at home is such a nice way to show people you care about them. It takes a little effort but it is totally worth it.
Your Quick Baking Questions
Can I use frozen fruit for the filling?
Yes, frozen fruit works great! Just cook it down a little longer to get rid of the extra water. It will taste just as good as fresh fruit.
What if my dough is too crumbly?
Add one more tablespoon of cold water. Mix it gently until it sticks. Sometimes the air is dry and the flour needs more moisture.
Can I make these gluten-free?
You can try using a gluten-free flour blend. Just make sure it is a 1-to-1 mix meant for baking. The crust might be a little more fragile.
How do I stop the filling from leaking?
Do not overfill them! Use a fork to press the edges very hard. Poking holes in the top also helps the air escape without pushing fruit out.
Can I use store-bought jam instead?
Sure! Use a high-quality jam with no added sugar. Just check that it is thick so it does not run out of the dough during baking.
Happy Baking at Home
Making your own healthy pop tarts is a fun way to enjoy a classic snack with real ingredients. You get to control the sugar and pick your favorite fruit flavors. I hope you enjoy every bite of these crispy, fruity treats with your family and friends. They are much better than anything from a box!