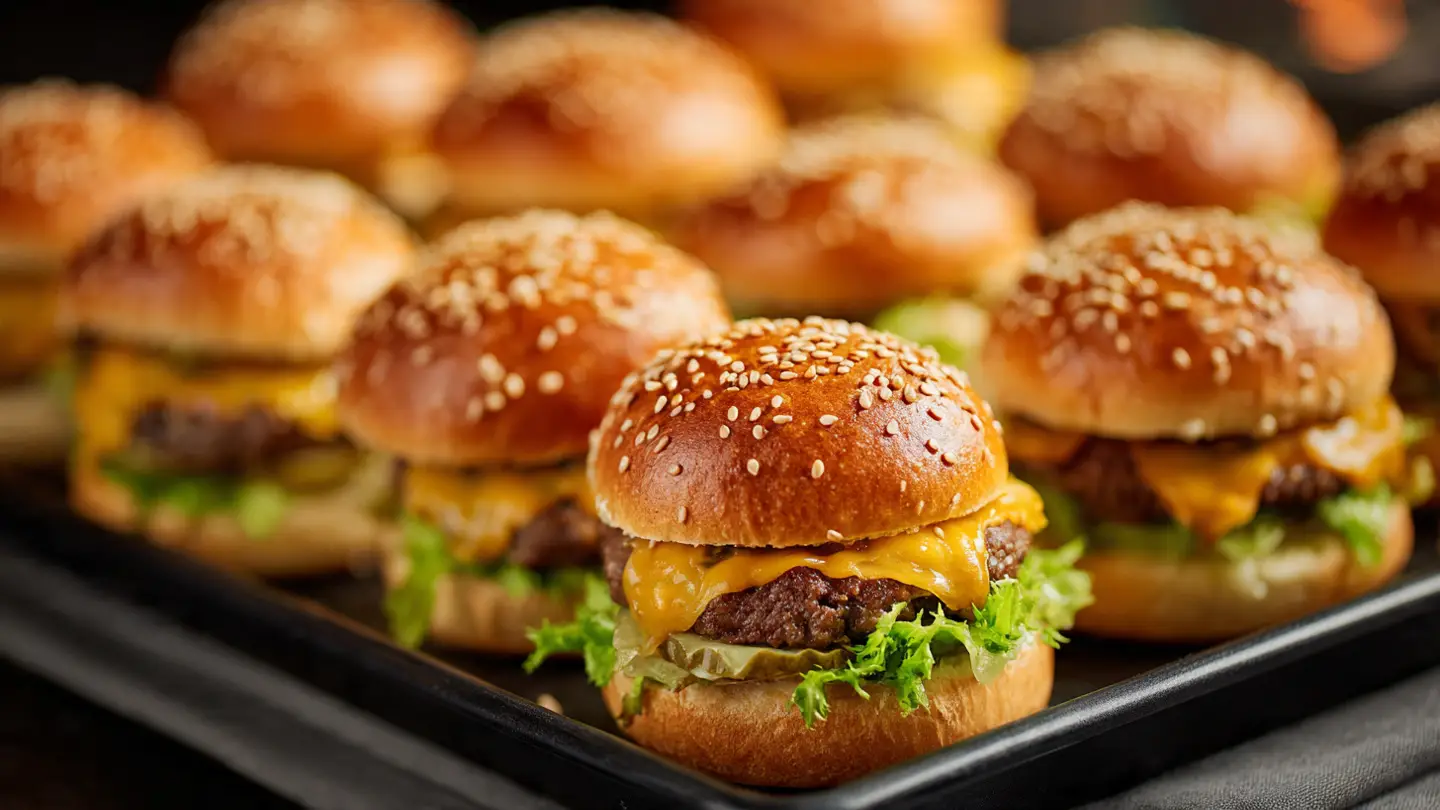
Big Mac Sliders
Everyone loves a big, juicy burger from the famous golden arches. But sometimes, you want to share that flavor with a big group of friends or family. These Big Mac Sliders are the perfect answer. They take all the things you love about the classic burger and put them into small, easy-to-eat buns. You get the special sauce, the pickles, and the onion in every single bite.
I remember the first time I made these for a game night. I was worried they might be too messy or hard to flip. It turns out that baking them all at once in a big tray is the best trick ever. No one has to stand over a hot grill while everyone else is having fun. These sliders are a huge hit at parties, and they are very simple to put together even if you are not a pro in the kitchen.
In this post, I will show you exactly how to make these at home. You will learn how to cook the meat just right and how to make a sauce that tastes just like the real thing. Get your apron on and let’s get cooking!
Check out the full list of steps below to start your burger feast.
The Secrets to a Great Slider
Making good sliders is about more than just small buns. You need the right balance of flavors. The beef needs to be seasoned well, but it should not overpower the toppings. The bun needs to be soft but strong enough to hold all the sauce. If the bun is too dry, the whole thing falls apart. If the meat is too greasy, the bottom bun gets soggy. Finding that middle ground is what makes a slider great.
I learned the hard way that using too much onion can be a mistake. One time, I put in giant chunks of raw onion, and it was all anyone could taste. Now, I use very small pieces so they blend in with the cheese and meat. It makes a big difference in how the burgers feel in your mouth. You want a little crunch, not a mouthful of sharp onion flavor. These small tips help you make a better meal every time.
The Ingredients You Will Need

To start, you will need a few simple things from the grocery store. Most of these items are probably already in your fridge or pantry. Using fresh ingredients will make the sliders taste much better than frozen ones. Here is what you should put on your shopping list for your burger night.
12 slider buns (the kind that come in a connected pack work best) 1 pound of ground beef (lean beef is better so it is not too greasy) 1/2 teaspoon of salt and 1/2 teaspoon of black pepper 1 teaspoon of garlic powder and 1 teaspoon of onion powder 6 to 8 slices of American cheese (this melts the best for that classic taste) 1/2 cup of shredded iceberg lettuce (it must be iceberg for the right crunch) 1/4 cup of dill pickle slices (thinly sliced is best) 2 tablespoons of dried minced onions (soak them in a little water first) 1 tablespoon of melted butter and 1 teaspoon of sesame seeds for the top
How to Make the Famous Sauce

The sauce is the most important part of this recipe. Without it, you just have a regular cheeseburger. To make it, you mix mayonnaise, yellow mustard, and sweet relish together. I also add a little bit of paprika, onion powder, and garlic powder. Some people think there is ketchup in the sauce, but the real secret is that there is actually no ketchup at all! The pink color comes from the paprika.
I suggest making the sauce an hour before you start cooking. This gives the flavors time to hang out and get to know each other. If you taste it right away, it might seem a bit sharp. But after it sits in the fridge, it becomes smooth and perfect. IMO, this sauce is so good you might want to double the recipe just to use it for dipping your french fries later.
Recipe Quick Info Prep Time: 15 minutes Cook Time: 20 minutes Servings: 12 sliders Difficulty: Easy
Preparing the Beef Base
Instead of making twelve tiny patties, we are going to cook the meat in one big sheet. This saves so much time and effort. First, preheat your oven to 350 degrees. Take your ground beef and press it into a rectangular shape on a large baking sheet with sides. Make sure the beef layer is a little bit bigger than your pack of buns. The meat will shrink a bit as it cooks in the oven.
Season the beef with salt, pepper, garlic powder, and onion powder. Bake it for about 10 to 12 minutes. When it comes out, you will see some fat on the tray. Use a spatula to carefully drain that liquid away. This step is very important because you do not want that grease to soak into your bread later. It keeps the bottom of the sliders nice and firm instead of mushy.
Assembling the Sliders

Now comes the fun part where everything starts to look like a burger. Take your pack of slider buns and slice them in half across the middle so you have a top half and a bottom half. Place the bottom half on a clean baking sheet. Spread a generous layer of your homemade sauce all over the bread. This acts like glue and keeps the meat in place.
Carefully slide your big sheet of cooked beef onto the buns. It should fit almost perfectly. Lay the slices of American cheese over the hot beef so they can start to melt. If you like it extra cheesy, you can overlap the slices. This is where the magic happens and all the flavors start to come together. It looks like a giant burger at this point, but don’t worry, we will cut them into small pieces later.
Adding the Toppings

Once the cheese is on, it is time for the crunch. Sprinkle your soaked minced onions over the cheese. Then, add a layer of dill pickles. I like to put at least two pickles on each spot where a slider will be. After the pickles, add a thin layer of shredded lettuce. Be careful not to add too much lettuce before the final bake, as it can get a bit soft in the heat.
Spread some more sauce on the inside of the top buns before placing them on top of the lettuce. This makes sure every bite is juicy. FYI, if you prefer fresh lettuce that is very crunchy, you can wait to add the lettuce until after the buns are toasted. It is a bit harder to put it inside the hot sliders, but some people like the cold lettuce against the hot meat better that way.
Top Cooking Tips Bun Choice: Use brioche slider buns for a richer, buttery taste that feels fancy. Onion Trick: Soaking dried onions in water makes them taste exactly like the ones at the burger shop. Cutting Hack: Use a long serrated knife (a bread knife) to cut the sliders after baking for clean edges.
Baking to Perfection

The last step is to get the buns nice and toasty. Brush the tops of the buns with melted butter. Use a pastry brush or even just the back of a spoon to get it even. Sprinkle the sesame seeds over the butter. The butter helps the seeds stick and gives the bread a beautiful golden color. Put the tray back in the oven for about 5 to 8 minutes.
Watch them closely! You want the bread to be warm and the cheese to be fully melted, but you don’t want to burn the tops. When they look golden and smell amazing, take them out. Let them sit for just two minutes. This short rest helps the juices stay in the meat so they don’t run out when you cut them. Use a sharp knife to cut between the buns and serve them while they are hot.
Serving Suggestions

These sliders are a full meal on their own, but they are even better with sides. French fries are the classic choice, of course. You can also serve them with a simple side salad or some potato chips. Because they are small, they are great for kids who might not be able to finish a whole big burger. I usually serve them on a big wooden board so people can just grab what they want.
If you are having a big party, you can make two or three trays at once. They go fast, so be ready! I have found that even people who say they aren’t hungry end up eating two or three. They are just that good. You can also set out a bowl of extra pickles or extra sauce for those people who want even more flavor on their plate.
Keeping Your Sliders Fresh
Sometimes you might have leftovers, though in my house, that is rare. If you do have some left, you need to store them the right way so they stay tasty. The bread can get soggy if you just put them in a plastic bag while they are still warm. You want to make sure they are completely cool before you put them away. This prevents steam from making the buns wet and mushy.
I have learned that these are actually pretty good the next day if you heat them up correctly. Don’t just throw them in the microwave, or the bread will get chewy like rubber. Using a toaster oven or the regular oven is a much better plan. It keeps the outside of the bun crispy while the meat gets hot again. Here are a few more tips for keeping your sliders in great shape for later.
Storage and Reheating Tips

To store your sliders, put them in an airtight container. They will stay good in the fridge for up to three days. I do not recommend freezing them once they are fully assembled. The lettuce and pickles do not freeze well and will turn into a mess when they thaw out. If you want to make them ahead of time, it is better to cook the meat and make the sauce, then assemble and bake them right before you want to eat.
When you are ready to eat your leftovers, wrap them loosely in aluminum foil. Put them in an oven at 350 degrees for about 10 minutes. This gently warms the middle without burning the top. If you are in a huge rush, the microwave will work for 30 seconds, but the bun won’t be as good. I always say the extra ten minutes in the oven is worth the wait for a better lunch!
Variations to Try

You can change this recipe to fit what you like. If you don’t like beef, you can use ground turkey or a plant-based meat instead. Some people like to add a slice of bacon to each slider for a smoky taste. If you like spicy food, try adding some chopped jalapeños on top of the cheese. The sauce and the buns will still make it feel like that classic burger you love.
Another fun idea is to change the cheese. While American cheese is the most authentic for this recipe, cheddar or Swiss can be very tasty too. Just remember that some cheeses melt slower than others. If you use a hard cheese, you might need to leave them in the oven for an extra minute or two. Experimenting with different toppings is a great way to make this recipe your own and keep your family excited for dinner.
Common Questions About Sliders
Can I use fresh onions instead of dried ones? Yes, you can use fresh white onion. Just make sure to dice it very small. I recommend sautéing them for a minute so they are soft and not too sharp in the burgers.
What if I cannot find slider buns? You can use dinner rolls instead. Just look for rolls that are soft and slightly sweet. Cut them in half just like you would with the slider buns.
Is there a way to make these gluten-free? You can use gluten-free rolls and make sure your sauce ingredients are certified gluten-free. Most of the other ingredients like beef and cheese are naturally safe to eat.
How do I keep the bottom bun from getting soggy? Always drain the grease from the cooked beef before putting it on the buns. You can also lightly toast the inside of the bottom buns in the oven for 2 minutes before adding the meat.
Can I make the sauce ahead of time? Yes! You can make the sauce up to three days early. It actually tastes better after the flavors have had time to mix in the refrigerator.
Enjoy Your Burger Party
These Big Mac Sliders are a simple way to bring a lot of joy to your table. They are easy to make, fun to eat, and taste just like the classic burger we all crave. I hope you enjoy making these for your next gathering as much as I do. Happy cooking!