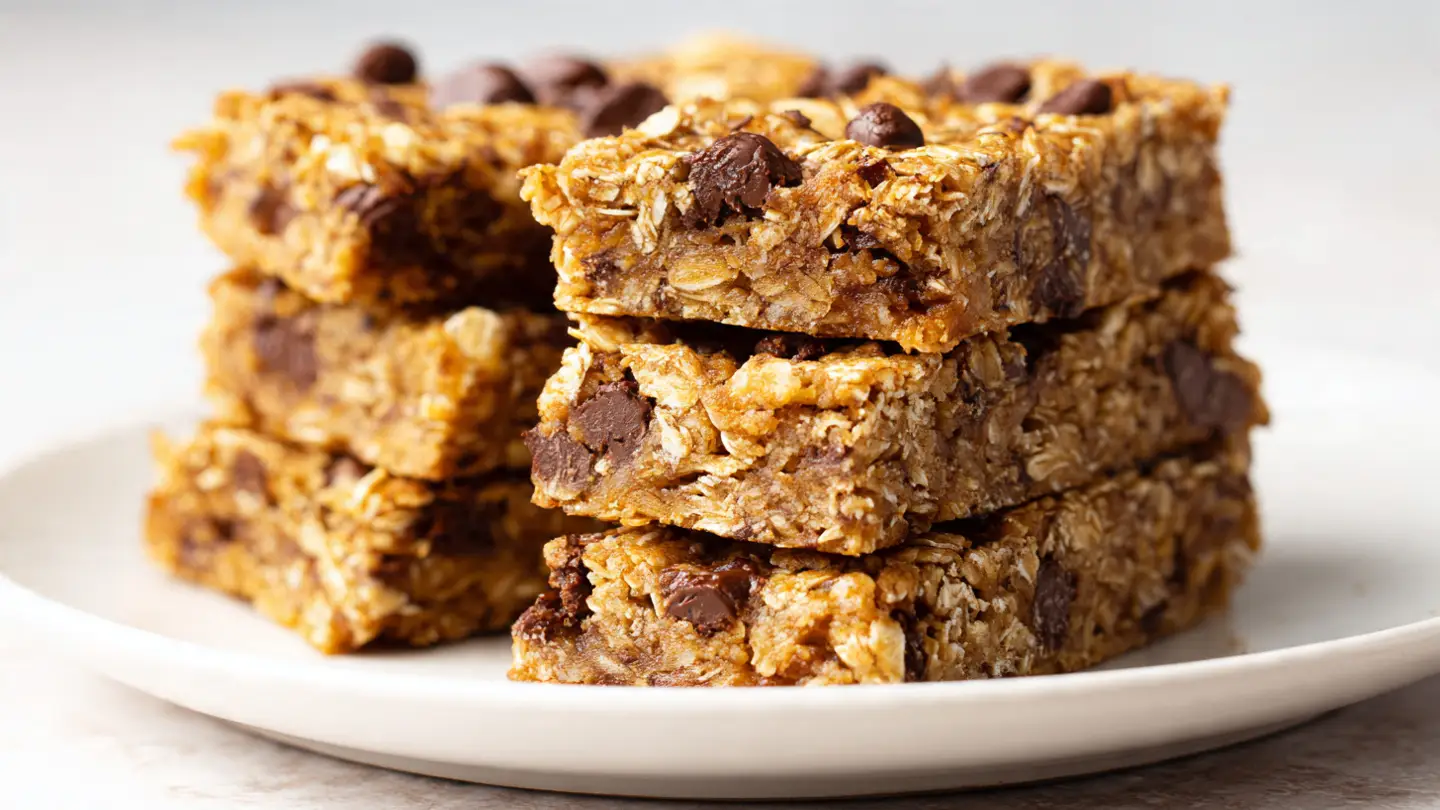
Soft and Chewy Banana Oatmeal Bars for Active Kids
Are you looking for a snack that your kids will actually eat? I know how hard it is to find something healthy that tastes like a treat. These banana oatmeal bars are my favorite thing to make on Sunday nights. They are soft, sweet, and full of good energy for school or sports.
I will show you exactly how to mix these up in one bowl. You do not need any fancy tools or expensive flour. Just grab those brown bananas sitting on your counter and some oats. Your kitchen will smell like a bakery in no time!
Check out the steps below to make these easy bars today.
The Best Way to Use Old Bananas
Most people throw away bananas when they get too many brown spots. I used to do that too until I realized those are the best ones for baking. The darker the peel, the sweeter the bar will be. This means we do not have to add much extra sugar to the recipe.
I once tried making these with green bananas because I was in a rush. It was a big mistake! The bars tasted like grass and were not soft at all. Now I wait until the bananas look almost black. It makes a huge difference in how the snack feels in your mouth.
The Simple Ingredients You Need

To start, you need two or three very ripe bananas. These are the stars of the show. You also need rolled oats. I like old-fashioned oats because they stay chewy. Quick oats work too, but the bars will be a little more mushy. Both kinds are fine for kids, so use what you have in the cupboard.
Next, grab some peanut butter or almond butter. This helps the bars stick together so they do not crumble in a lunchbox. If your kid has a nut allergy, sunflower seed butter is a great swap. You also need a little bit of honey or maple syrup for extra sweetness. Don’t forget a splash of vanilla and a pinch of salt to make the flavors pop.
Why These Bars Stay Soft

Many granola bars from the store are hard and crunchy. Those can be tough for little kids to chew. My recipe uses mashed bananas as the base, which keeps things moist. The oats soak up the fruit juice while they bake. This creates a texture that is more like a dense cake than a hard cracker.
The fat from the nut butter also plays a big role. It keeps the oats from getting dry in the oven. IMO, a soft snack is always better than one that hurts your teeth. These stay soft for about four days if you keep them in a sealed container. You can even zap them in the microwave for ten seconds to make them feel fresh again.
Recipe Quick Info
- Prep Time: 10 minutes
- Cook Time: 20 minutes
- Servings: 12 bars
- Difficulty: Very Easy
Step by Step Baking Instructions
Getting the texture right is easy if you follow the order of the steps. I like to get all my bowls out before I start. This keeps the kitchen from getting too messy. Even if you are not a pro baker, you can handle this recipe with ease.
Make sure you preheat your oven first. A hot oven is the secret to a good bake. If you put the pan in a cold oven, the bars might come out gummy. Trust me, waiting those five minutes for the oven to beep is worth it for the perfect snack.
Mashing the Fruit Correctly

First, peel your bananas and put them in a large bowl. Use a fork to mash them up until they look like a thick soup. It is okay if there are a few small lumps left. Those lumps turn into sweet little pockets of flavor once they are cooked. Just make sure there are no giant chunks of fruit.
If your bananas are not quite soft enough, you can microwave them for 30 seconds. This softens the fibers and makes them easier to crush. I learned this trick when my kids wanted bars but the bananas were still yellow. It works like a charm every single time. Once they are mashed, stir in your wet ingredients like honey and vanilla.
Mixing the Dry and Wet Parts

Now it is time to add the oats and any fun extras. Pour the oats into the bowl with the banana mixture. Stir it well so every single oat is covered in the wet batter. If you see any dry white spots, keep stirring! The oats need to be fully coated so they cook evenly and stay soft.
This is the part where you can add chocolate chips or raisins. I usually add a handful of mini chocolate chips. Kids love seeing those little dark spots in their snacks. FYI, you can also add cinnamon or flax seeds if you want to be extra healthy. The batter should be thick and heavy, not runny like pancake mix.
Preparing the Baking Pan

I always use parchment paper to line my pan. This is a pro tip that saves you from a big mess. If you just grease the pan with butter, the honey in the bars might make them stick to the bottom. With paper, you can just lift the whole block of bars out once they are cool. It makes cutting them into squares much faster too.
Press the batter into the pan using the back of a spoon. You want to push it into the corners so the bars are all the same thickness. If one side is thinner than the other, it will burn while the thick side stays raw. Aim for about one inch of thickness across the whole pan for the best results.
Baking and Cooling the Bars

Slide the pan into the middle rack of your oven. Bake them for about 15 to 20 minutes. You will know they are done when the edges look golden brown and the top feels firm when you tap it. Don’t overbake them! If they stay in too long, they will lose that chewy texture we want. They might look a little soft when you first pull them out, but they will firm up as they cool.
Wait at least 20 minutes before you try to cut them. I know it is hard to wait when the house smells like cookies. But if you cut them while they are hot, they will fall apart into a pile of crumbs. Cooling lets the oats set and lock together. Once cool, use a sharp knife to slice them into rectangles or squares for easy grabbing.
Success Tips for Moms
- Wet Hands: If the batter sticks to your spoon, wet your hands with water and press the dough down.
- Storage: Wrap bars individually in plastic wrap for quick snacks on the go.
- Freezing: These last for 3 months in the freezer. Just thaw one in the fridge overnight.
Making the Recipe Your Own
I love this recipe because you can change it every week. Kids get bored fast, so I like to switch up the flavors. One week I might use dried cranberries, and the next week I might use chopped walnuts. It keeps the snack drawer interesting and fun for everyone.
You can also adjust the recipe based on what you have in the pantry. If you run out of honey, use maple syrup or even a little brown sugar. The bars are very forgiving. As long as you have the banana and the oats, you are going to end up with something tasty.
Adding Fun Mix-ins

Think about what your kids like most. If they love trail mix, add sunflower seeds and dried fruit. If they like tropical flavors, try shredded coconut and dried pineapple pieces. I find that adding about half a cup of mix-ins is the perfect amount. Too many extras might make the bars crumble.
You can even try adding a spoonful of cocoa powder to the batter. This turns them into chocolate banana bars. My son thinks these are brownies, but I know they are full of fiber and fruit. It is a win for both of us! Just remember to keep the total amount of dry stuff the same so the bars don’t get too dry.
Perfect Serving Suggestions

These bars are great for breakfast when you are running late. I usually give one to my daughter with a glass of milk. They are also perfect for after soccer practice. The oats give kids slow-release energy so they don’t have a sugar crash later in the day. It is way better than a bag of salty chips or a candy bar.
For a fancy treat, you can drizzle a little melted chocolate over the top after they cool. This makes them look like they came from a high-end cafe. You can also serve them warm with a scoop of yogurt on top. It feels like a real dessert but it is still healthy enough for any time of day.
Your Common Baking Questions
Can I make these without peanut butter?
Yes! Use almond butter, soy butter, or sunflower seed butter. If you want no butter at all, use 1/4 cup of applesauce instead.
How long do these bars last?
They stay fresh in a container for 4 days. In the fridge, they last for a week. You can also freeze them for up to 3 months.
My bars are too crumbly, what happened?
You might have added too many oats or not enough banana. Make sure your bananas are large and very mashy to hold it all together.
Can I use steel cut oats?
No, steel cut oats are too hard for this recipe. They will not soften in the oven and will be very crunchy in a bad way.
Is this recipe gluten free?
It can be! Just make sure your bag of oats says Gluten Free on the label. Oats are naturally gluten free but sometimes grow near wheat.
Happy Healthy Snacking
I hope your kids love these bars as much as mine do. They are a simple way to use up old fruit and keep everyone full. Baking doesn’t have to be hard or perfect to be great. Just have fun and enjoy your homemade treats!