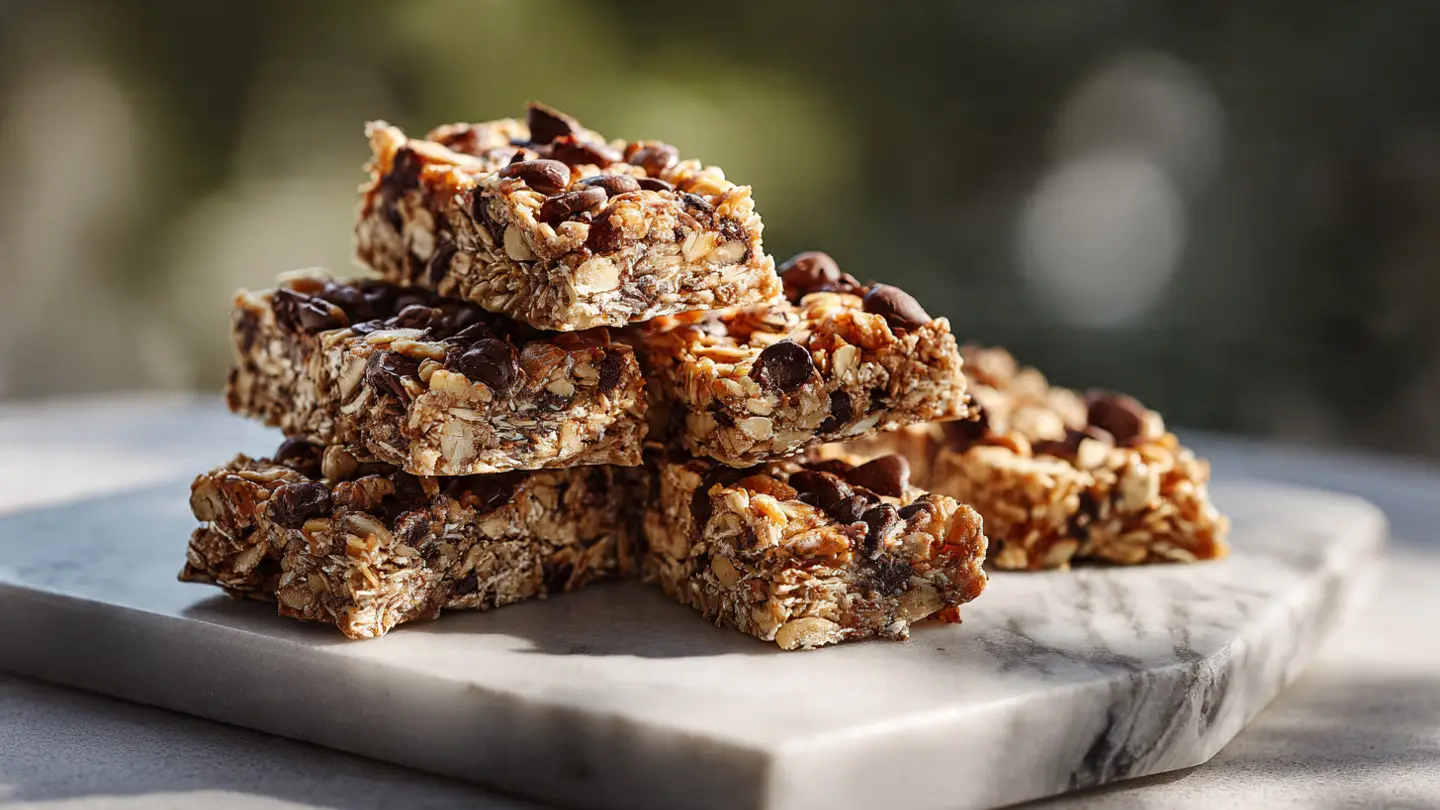
Homemade Granola Bars
Making snacks at home is one of my favorite things to do. It saves a lot of money and tastes much better than the food you buy in a box. Many people think making granola bars is hard, but it is actually very easy. You only need a few simple tools and some basic items from your pantry. Today, I will show you how to make the best chewy granola bars you have ever tasted.
You will learn how to mix the dry parts with the sticky parts to get a bar that does not fall apart. I have made these dozens of times for my family. We love to take them on hikes or eat them as a quick breakfast. Once you learn the basic steps, you can change the recipe to fit your own taste. This is a great way to use up small amounts of nuts or seeds you have in your kitchen.
Check out the steps below to start your snack-making adventure!
Why You Should Make Your Own Snacks
Buying snacks at the store can be very expensive. Often, those bars have a lot of sugar and things you cannot pronounce. When you make them at home, you are the boss of what goes inside. You can pick the best oats and the yummiest honey. It makes me feel good to know exactly what my family is eating every day. Plus, it is a fun way to spend a Saturday morning.
I used to buy big boxes of bars every week. Then I looked at the price and realized I could make three times as many for the same cost. My kids also like to help me press the mixture into the pan. It is like a science project that you can eat! This recipe is very forgiving, so do not worry if you make a small mistake. Most of the time, it still turns out delicious.
The Best Ingredients for Success

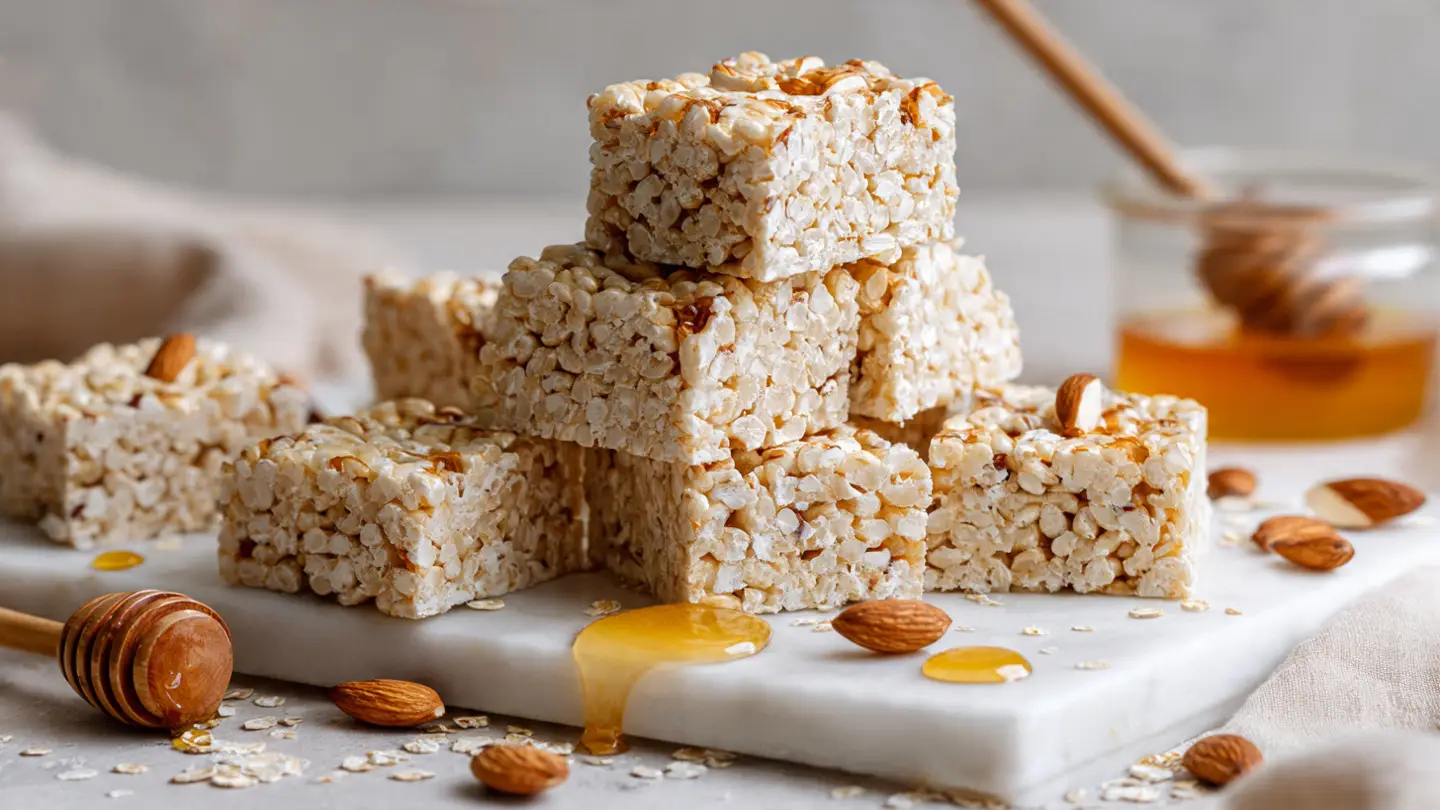
Choosing the right ingredients is the first step to a great snack. For this recipe, you need rolled oats. Do not use the instant kind because they are too thin and will turn into mush. Rolled oats give the bars a nice chew and keep them sturdy. You also need a binder, which is the glue that holds everything together. I usually use honey or maple syrup for this part.
Fat is also important so the bars are not too dry. Peanut butter or almond butter works great here. If you have a nut allergy, you can use sunflower seed butter instead. Add some fun things like chocolate chips, dried cranberries, or sunflower seeds for extra flavor. Make sure your ingredients are fresh so the bars taste their best. IMO, the chocolate chips are the most important part!
Supplies You Will Need

You do not need fancy machines to make these bars. A large mixing bowl is a must for stirring everything together. You will also need a small pot or a microwave-safe bowl to melt the honey and nut butter. A square baking pan is the perfect size for these bars. I like using an 8-inch by 8-inch pan because it makes the bars nice and thick.
One tool I always recommend is parchment paper. This is a special paper that stops food from sticking to the pan. If you do not use it, you might have a hard time getting the bars out. I once forgot the paper and had to eat the granola with a spoon because it was stuck to the bottom! A flat spatula is also helpful for pressing the mixture down firmly. This ensures the bars do not crumble when you cut them.
Recipe Quick Info
- Prep Time: 15 minutes
- Cook Time: 5 minutes (stovetop only)
- Servings: 12 bars
- Difficulty: Very Easy
Gather Your Ingredients List

Here is what you need to get from your cupboard. Having everything ready before you start makes the process much smoother. This is a “no-bake” style recipe, so most of the work happens on the counter. Make sure your measuring cups are clean and ready to go.
- 2 cups of old-fashioned rolled oats
- 1/2 cup of creamy peanut butter (or your favorite nut butter)
- 1/3 cup of honey or maple syrup
- 1/2 cup of mix-ins (chocolate chips, nuts, or dried fruit)
- 1/2 teaspoon of vanilla extract
- A tiny pinch of salt
How to Prepare the Mixture

First, put your oats and your dry mix-ins into the big bowl. Stir them around so they are well mixed. In your small pot, put the honey and the peanut butter. Turn the heat to low and stir them together. You only want to warm them up until they look like a smooth liquid. Do not let it boil, or the honey might get too hard later.
Once the liquid is smooth, take it off the heat and stir in the vanilla and salt. Pour this warm, sticky liquid over your oats. Use your big spoon to mix it all up. You want every single oat to be covered in the sticky glue. If you see any dry white spots, keep stirring. It takes a little bit of muscle, but it is worth it for a perfect bar.
Pressing the Bars into the Pan

This is the most important step in the whole recipe. If you do not press hard enough, your bars will fall apart into granola. Line your pan with parchment paper so some hangs over the sides. This makes it easy to lift the whole block out later. Dump the sticky oat mixture into the pan and spread it out to the corners.
Now, take a flat spatula or even the bottom of a heavy glass. Press down as hard as you can. You want to pack those oats together very tightly. I usually spend about two minutes just pressing. FYI, if the mixture is sticking to your hands, wet your fingers with a little water. This stops the sticking and lets you get a nice flat surface. When you are done, the top should look smooth and even.
Chilling and Cutting Your Snacks

Now you have to be patient. Put the pan in the fridge for at least two hours. Overnight is even better. The cold helps the honey and peanut butter get firm again. If you try to cut them while they are warm, you will just have a big mess. It is hard to wait, but the result is a perfect, chewy snack that holds its shape.
Once they are cold, lift the parchment paper out of the pan. Place the big square of granola on a cutting board. Use a sharp knife to cut them into rectangles. I usually get 12 bars out of one pan, but you can make them smaller or bigger. Store them in a container in the fridge so they stay firm. If they sit out on a hot day, they might get a little soft again.
Pro Snack Tips
- Hard Press: Use the bottom of a measuring cup to press the bars down. It works better than a spoon.
- Chocolate Tip: If you want the chocolate chips to stay whole, let the mixture cool for five minutes before adding them.
- Salt Power: A tiny bit of salt makes the honey taste even sweeter.
Fun Ways to Change the Flavor

You do not have to stick to just one flavor. I love to try new combinations every week. If you like tropical flavors, try using dried pineapple and shredded coconut. If you want something crunchy, add chopped walnuts or pecans. You can even use different kinds of nut butter to change the base taste.
Another fun idea is to drizzle melted chocolate over the top after you cut them. This makes them feel like a fancy dessert from a bakery. Just remember to keep the total amount of “extra” stuff to about half a cup. If you add too many heavy things, the sticky glue won’t be able to hold it all together. This recipe is your canvas, so feel free to get creative with whatever you find in your kitchen!
Serving and Storage Ideas

These bars are perfect for busy mornings. I often wrap them in small pieces of wax paper so I can grab one on my way out the door. They also fit perfectly in school lunch boxes. Because they have healthy fats and fiber, they keep you full for a long time. It is a much better choice than a bag of chips or a sugary cookie.
Keep your bars in an airtight container in the fridge for up to two weeks. You can also freeze them! I put mine in a freezer bag with a piece of paper between each layer so they do not stick. They stay fresh in the freezer for about three months. Just take one out and let it sit for ten minutes before you eat it. It is a great way to always have a healthy snack ready to go.
Common Questions About Granola Bars
Why are my granola bars falling apart?
This usually happens if you did not press the mixture into the pan hard enough or if there was not enough honey. Try pressing harder next time and chill them longer.
Can I use quick oats instead of rolled oats?
I do not recommend it. Quick oats are too soft and will make the bars mushy. Rolled oats give the best texture and stay firm.
Can I make these without peanut butter?
Yes! You can use almond butter, cashew butter, or sunflower seed butter. Just make sure the butter you use is creamy and easy to stir.
Are these granola bars gluten-free?
They can be! Just make sure to buy oats that are labeled as gluten-free. Oats are naturally gluten-free but are sometimes processed near wheat.
How long do these bars last in the fridge?
They will stay fresh and tasty for about two weeks if you keep them in a sealed container in the refrigerator.
Happy Snacking Everyone
Making your own granola bars is a smart and tasty choice for any home cook. You save money and get to eat exactly what you like. Remember to press the mixture down firmly and let it chill before you cut. I hope you enjoy these treats as much as I do!