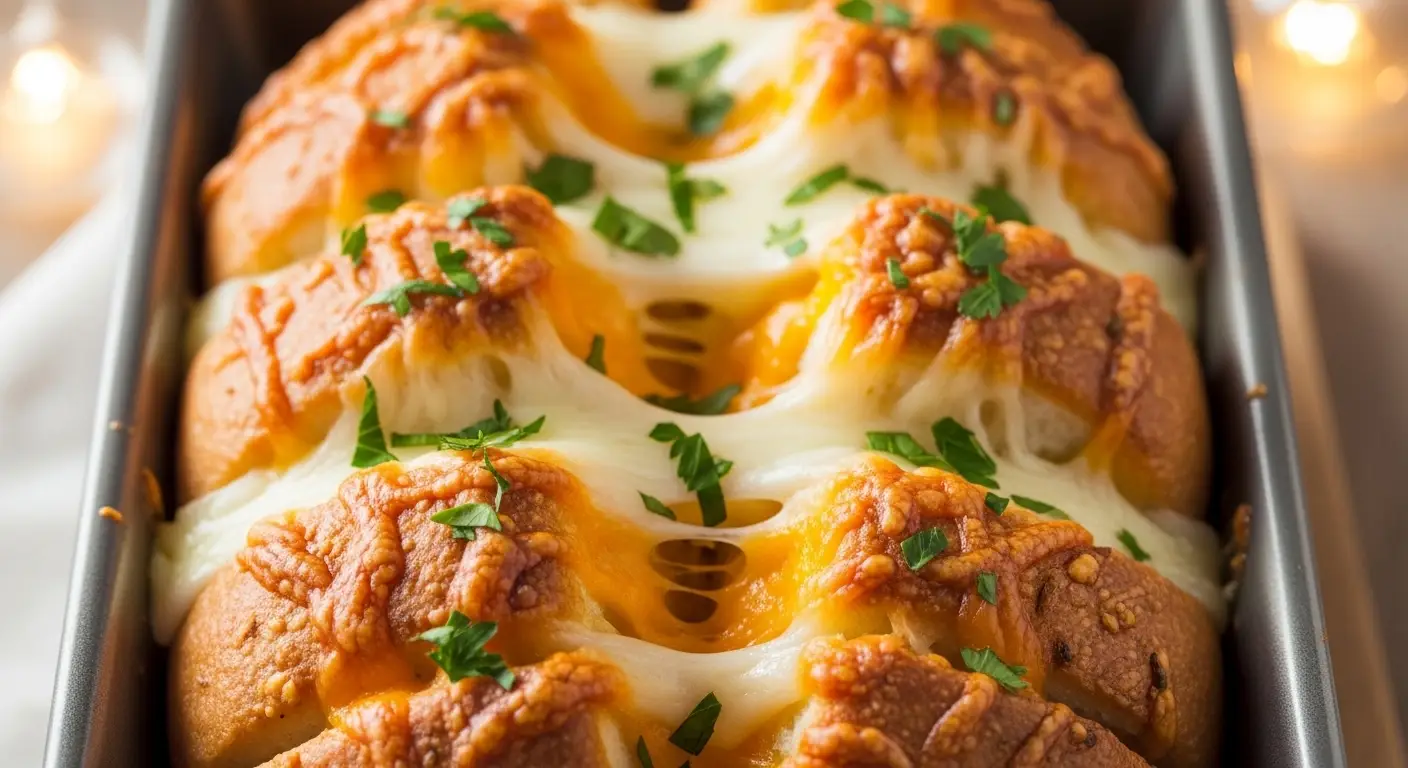
Cheesy Garlic Pull Apart Bread
I love bread more than almost any other food. There is something so special about the smell of garlic and butter heating up in the oven. My house always smells like a fancy Italian restaurant when I make this recipe. It is the kind of food that makes everyone run to the kitchen before it is even done. This bread is soft, salty, and has long strings of melted cheese that stretch when you pull a piece off.
Today, I am going to show you how to make the perfect cheesy garlic pull apart bread from scratch. You do not need to be a professional baker to get this right. I will guide you through every single step, from mixing the dough to the final bake. We will talk about which cheeses melt the best and how to get that golden brown crust on top. By the end of this page, you will be ready to bake a loaf that your friends and family will talk about for weeks.
Are you ready to make the best snack ever?
The Joy of Making Homemade Bread
Making bread at home used to scare me. I thought I would mess up the yeast or the dough would not rise. One time, I used water that was way too hot and I killed the yeast. The bread stayed flat like a pancake! It was a sad day for my dinner. But I learned that if you follow the steps and stay patient, it is actually quite easy. Now, I find it very relaxing to switch off my phone and just work with the dough.
This pull apart bread is different from a normal loaf. Instead of slicing it with a knife, you use your hands to grab chunks. This makes it a great food for parties or big family dinners. It is messy in the best way possible. People love the interaction of pulling it apart. Plus, every single nook and cranny gets filled with garlic butter and cheese. You never get a dry bite with this method. It is pure comfort food that brings people together around the table.
The Simple Ingredients You Need

To start, you need basic things from your pantry. You will need all-purpose flour, which gives the bread a nice chew. You also need active dry yeast to make the bread rise. For the liquid, I use warm milk instead of water. Milk makes the bread much softer and richer. You will also need a little bit of sugar. The sugar does not make the bread sweet, but it helps the yeast wake up and start working. It is like a little snack for the yeast so it can blow bubbles into your dough.
For the filling, butter is the star of the show. I always use salted butter because it adds more flavor. Then comes the garlic. I like to use a lot of fresh garlic cloves. Please do not use the garlic powder for this part if you can help it. Fresh garlic has a spicy kick that tastes much better once it bakes. Finally, you need cheese. I usually go for mozzarella because it stretches so well. Sometimes I add a bit of cheddar or parmesan for a sharper taste. A little bit of dried parsley adds a nice green color to the top too.
How to Mix and Knead the Dough

Mixing the dough is the first big step. You start by putting the warm milk, sugar, and yeast in a bowl. Let it sit for about five minutes. You will know it is ready when it looks foamy on top. If it does not foam, your yeast might be old or the milk was too hot. Once it is bubbly, stir in the flour and a pinch of salt. You can use a big spoon until it gets too heavy to stir. Then, it is time to use your hands. This is my favorite part because the dough feels warm and soft.
Kneading is just a fancy word for folding and pushing the dough. You do this to build strength in the bread so it can hold its shape. I do this on a clean counter with a little bit of flour so it does not stick. Push the dough away from you with the palms of your hands, fold it back, and turn it. Do this for about eight to ten minutes. Your arms might get a little tired, but think of it as a workout before you eat all that cheese! You want the dough to feel smooth and springy. If you poke it, it should bounce back slowly.
Letting the Dough Rise and Grow

After all that hard work kneading, the dough needs a nap. I put it in a bowl that has been greased with a tiny bit of oil. This stops the dough from sticking to the sides as it grows. Cover the bowl with a clean cloth or some plastic wrap. Now, you just have to wait. The dough needs to double in size. This usually takes about an hour depending on how warm your house is. If your kitchen is cold, it might take longer. I usually put mine near a window where the sun is shining.
Waiting is the hardest part. I usually use this time to clean up the flour mess I made on the counter. While the dough is rising, it is building flavor. If you rush this part, your bread will be dense and heavy. You want it to be full of air so it stays light. Once it has grown big and puffy, you can move on to the fun part. It is so satisfying to see how much a little bit of yeast can change a small ball of dough into a giant fluffy cloud. It feels like magic every single time I do it.
Recipe Quick Info
- Prep Time: 20 minutes
- Rise Time: 90 minutes
- Cook Time: 25 minutes
- Servings: 8 people
- Difficulty: Medium
Step By Step Instructions for Assembly

- First, punch the air out of your risen dough. It sounds mean, but it is necessary!
- Roll the dough out into a big rectangle on your counter. Use a rolling pin if you have one.
- Melt your butter and mix it with minced garlic and parsley. Brush this all over the dough.
- Sprinkle your shredded cheese evenly over the butter layer. Make sure to get it all the way to the edges.
- Use a knife or a pizza cutter to cut the dough into small squares, about the size of a sticky note.
- Stack the squares on top of each other in little piles.
- Turn your loaf pan on its side and slide the stacks in. This makes the layers stand up.
- Let the loaf rise for another 30 minutes in the pan before you put it in the oven.
The second rise is very important. It lets the dough pieces stick together just enough but stay separate so you can pull them apart later. I found that if I skip this, the bread comes out a bit tough. IMO, the extra 30 minutes makes a huge difference in how soft the bread feels. Just be careful when you are stacking the squares. If you drop a stack, it is fine! Just pick it up and keep going. It does not have to look perfect. The cheese will melt and hide any mistakes you make.
Baking to Golden Perfection

Preheat your oven to 375 degrees. When the bread goes in, the smell will fill your whole house. It is the best air freshener in the world. I usually bake it for about 25 to 30 minutes. You are looking for a deep golden brown color on the top. If the top gets brown too fast, you can put a piece of tin foil over it. This lets the middle finish cooking without burning the top. I learned this the hard way after my first loaf was raw in the center but black on the top!
When you take it out, let it sit in the pan for five minutes. This helps the cheese set slightly so it doesn’t just slide off when you move it. But do not wait too long! You want to eat this while it is warm. The butter should be soaking into the bottom of the bread, making it almost crispy like a fried piece of toast. I like to brush a little more garlic butter on the very top right when it comes out. It gives it a nice shine and an extra punch of flavor that is hard to beat.
Best Tips and Variations to Try

You can change this recipe in so many ways. If you like heat, add some chopped jalapeños between the layers. The spicy pepper goes great with the creamy cheese. For meat lovers, you can add cooked bacon bits or small pieces of pepperoni. It makes the bread taste like a pizza. I have even tried adding a little bit of pesto sauce instead of plain butter. It gives the bread a bright green color and a very fresh basil taste. Just be careful not to add too much wet filling or the dough will get soggy.
Another tip is about the cheese. I like a mix of mozzarella and sharp cheddar. The mozzarella gives you the cool cheese pull that looks great in photos. The cheddar gives you the salty, tangy flavor that everyone loves. If you want a more fancy version, use some gruyere or fontina cheese. They melt beautifully and feel a bit more grown-up. Also, make sure your garlic is fresh. FYI, the pre-minced garlic in the jar can sometimes taste a bit sour when it bakes at high heat. Fresh is always best for this bread.
Pro Tips for Success
- Don’t Kill Yeast: Make sure your milk is warm like baby bath water, not hot.
- Room Temp Butter: Soft butter is easier to mix with the garlic and herbs.
- Flour Your Surface: Keep a little extra flour nearby so your dough doesn’t stick to the counter.
What to Serve With Your Bread

This bread is a meal all by itself if you ask me. But usually, I serve it as a side dish. It is amazing with a big bowl of spaghetti and red sauce. You can use the bread to scoop up all the extra sauce on your plate. It also goes perfectly with a hot bowl of tomato soup on a cold day. Dunking a cheesy piece of bread into soup is one of the best feelings. My kids love it when I make this for a movie night. We just put the whole loaf in the middle of the table and everyone digs in.
If you want to keep it simple, just serve it with a small bowl of marinara sauce for dipping. You can also make a quick ranch dip or a balsamic vinegar and oil mix. A fresh green salad on the side helps cut through all that rich butter and cheese. It makes the meal feel a bit more balanced. No matter what you serve it with, make sure you have plenty of napkins. This bread is finger food, and your hands will definitely get buttery. That is half the fun of eating it!
How to Store and Reheat Leftovers

If you actually have leftovers, you need to store them right. This bread is best on the first day, but it still tastes good later. Put any extra pieces in an airtight container or a zip-top bag. Keep it in the fridge for up to three days. Do not leave it on the counter because the cheese and butter might go bad. You can also freeze this bread! Wrap it tightly in foil and then put it in a freezer bag. It will stay good for about a month. This is great for when you want a quick snack later on.
To reheat it, do not use the microwave if you can help it. The microwave makes bread chewy and tough like rubber. Instead, use your oven or a toaster oven. Wrap the bread in foil and bake it at 350 degrees for about ten minutes. This makes the cheese melty again and keeps the crust crispy. If you are in a big hurry, the microwave works for 15 seconds, but it won’t be as good. I usually just put a piece in the air fryer for a few minutes. It comes out tasting almost as fresh as the day I made it.
Common Questions About Garlic Bread
I know you might have some questions before you start. Baking can be tricky if you are new to it. Here are some of the things people often ask me about this recipe. I want you to feel totally ready to jump in and start cooking. Remember, even if it doesn’t look like a picture in a book, it will still taste amazing because of the garlic and butter!
Can I use store-bought pizza dough?
Yes! It saves time. Just follow the assembly steps using the pre-made dough instead of making your own. It works great.
Why didn’t my bread rise?
Your yeast might be old, or your milk was too hot. Yeast is alive and needs the right temperature to grow properly.
Can I make this without a loaf pan?
You can! You can shape the dough pieces into small balls and put them in a round cake pan or a pie dish instead.
Is there a vegan version of this?
Yes. Use plant-based milk, vegan butter, and your favorite vegan cheese shreds. It still tastes delicious with the garlic.
What is the best cheese for the pull-apart effect?
Low-moisture mozzarella cheese is the best. It melts smoothly and gives those long, stretchy strings everyone loves.
Time to Get Baking
Now you know all my secrets for making the best cheesy garlic pull apart bread. It is a simple recipe that feels very special when you bring it to the table. Just take your time with the dough and do not be afraid to get your hands messy. The reward is a warm, buttery loaf of bread that everyone will love. I hope you enjoy every single cheesy bite of your homemade creation!