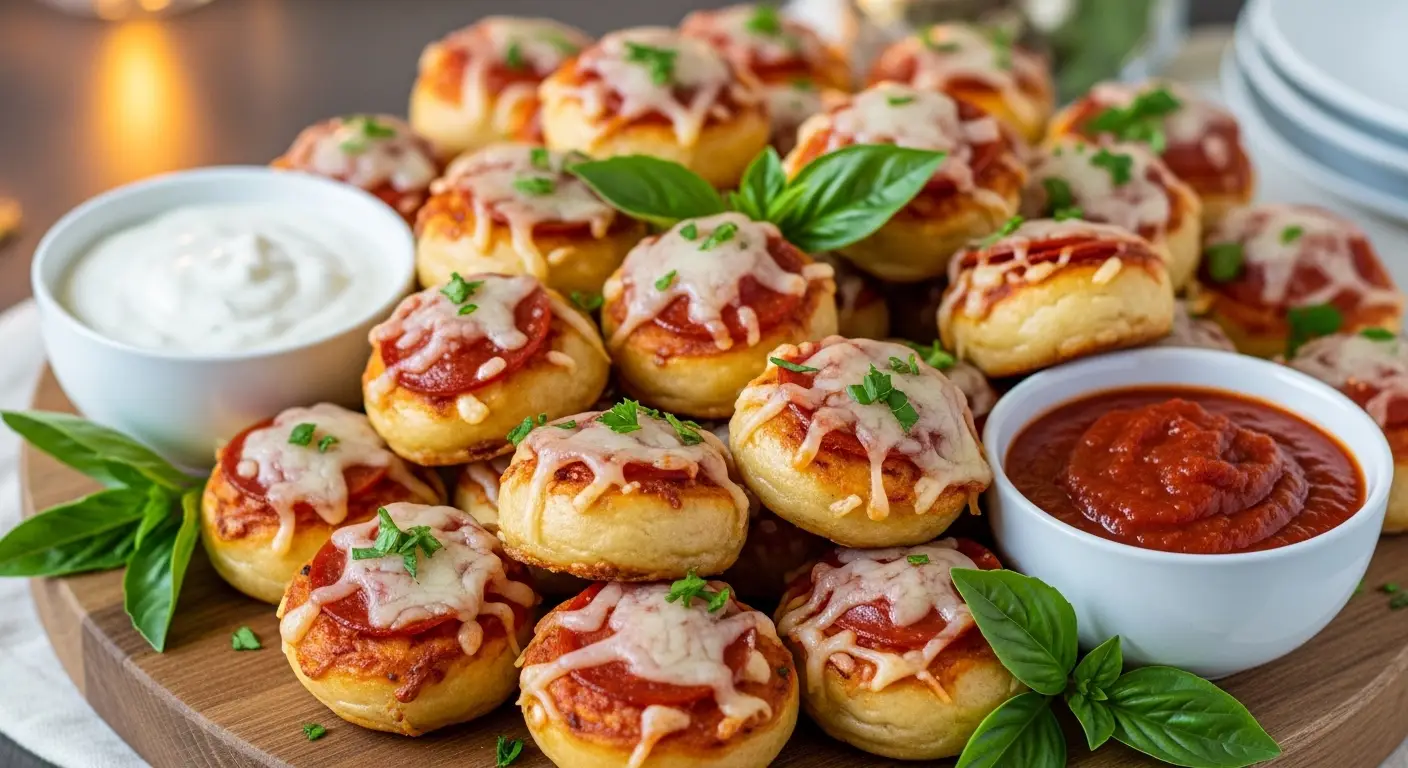
Homemade Bagel Bites
Everyone loves a good snack that reminds them of being a kid. For me, that snack was always those tiny frozen pizzas on bread. I remember burning my tongue because I could not wait for them to cool down. They were crunchy, salty, and perfect for a movie night. But as I got older, I realized the store-bought ones sometimes taste like cardboard. I wanted something better that used real food from my kitchen.
Making your own snacks at home is a great way to save money. You also get to pick exactly what goes on top of your food. If you want extra cheese, you can add it. If you hate peppers, you can leave them off. This recipe will show you how to turn mini bagels into the best bite-sized pizzas you have ever had. It is easy enough for kids to help with too!
By the end of this guide, you will know how to prep, bake, and store these tasty treats. They are perfect for parties, after-school snacks, or just a lazy Saturday lunch. Let us get started on making these crunchy little circles of joy. I promise they taste way better than anything from a box in the freezer aisle.
Would you like to see the full list of what you need?
Everything You Need for Your Pizza Bites
Before we start cooking, we need to gather all our supplies. Using fresh ingredients makes a huge difference in how these turn out. I used to think any old cheese would work, but I learned that high-quality mozzarella melts so much better. You want that long, stretchy cheese pull when you take a bite. It makes the whole experience feel more special and delicious.
The base of this snack is the mini bagel. You can find these in the bread aisle at most grocery stores. I usually get the plain ones so the pizza flavors can really shine. If you can only find full-sized bagels, you can use those too, but you will need to cut them into smaller pieces. These tiny bagels are just the right size for a two-bite snack. They hold up well under the heavy sauce and cheese without getting soggy.
The Simple Ingredient List

To make these at home, you only need a few basic things. Most of these are likely already in your fridge or pantry. I like to keep these items on hand just in case I get a sudden craving for something savory. Here is exactly what you should grab from the store.
- 6 mini bagels (plain works best)
- 1/2 cup of your favorite pizza sauce
- 1 cup of shredded mozzarella cheese
- 1/4 cup of mini pepperoni slices
- 1/2 teaspoon of dried oregano
- 1/4 teaspoon of garlic powder
- Optional: Fresh parsley for a green garnish
The Right Tools for the Job

You do not need fancy machines to make this recipe. A simple baking sheet is the main tool you will use. I always line my pan with parchment paper. This is a pro tip because it stops the cheese from sticking to the metal. It also makes cleaning up much faster since you just toss the paper away when you are done.
A serrated knife is also very helpful for cutting the bagels. Bagels can be tough on the outside, and a smooth knife might slip. A bumpy edge grips the crust and cuts through cleanly. You will also need a small spoon. This helps you spread the sauce evenly without making a giant mess on your counter. Staying organized makes the whole process more fun and less stressful.
Recipe Quick Info
- Prep Time: 10 minutes
- Cook Time: 12 minutes
- Servings: 12 pizza bites
- Difficulty: Very Easy
How to Build the Perfect Bagel Bite
Now comes the fun part where we actually build our snacks. This is where you can get creative and involve your family. I once tried to make these with way too much sauce, and they turned into a soggy mess. It was a big mistake! I learned that a little bit of sauce goes a long way. You want just enough to cover the bread but not so much that it leaks everywhere.
The order of the toppings matters more than you might think. If you put the pepperoni under the cheese, it stays soft. If you put it on top, the edges get crispy and delicious in the oven. I prefer the crispy edges myself. Making sure each bagel half gets an even amount of cheese ensures that every bite is just as good as the last one. Follow these steps for the best results every time.
Step-by-Step Cooking Guide

First, turn your oven on to 400 degrees. While that heats up, slice your mini bagels in half so you have 12 small circles. Lay them out on your lined baking sheet with the cut side facing up. I like to toast them for just two minutes before adding toppings. This creates a barrier so the sauce does not soak into the bread too quickly.
- Spread about one teaspoon of sauce onto each bagel half.
- Sprinkle a pinch of garlic powder and oregano over the sauce.
- Add a generous pile of mozzarella cheese to each one.
- Place 3 to 4 mini pepperoni slices on top of the cheese.
- Bake in the oven for 10 to 12 minutes until the cheese is bubbly and brown.
Tips for the Best Texture

If you like a very crunchy snack, move your oven rack to the top position. The heat is stronger up there, which helps brown the cheese. I also suggest checking them at the 8-minute mark. Every oven is a little different, and you do not want your hard work to burn. A golden brown color is what you are looking for.
One trick most people skip is letting them sit for a minute after they come out. I know it is hard to wait! But letting the cheese set for sixty seconds prevents it from sliding off the bagel when you take your first bite. It also saves the roof of your mouth from getting burned. Patience is a virtue, even when it comes to pizza snacks. FYI, the smell in your kitchen will be amazing while you wait.
Fun Variations to Try

You do not have to stick to pepperoni if you want something different. Sometimes I use bits of cooked sausage or even small pieces of pineapple. For a veggie version, finely chopped bell peppers and onions work great. Just make sure the pieces are very small so they cook at the same rate as the bagel. If the toppings are too big, they might fall off.
Another idea is to change the sauce. You could use BBQ sauce and chicken for a different flavor profile. Or use a white garlic sauce for a cheesy garlic bread vibe. IMO, the classic red sauce is the best, but it is fun to mix it up once in a while. This recipe is like a blank canvas for your favorite pizza toppings. Just don’t overload them or they will get heavy.
Pro Level Snack Tips
- Pre-Toasting: Always toast the bagels for 2 minutes before saucing to keep them crisp.
- Fresh Grating: Grate your own cheese from a block for a better melt than pre-shredded bags.
- Spice it up: Add a tiny pinch of red pepper flakes if you like a little heat.
Serving and Storing Your Snacks
Once your bagel bites are done, you need a plan for serving them. They look great on a big wooden board or a colorful plate. I usually serve them with a side of extra pizza sauce or ranch dressing for dipping. It adds another layer of flavor that people really love. These are best served warm, but they are still pretty good at room temperature if you are at a party.
If you happen to have leftovers, do not worry. They store quite well if you handle them right. I have tried keeping them in a bowl, but they got soft. The best way is to keep them flat so the toppings do not get smashed. You can even freeze these yourself just like the ones you buy at the store. It is a great way to meal prep snacks for the week ahead.
How to Store and Reheat

To store your leftovers, let them cool completely first. Put them in an airtight container in the fridge for up to three days. If you want to freeze them, lay them on a tray in the freezer for an hour. Once they are frozen solid, you can toss them into a freezer bag. This prevents them from sticking together in one big frozen clump.
When you want to eat them again, avoid the microwave if you can. The microwave makes the bread chewy and soft. Instead, put them back in the toaster oven or the big oven at 350 degrees. They only need about five minutes to get hot and crunchy again. This makes them taste almost as fresh as the day you made them. It is a total game-changer for snack time.
Best Ways to Serve

These little pizzas are a hit at any gathering. I like to put them out during football games or birthday parties. Because they are small, people can grab one or two without needing a full plate and fork. This makes them a very clean and easy party food. You can even put toothpicks in them to make them even easier to pick up.
For a complete meal, I sometimes serve these alongside a big green salad. The cold, crisp veggies balance out the warm, cheesy bread perfectly. It makes a simple snack feel like a real dinner. My kids love it when I make a “pizza bar” where they can choose their own toppings before I put them in the oven. It is a fun activity that ends with a yummy reward.
Common Questions About Bagel Bites
Can I use regular sized bagels?
Yes, but you should cut them into quarters. This keeps them bite-sized. Large bagels take a bit longer to get crunchy, so watch the timer closely.
Why are my bagel bites soggy?
You might be using too much sauce. Use just one teaspoon per bagel. Also, try pre-toasting the bagels for 2 minutes before adding the sauce to create a crust.
Can I make these in an air fryer?
Absolutely! Cook them at 375 degrees for about 5 to 7 minutes. They get very crispy in the air fryer. Just make sure they don’t blow around.
Is it cheaper to make these or buy them?
It is usually cheaper to make them at home. A bag of bagels and a block of cheese costs less than several boxes of the frozen kind, plus they taste better.
The Final Toast
Making your own bagel bites is a fast and fun way to enjoy a classic snack. You get better ingredients and a much better crunch than the frozen version. I hope you enjoy making these as much as I do. Now go enjoy your cheesy creation!