Best Ever Homemade Raspberry Fruit Leather
I love snacks that taste like candy but are actually good for you. Raspberry fruit leather is one of those magic treats that kids and adults both crave. It is chewy, tart, and sweet all at the same time. Many store-bought fruit snacks have a lot of corn syrup and red dye, which I try to avoid when I can. Making it at home lets you control exactly what goes inside, and the flavor is much more intense.
Today, I am going to show you how to turn fresh or frozen berries into thin, stretchy sheets of pure fruit joy. You do not need a fancy machine to do this. Your regular kitchen oven works just fine as long as you have a little bit of patience. By the time you finish reading, you will know the secret to getting that perfect texture every single time without it being too sticky or too brittle.
Ready to turn your kitchen into a healthy snack factory? Let’s get started on this berry adventure!
Why Homemade Fruit Snacks Are Better
When I first tried making fruit leather, I was worried it would be too hard. I thought I might need special tools or expensive ingredients. It turns out that all you really need are berries and a tiny bit of sweetener. The heat from the oven slowly dries out the moisture, leaving behind the natural fibers and sugars. This process concentrates the raspberry flavor so it tastes like a giant burst of summer in every bite.
One thing I learned the hard way is that raspberries have a lot of tiny seeds. If you leave them in, the fruit leather feels a bit crunchy and stuck in your teeth. Taking the time to strain the seeds makes a huge difference in how professional the final snack feels. It is a simple step that makes the snack much more enjoyable for little kids who might be picky about textures. Plus, homemade snacks are much cheaper than the small boxes you buy at the grocery store.
The Short List of Ingredients

You only need two main things to make this recipe work. The star of the show is the raspberry. You can use fresh berries if they are in season and sweet. If it is winter, frozen raspberries are actually a great choice because they are picked at their peak and usually cost less. You will need about three or four cups of berries to make one large tray of fruit leather. It seems like a lot, but they shrink down significantly once the water evaporates.
The second ingredient is a sweetener like honey or maple syrup. Even though raspberries are sweet, they have a natural tartness that gets stronger when dried. Adding a tablespoon or two of honey helps balance that sour kick. I also like to add a tiny squeeze of lemon juice. The acid in the lemon keeps the color bright red so it does not turn a dull brownish color in the oven. IMO, the lemon juice is the secret to making it look as good as it tastes.
Essential Kitchen Tools You Need

To get started, you will need a blender or a food processor. This is what turns the solid berries into a smooth liquid. If you do not have a blender, you could mash them by hand, but it will take a long time and won’t be as smooth. After blending, you need a fine-mesh strainer. This is the tool that catches all those pesky seeds I mentioned earlier. Pressing the puree through the mesh with the back of a spoon is the best way to get every drop of juice out.
You also need a baking sheet with a rim. The rim is important because it keeps the liquid from spilling off the sides and making a mess in your oven. To prevent the fruit from sticking, I highly recommend a silicone baking mat. It is much easier to peel the leather off a silicone mat than parchment paper. If you use parchment paper, make sure it is high quality, or you might end up peeling tiny bits of paper off your snack, which is not fun at all!
Preparing the Raspberry Puree

First, put your raspberries in the blender. If you are using frozen berries, let them thaw out first so they blend easily. Add your honey and lemon juice right into the blender. Turn it on high until the mix looks like a smooth soup. Give it a taste! If it is way too sour, add another teaspoon of honey. Remember that the flavor will get stronger as it dries, so do not make it too sweet right now.
Next, set your strainer over a clean bowl. Pour the mix into the strainer. Use a spoon to push the puree through the holes. You will be left with a pile of yellow seeds in the strainer and a beautiful, thick red liquid in the bowl. Throw the seeds away or save them for a smoothie if you don’t mind the crunch. Now you have the perfect base for your fruit leather. It should be thick enough to coat the back of your spoon but thin enough to pour.
Recipe Quick Info
- Prep Time: 15 minutes
- Cook Time: 4-6 hours
- Servings: 10 rolls
- Difficulty: Easy
Spreading the Mixture Correcty

This is the most important part of the whole process. Pour the puree onto your lined baking sheet. Use a spatula or the back of a large spoon to spread it out into a rectangle. You want the layer to be about 1/8 of an inch thick. If it is too thin, it will turn into a crisp cracker. If it is too thick, the middle will stay wet while the edges burn. I try to make the edges just a tiny bit thicker than the center because the edges always dry out first.
Gently tilt the pan from side to side to help the liquid level out. Try to get it as even as possible. If you see any air bubbles, pop them with a toothpick or give the pan a firm tap on the counter. A smooth surface ensures that the heat hits everything equally. Once it looks like a perfect red mirror, it is ready for the heat. Just make sure your oven is preheated to its lowest setting, usually around 140 to 170 degrees Fahrenheit.
The Slow Baking Process

Fruit leather does not really cook; it dehydrates. This means we are just removing the water. Put the pan in the oven on the middle rack. Now, you wait. This usually takes between four and six hours. I know that sounds like a long time, but you don’t have to do anything while it sits there. Check it after four hours. Touch the center with your finger. If it feels sticky and leaves a mark, it needs more time. If it feels tacky but doesn’t stick to your skin, it is almost done.
One mistake I made once was turning the oven up to 300 degrees to try and finish faster. Do not do this! The high heat will cook the sugars and turn the fruit brown and bitter. Low and slow is the only way to go. If your oven has a convection or fan setting, turn it on. The moving air helps the moisture escape faster. You want the leather to look matte, not shiny, when it is finished. It should peel away from the mat in one big, beautiful piece without tearing.
Cutting and Storing the Leather

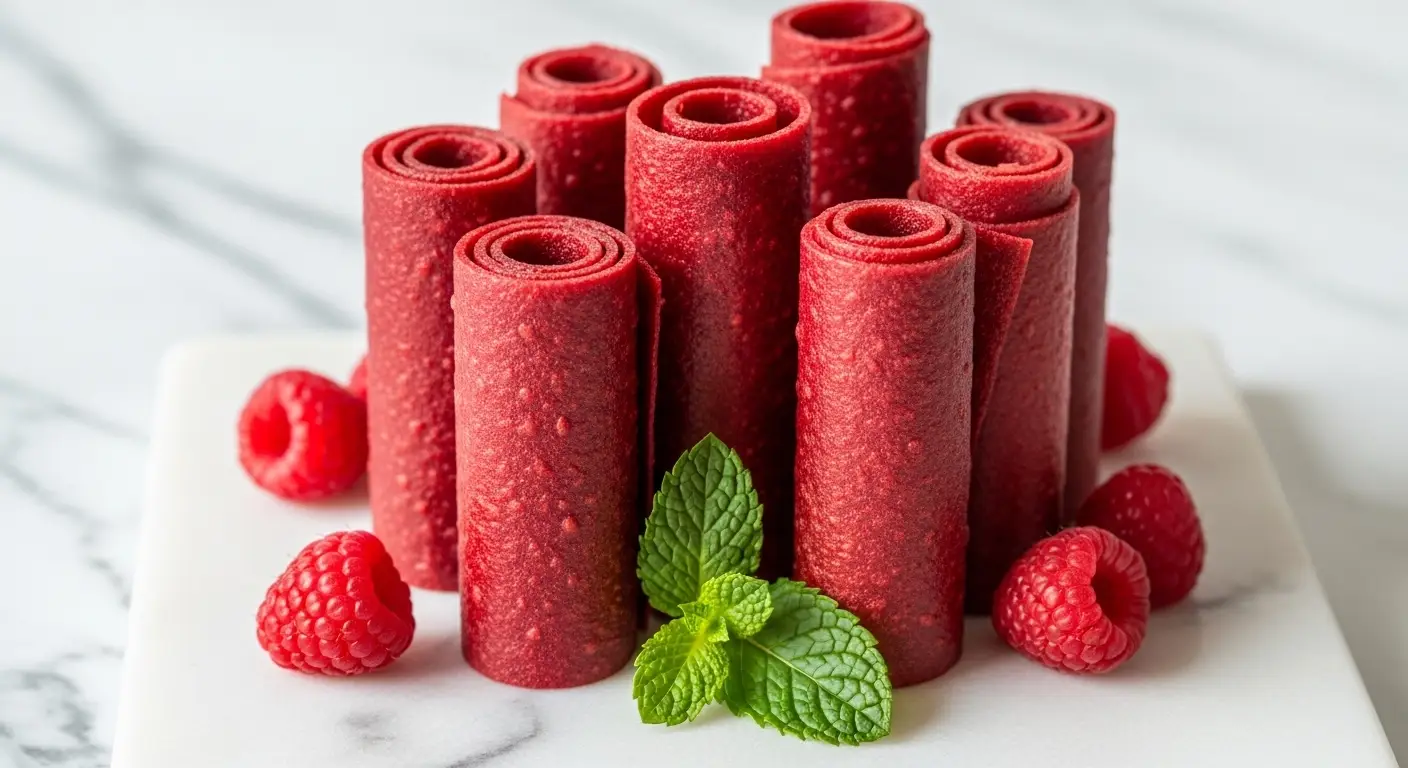
Once you take the pan out of the oven, let it cool down completely. It will firm up more as it reaches room temperature. When it is cool, peel the whole sheet off the silicone mat. I like to lay the sheet of fruit on a piece of parchment paper that is slightly bigger than the fruit. This makes it easy to handle and keeps it from sticking to itself once you roll it up. Use kitchen scissors or a pizza cutter to slice the sheet into long strips about two inches wide.
Roll each strip up tightly. The parchment paper will be on the outside of the fruit, making it look like the fruit roll-ups you see at the store. You can use a little piece of tape or a string to keep them closed, but usually, they stay rolled on their own. Put the rolls in an airtight container or a plastic zip bag. They will stay fresh at room temperature for about two weeks, or in the fridge for a month. FYI, they rarely last that long in my house because they are so snackable!
Pro Drying Tips
- Test for Doneness: The leather should peel back easily without leaving any wet residue on the mat.
- Avoid Over-drying: If the edges get brittle, you can trim them off and eat them as “fruit chips.”
- Airflow: Prop the oven door open slightly with a wooden spoon if your oven doesn’t go below 170 degrees.
Fun Flavor Variations to Try

Once you master the basic raspberry recipe, you can start mixing things up. I love adding a little bit of vanilla extract to the blender for a “berries and cream” flavor. You can also mix raspberries with other fruits. A raspberry and banana blend is very creamy and sweet. If you like things a little spicy, a tiny pinch of ginger powder adds a nice zing that wakes up your taste buds. This recipe is very flexible, so do not be afraid to experiment with whatever fruit is sitting in your kitchen.
Another great idea is to sprinkle some chia seeds or hemp hearts on top before you put the tray in the oven. This adds a little bit of crunch and extra nutrition. Just keep in mind that adding watery fruits like watermelon will make the drying time much longer. Stick to fleshy fruits like peaches, berries, or apples for the best results. If the mix feels too runny after blending, you can simmer it in a pot for ten minutes to thicken it up before spreading it on the tray. This helps speed up the oven time too!
Ways to Serve and Enjoy

These fruit rolls are the perfect addition to a school lunchbox. They don’t get smashed like fresh berries do, and they provide a nice energy boost in the middle of the day. I also love taking them on hikes or long car trips. They are lightweight and don’t need to be kept cold. Sometimes I even chop them up into small bits and stir them into plain yogurt or oatmeal. It adds a concentrated pop of fruit flavor and a chewy texture that is much better than plain raisins.
If you are feeling fancy, you can use small cookie cutters to cut shapes out of the flat sheet before you roll it. Hearts, stars, or little animals make these even more fun for kids. This snack also works well on a charcuterie board. The tartness of the raspberry goes really well with soft cheeses like brie or goat cheese. It is a sophisticated way to use a simple snack. No matter how you eat them, you will feel good knowing exactly what went into making them. It is a win-win for everyone!
Frequently Asked Questions
Can I make this without a blender?
You can mash the berries with a fork or potato masher, but the texture will be chunky. A blender is much better for a smooth, flexible leather that does not tear easily.
Why did my fruit leather turn out crunchy?
It stayed in the oven too long or the temperature was too high. If it is brittle, you can still eat it like a chip, or grind it up to use as a sweet fruit powder topping.
Do I have to use a silicone mat?
A silicone mat is best because it is non-stick. You can use parchment paper, but you must be careful. Never use wax paper or foil, as the fruit will stick and be impossible to remove.
How do I know when it is done?
Touch the center of the sheet. It should feel firm and not sticky. If your finger leaves an indent or comes away wet, it needs more time. It should peel up in one piece.
Can I use sugar instead of honey?
Yes, but make sure the sugar dissolves completely in the puree. Liquid sweeteners like honey or agave work better because they help keep the leather flexible and soft after drying.
Start Your Healthy Snacking Today
Making your own raspberry fruit leather is a simple way to eat more fruit and less processed sugar. It takes some time in the oven, but the work is very easy. Once you try the fresh taste of homemade berry rolls, you will never want to go back to the store-bought ones. Grab some berries and start blending!