Crispy and Cheesy Garlic Parmesan Focaccia
I love bread. There is something so special about the smell of fresh dough baking in the oven. My house always smells like a fancy bakery when I make this recipe. You are going to learn how to make a bread that is very crunchy on the outside but soft like a pillow on the inside. It has lots of garlic and bubbly cheese on top.
This recipe is great because you do not need to be an expert. I will show you every step so you can feel proud of what you bake. You do not even need a big mixer to make this dough work. Just a bowl, some patience, and your hands will do the trick. Let us get started on this tasty project.
Check out the steps below to make your own masterpiece.
Why This Bread Is Special
Focaccia is a flat bread from Italy. It is famous for having little dimples on top that hold onto olive oil. My version adds a lot of garlic and parmesan cheese to make it taste even better. The bottom gets fried in the pan with olive oil, so it stays extra crispy. It is almost like a thick pizza crust but much lighter.
I remember the first time I tried to make this. I was so scared of using yeast. I thought the bread would not rise and I would waste my time. But I learned that yeast is just a tiny plant that needs a warm hug and some sugar. Once I figured that out, my bread came out perfect every time. You can do it too!
The Simple Ingredients You Need

You do not need many things to make this bread. Most of these items are probably in your kitchen right now. I like to use high-quality olive oil because it gives the bread a rich taste. If you use cheap oil, the bread might taste a bit flat. Also, make sure your garlic is fresh and not from a squeeze bottle for the best flavor.
- 4 cups of all-purpose flour
- 2 teaspoons of sea salt
- 2 teaspoons of instant yeast
- 2 cups of warm water (not hot!)
- 1 teaspoon of honey or sugar
- 1/2 cup of extra virgin olive oil
- 6 cloves of minced garlic
- 1 cup of shredded parmesan cheese
- 1 tablespoon of fresh rosemary (optional)
Using warm water is very important. If the water is too hot, it will kill the yeast. If it is too cold, the yeast will stay asleep. Think of it like a warm bath for a baby. That is the perfect heat for your dough to grow big and fluffy.
Setting Up Your Baking Space

Before you start mixing, get your space ready. I always clear off my counter so I have room to move. You will need a large bowl for the dough to grow in. You also need a metal baking pan. I prefer metal over glass for this recipe. Metal gets hotter and helps make the bottom of the bread very crunchy.
Make sure your pan is clean and dry. We are going to put a lot of oil in it later. This bread basically fries in the pan while it bakes. That is the secret to the crispy texture we want. If you are worried about the bread sticking, don’t be! The oil acts like a slippery slide for the dough.
How to Mix Your Dough

- In your large bowl, whisk the flour, salt, and yeast together.
- In a separate small jar, mix the warm water and honey until the honey melts.
- Pour the water into the flour mixture.
- Use a big spoon or your hands to mix it until no dry flour is left.
- The dough will be very sticky and wet. Do not add more flour!
One mistake I made early on was adding too much flour. I thought the dough looked too messy. But wet dough makes the softest bread. If you add too much flour, your bread will be tough like a rock. Keep it sticky and trust the process. It will look like a shaggy mess at first, but that is exactly what we want.
The First Big Rise

Now comes the hardest part: waiting. Cover your bowl with a clean towel or plastic wrap. Put it in a warm spot in your house. I usually put mine inside the oven with the light turned on (but the oven turned off). This keeps it away from cold air. Let it sit there for about two hours.
During this time, the yeast is eating the sugar and making bubbles. These bubbles are what make the bread airy. If you rush this part, your bread will be flat and sad. Use this time to watch a show or clean your room. IMO, the longer you let it rise, the better the flavor becomes. Some people even leave it in the fridge overnight!
Preparing the Baking Pan

Pour about 3 tablespoons of olive oil into your baking pan. Use your fingers to spread it all over the bottom and the sides. This is very important! Then, take your puffy dough and gently tip it into the pan. Do not pull it or stretch it too hard. Just let it fall into the oil.
Once the dough is in the pan, turn it over once so both sides are coated in oil. It won’t reach the corners of the pan yet. That is okay! It needs to rest again. Cover the pan and let it sit for another 45 minutes. The dough will naturally relax and spread out to fill the space on its own.
The Fun Part: Dimpling the Dough

This is my favorite part of the whole recipe. Once the dough has spread out, it is time to make the dimples. Poke your fingers deep into the dough all over the surface. You want to touch the bottom of the pan. It should feel like you are playing a piano on the bread. This creates little wells that will catch the garlic and cheese.
If the dough shrinks back when you poke it, let it rest for ten more minutes. It just means the gluten is a bit tight. When you are done, the dough should look like a bumpy moon surface. This texture is what makes focaccia look so beautiful once it comes out of the oven. It is very satisfying to do!
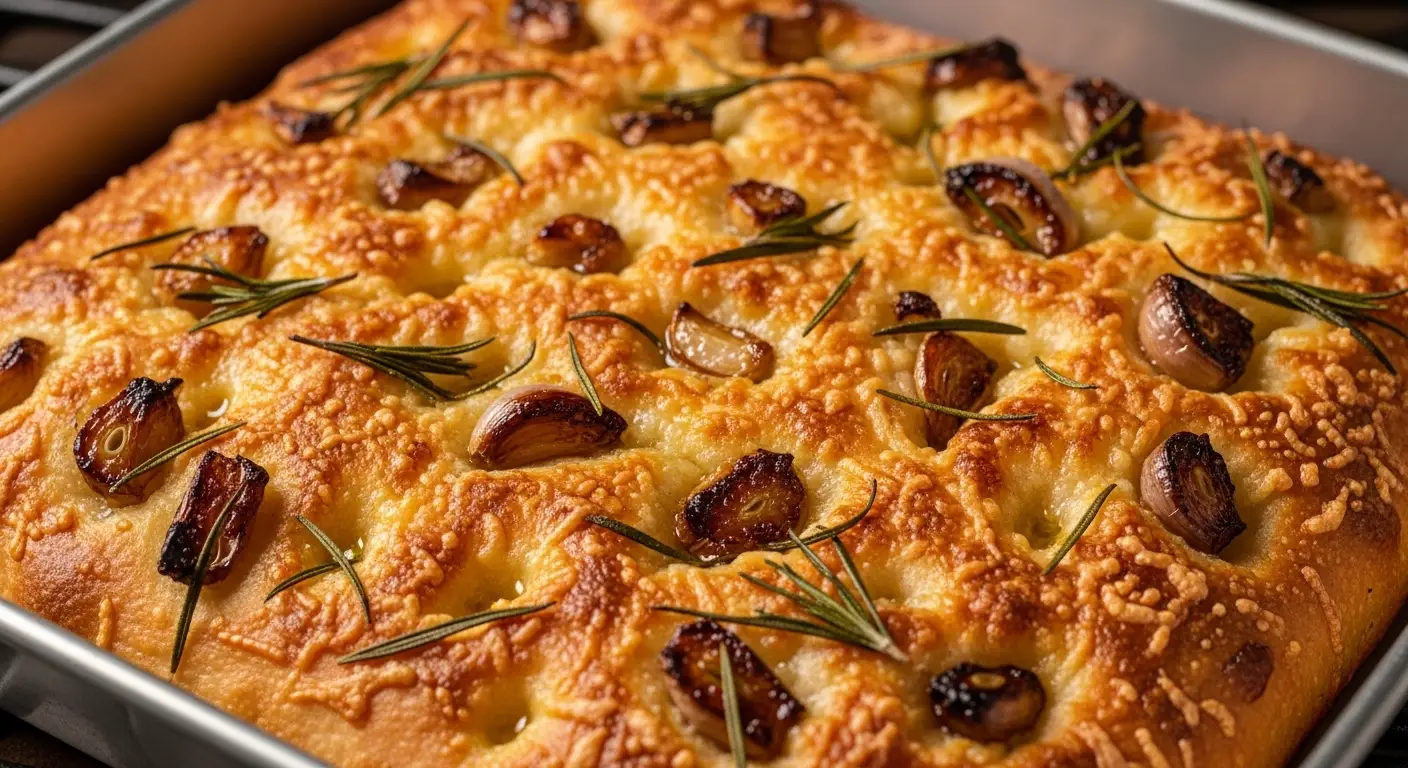
Adding the Garlic and Cheese

Now we add the flavor. Mix your minced garlic with a little bit of olive oil and drizzle it over the top. Make sure the garlic pieces fall into those dimples we just made. Then, sprinkle the parmesan cheese all over the top. Use a lot! The cheese will melt and turn into a crispy gold crust in the oven.
FYI, if you don’t like rosemary, you can use thyme or just leave the herbs off. The garlic and cheese are the stars here. I like to add a tiny pinch of flaky salt on top right before it goes into the oven. This makes the cheese flavor pop even more. It is a small step that makes a huge difference in the final taste.
Baking to Golden Perfection

Heat your oven to 425 degrees. Put the pan on the middle rack. Bake it for about 20 to 25 minutes. You want to see the cheese turning brown and the edges of the bread looking very crispy. If it looks too pale, leave it in for three more minutes. We want that crunch!
Recipe Quick Info
- Prep Time: 15 minutes (plus 3 hours rising)
- Cook Time: 25 minutes
- Servings: 12 pieces
- Difficulty: Easy
When you take it out, you will hear a sizzling sound. That is the olive oil frying the bottom of the bread. It is music to my ears. Let the bread sit in the pan for five minutes before you try to move it. This helps the bottom stay crispy instead of getting soggy from the steam.
How to Serve Your Focaccia

I think this bread is best when it is still warm. You can cut it into squares or long strips. It is amazing on its own, but it also makes a great side for pasta or soup. I sometimes use two big slices to make a sandwich with ham and cheese. It is the best sandwich you will ever have.
If you have leftovers, you can keep them in a bag. But the bread will lose its crunch after a day. To fix this, just put a slice in the toaster or a hot pan for a minute. It will wake up the oils and make it crispy again. I rarely have leftovers because my family eats the whole pan in one sitting!
Tips for Success
Cooking is a skill that takes practice. I have made many mistakes so you don’t have to. For example, once I forgot the salt. The bread looked beautiful but tasted like nothing! Always double-check your ingredients before you start mixing. Here are some other things I have learned over the years.
If your house is very cold, the dough might take three hours to rise instead of two. That is fine! Just look at the size of the dough, not the clock. Also, make sure your parmesan cheese is the dry kind from a block. The wet mozzarella cheese will make the bread too soggy for this specific recipe.
Variations to Try Later

Once you master this garlic parmesan version, you can try other toppings. You can press cherry tomatoes into the dough for a sweet taste. Or you can use olives and red onions for something salty. Some people even put thinly sliced potatoes on top! The possibilities are endless once you have a good base dough.
My friend likes to add a little bit of chili flakes to the garlic oil. It gives the bread a tiny bit of heat that goes great with the cheese. You can also swap the parmesan for pecorino cheese if you want a stronger, saltier flavor. Just remember to keep the ratios the same so the bread still bakes correctly.
Pro Baker Tips
- The Finger Test: Gently press the dough. If it springs back slowly, it is ready.
- Cold Ferment: Let the dough rise in the fridge for 24 hours for a sour, deep flavor.
- Don’t Scrimp: Use plenty of oil. It is what makes the crust taste like a fried treat.
Common Mistakes to Avoid

One big mistake is using old yeast. Yeast is alive, and it can die if it sits in your cupboard for years. If your water doesn’t get bubbly after you mix in the yeast, stop! Your bread won’t rise. Go buy fresh yeast and start over. It is better to restart early than to waste four cups of flour on a flat loaf.
Another issue is not dimpling deep enough. If you just touch the surface, the oil and garlic will slide off the bread and burn on the edges of the pan. You want those toppings to be nestled inside the dough. Be brave and push your fingers all the way down. The dough is tough enough to handle it!
Common Questions About Focaccia
Can I use whole wheat flour?
Yes, but the bread will be much heavier. I suggest using half white flour and half whole wheat flour for a better texture.
How do I store the leftovers?
Keep it in an airtight container at room temperature for 2 days. To keep it longer, wrap it tightly and freeze it for up to a month.
Why is my focaccia chewy instead of crispy?
You probably did not use enough olive oil or your oven was not hot enough. Make sure to use the full 1/2 cup of oil!
Can I make the dough in a bread machine?
Yes, use the dough setting. Once it is done mixing and rising, move it to your oiled baking pan and follow the dimpling steps.
What if I don’t have parmesan cheese?
You can use cheddar or asiago. Any hard cheese that melts well will work, but parmesan gives the best salty crust.
Enjoy Your Homemade Bread
Making bread is a great way to relax and feed the people you love. This garlic parmesan focaccia is a total crowd-pleaser that looks much harder to make than it actually is. I hope you have fun dimpling the dough and enjoying that first warm, crunchy bite. Happy baking!