10 Minute Microwave Apple Crisp for a Warm Healthy Treat
Do you ever want a warm dessert but do not want to wait an hour? I feel that way almost every night after dinner. Usually, I look at the oven and think it takes too long to heat up. That is why I started making this microwave apple crisp. It is fast, sweet, and actually quite good for you. You only need one bowl and a few minutes to make it happen.
This recipe is perfect for kids or anyone who wants a snack right now. It smells like a cozy kitchen in the fall. You get soft apples and a crunchy top without any big mess. Best of all, you likely have every single thing you need in your pantry already. No fancy tools or hard skills are required here.
I will show you how to pick the right apples and mix the perfect topping. You will learn how to get that golden crunch even without a big oven. Let us look at how to make this tasty treat in record time. It is going to be your new favorite way to eat fruit.
Check out the full recipe below to start cooking!
Recipe Quick Info
- Prep Time: 5 minutes
- Cook Time: 5 minutes
- Servings: 1 person
- Difficulty: Very Easy
The Best Ingredients for Your Fast Apple Crisp
Finding the right stuff for your crisp makes a huge difference in how it tastes. You want apples that stay a little firm so they do not turn into mush. I also like to use oats that have some texture. This part of the recipe is where you can change things to fit what you like best. If you want it sweeter, you can add more sugar, or keep it light for a healthy snack.
The Perfect Apple Varieties

Not all apples work the same when you cook them. Some apples get very soft and watery in the microwave. I suggest using Granny Smith apples if you like a sour taste. They hold their shape really well. If you want something sweeter, Honeycrisp or Gala apples are great choices too. I once tried using a very soft red apple and it turned into apple sauce, so try to avoid those if you can.
Peeling the apple is up to you. I usually leave the skin on because it has good vitamins and saves time. Just make sure to wash the fruit well before you start cutting. Cut the pieces into small cubes about the size of a dice. If the pieces are too big, they will stay hard while the rest of the dessert gets too hot. Even sizing helps everything cook at the exact same time.
Pantry Staples for the Topping

The topping is the best part of any crisp. You need old-fashioned rolled oats to get a good chew. Quick oats work too, but they can be a bit powdery. For the sweet part, I use a little bit of brown sugar. It has a deep flavor that tastes like caramel when it melts. If you want to be very healthy, you can use maple syrup instead. Just know that syrup makes the top a bit softer than sugar does.
You also need a tiny bit of flour to hold it all together. Whole wheat flour works great here and adds a nutty taste. Do not forget the cinnamon! Cinnamon is the secret to making the whole house smell amazing. I use a lot because I love that warm spice. A tiny pinch of salt is also key because it makes the sweet flavors pop. Without salt, the dessert can taste a bit flat or boring.
Healthy Fat Options

To make the topping crunchy, you need a little bit of fat. Butter is the classic choice because it tastes so rich. If you do not eat dairy, coconut oil is a perfect swap. I use refined coconut oil so it does not taste like a coconut, but either kind works fine. You only need about one tablespoon for a single serving. This keeps the treat light but still satisfying.
Make sure your butter is soft or melted before you mix it with the oats. If the butter is too cold, it will stay in big clumps. You want the oats to look like wet sand. This ensures every bite has that buttery goodness. I have tried making this without any fat before, and it just does not get crunchy. The fat is what helps the microwave “fry” the oats just a little bit to create that texture we all love.
How to Cook Your Crisp to Perfection
Cooking in a microwave is faster than an oven, but it works differently. Heat moves through the food in waves, so you have to be careful not to overcook it. The goal is to get the apples soft and bubbly while keeping the top from getting soggy. It only takes about five minutes of cooking time, but those minutes are very important for the final result.
Preparing the Apple Base

First, put your apple chunks into a microwave-safe bowl or a large mug. I like to toss them with a tiny bit of water and a sprinkle of cinnamon first. The water creates steam which helps the apples soften quickly. If you like a thick sauce, you can add a half teaspoon of cornstarch to the apples. This will turn the juice into a sticky glaze as it heats up. It makes the dish feel much more like a real pie.
Give the apples a good stir so they are all coated. Make sure there is a little space at the top of the bowl. When the fruit boils, it can sometimes bubble over the edge. I learned this the hard way and had to clean sticky juice off the bottom of my microwave! A medium-sized bowl is usually safer than a tiny cup. Leave the apples in the bowl while you get the topping ready in a separate small dish.
Mixing the Crunchy Topping

In a different small bowl, mix your oats, sugar, flour, and spices. Add your melted butter or oil last. Use a fork to stir it all together. You want to see small clumps forming. If the mix looks too dry, add a few more drops of oil. If it looks too wet, add a spoonful more of oats. This part is very flexible, so do not worry about being perfectly exact. IMO, the clumps are the best part anyway.
Once it is mixed, sprinkle it evenly over the top of your apples. Do not press it down too hard. You want air to move between the oats so they can dry out and get crisp. If you pack it down like a brick, the middle will stay soft. I like to leave a few gaps where I can see the red or green of the apples peeking through. This looks pretty and helps the steam escape so the top stays firm.
Setting the Microwave Time

Every microwave has a different power level. I usually start with three minutes on high. You will hear the apples start to hiss and pop a little bit. That is a good sign! After three minutes, check the apples with a fork. If they are soft, you are almost done. If they are still crunchy, give them another minute. You want the topping to look a little darker than when it started, though it won’t get as brown as it does in an oven.
Be careful when you take the bowl out! It will be very hot. I always use an oven mitt or a thick towel to grab it. Let the crisp sit on the counter for two minutes before you eat it. This is the hardest part because it smells so good. However, letting it sit allows the juices to thicken up and the topping to harden. If you eat it right away, it might be a bit runny. Patience makes the flavor much better.
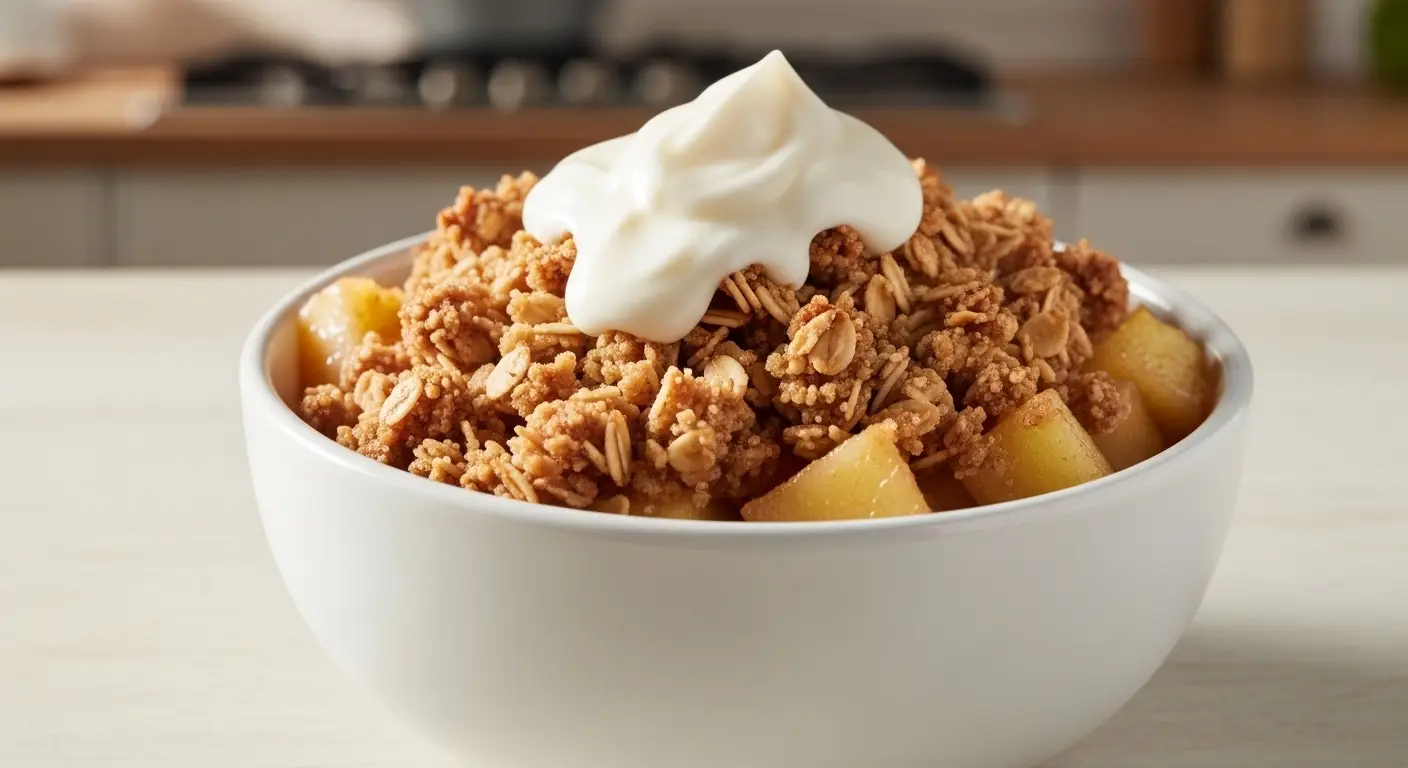
Adding Fun Toppings

Even though this is a healthy treat, you can dress it up. A small scoop of vanilla Greek yogurt on top is amazing. It adds protein and tastes like ice cream. If you are feeling fancy, a drizzle of peanut butter or almond butter adds a nice salty kick. I also love adding a few chopped walnuts or pecans for extra crunch. This adds healthy fats and makes the snack more filling.
For a real dessert feel, a tiny bit of whipped cream or a small scoop of low-fat frozen yogurt works wonders. The cold topping against the hot apples is the best combination ever. You can also sprinkle a little extra cinnamon on top just to make it look like it came from a cafe. It is a great way to impress a friend or treat yourself after a long day at school or work.
Pro Kitchen Tips
- Apple Size: Cut apples into equal cubes so they cook evenly.
- Crisp Factor: Let the dish sit for 2 minutes after cooking to let the top harden.
- Bowl Choice: Use a deep bowl to prevent the fruit juice from bubbling over.
- Healthy Swap: Use honey instead of sugar for a natural sweetener.
Making It Work for Everyone
This recipe is very easy to change. You might have food allergies or just like different flavors. That is the beauty of cooking at home. You can make it exactly how you want it. Whether you need it to be gluten-free or you just want to use a different fruit, these tips will help you make the best version possible. It is a very forgiving recipe that is hard to mess up.
Gluten-Free and Vegan Ideas

If you cannot eat gluten, this recipe is still for you. Just make sure your oats are labeled “certified gluten-free.” Some oats are processed near wheat, so this is important for safety. Instead of regular flour, you can use almond flour or a gluten-free blend. Almond flour actually tastes even better because it gets toasted in the microwave. It gives the dish a lovely nutty smell that pairs perfectly with the apples.
For my vegan friends, using coconut oil instead of butter is an easy fix. You can also use a vegan butter stick if you prefer that flavor. Since there are no eggs or milk in the base recipe, it is already very close to being vegan. Just check your sugar to make sure it fits your diet. It is a great treat that everyone can enjoy together regardless of their food needs. FYI, most people can’t even tell the difference when you use these swaps.
Using Different Fruits

You do not have to stop at apples. This same method works for many other fruits. Pears are a fantastic choice because they get very soft and sweet. You can even mix apples and pears together for a different taste. If it is summer, try using peaches or berries. Berries will get very juicy, so you might need an extra pinch of flour in the fruit mix to soak up the liquid.
I once made this with frozen cherries when I ran out of apples. It was a bit more tart, but still very yummy. Just remember that frozen fruit might take an extra minute or two to heat up. If you use a very sweet fruit like ripe peaches, you can use less sugar in the topping. This keeps the treat healthy and lets the natural fruit flavor shine through. It is fun to experiment with whatever you have in your fridge.
Your Questions Answered
Can I make this in a toaster oven?
Yes! Use an oven-safe dish at 350 degrees for 15-20 minutes. The top will get much browner and crunchier than in the microwave.
Is this recipe okay for breakfast?
Totally. It has fruit, oats, and very little sugar. It is basically a warm bowl of oatmeal but with way more flavor and a better texture.
Why did my topping turn out soggy?
This usually happens if you cover the bowl. Keep it uncovered so steam can escape. Also, let it sit for two minutes after cooking to firm up.
Can I use steel-cut oats?
I would not recommend it. Steel-cut oats take a long time to cook and will stay very hard and crunchy in a way that hurts your teeth.
How long does it stay fresh?
It is best eaten right away. If you wait until the next day, the topping will get soft. If you must save it, reheat it for 30 seconds.
Enjoy Your Warm Apple Treat
You now have a fast and healthy dessert ready in minutes. This recipe proves that you do not need a lot of time to eat something delicious and good for your body. I hope you enjoy every sweet, crunchy bite of your microwave apple crisp. It is the perfect way to end any day on a happy note.