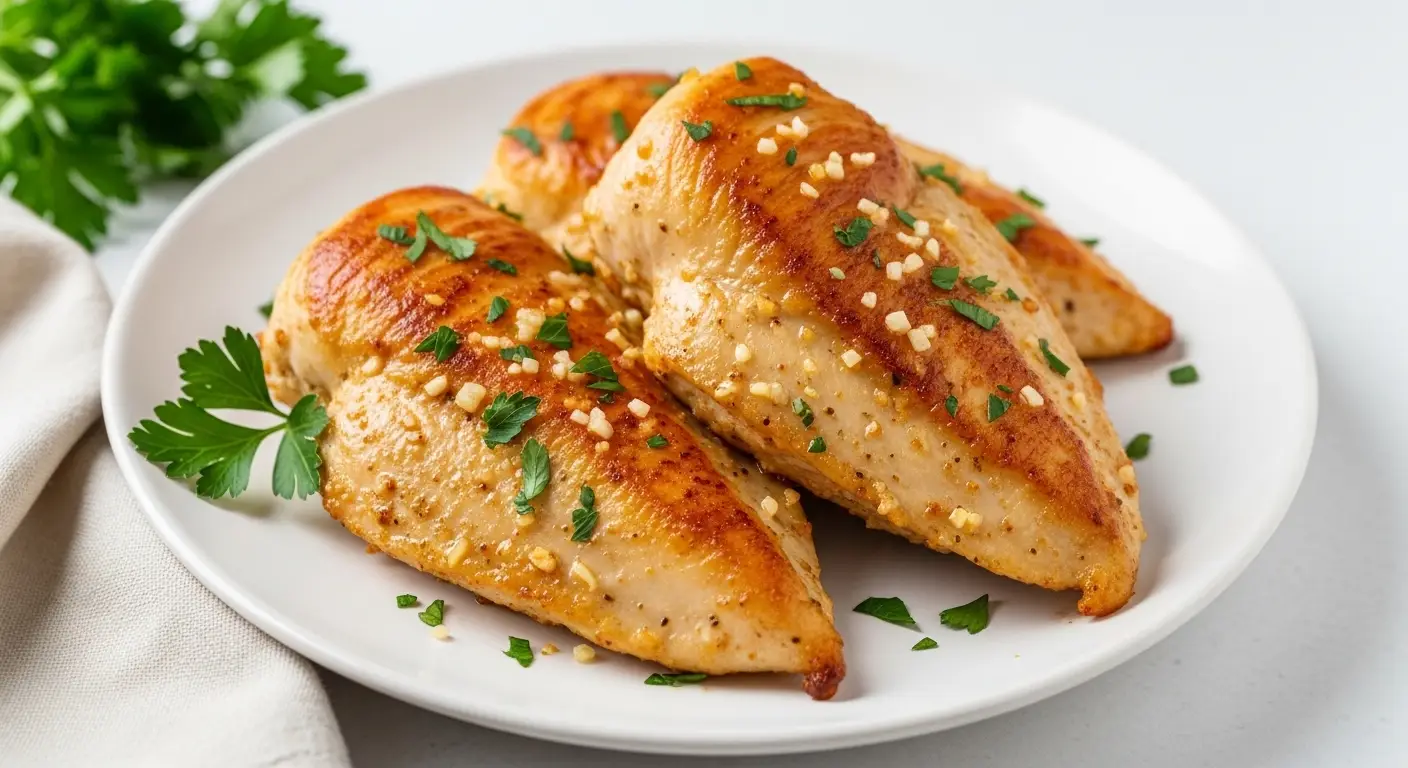
Garlic Parmesan Chicken
Garlic Parmesan chicken is one of my favorite things to cook. It smells amazing while it sits in the oven. The house starts to smell like toasted cheese and fresh garlic. This dish is great because it tastes like food from a fancy place, but it is very cheap to make. You do not need to be a pro in the kitchen to get this right. I will show you every step to make it perfect every time.
You are going to learn how to prep the meat and make a crunchy coating. I will also talk about how to keep the chicken juicy inside. Many people overcook chicken, but I have a trick to stop that. By the end of this page, you will know how to make a dinner that looks and tastes like a million bucks. Let’s get your apron on and start cooking this tasty meal.
Check out the steps below to start your dinner tonight!
Why You Will Love This Recipe
This recipe is a winner because it uses items you likely already have in your pantry. Garlic and cheese are a match made in heaven. When they get hot, they turn into a golden crust that snaps when you bite it. It is also a fast meal. You can get it on the table in about thirty minutes. That is faster than waiting for a pizza delivery guy to show up at your door!
I remember the first time I tried to make this. I used way too much salt because I forgot the cheese was already salty. It was a big mistake! I had to drink a whole gallon of water that night. Now, I know how to balance the flavors. This version is just right. It is not too salty and not too spicy. It is a safe bet for kids and picky eaters who do not like strange green things in their food.
The Main Ingredients You Need

To start, you need good chicken. I like to use chicken breasts because they are easy to cut. You can also use thighs if you want the meat to stay extra moist. The star of the show is the Parmesan cheese. Try to get the kind that looks like small shreds, not the powder in a green can. The fresh shreds melt better and give you those nice crispy bits we all love. Garlic is the next big thing. Use fresh cloves if you can. The stuff in the jar is okay, but fresh garlic has a kick that makes the dish pop.
- 1.5 pounds of chicken breasts
- 1 cup of shredded Parmesan cheese
- 1/2 cup of breadcrumbs (plain or panko)
- 3 cloves of garlic, minced small
- 2 tablespoons of melted butter
- 1 teaspoon of dried oregano
- A pinch of black pepper
Tools for the Job

You do not need many tools for this. A good baking dish is the most important thing. I use a glass one so I can see if the bottom is getting brown. You also need a couple of shallow bowls. These are for dipping the chicken. Think of it like a little assembly line. One bowl holds the butter, and the other holds the cheese mix. Using wide bowls makes it easier to coat the meat without making a huge mess on your counter.
I also suggest using a meat thermometer. This is a small tool that tells you how hot the inside of the chicken is. It is the best way to make sure the meat is safe to eat but still soft. If you don’t have one, you can just cut into a piece to check, but a thermometer is better. It keeps the juices inside instead of letting them run out on the plate. FYI, a cheap one works just as well as an expensive one!
Recipe Quick Info
- Prep Time: 10 minutes
- Cook Time: 20 minutes
- Servings: 4 people
- Difficulty: Easy
Step By Step Instructions

First, heat your oven to 400 degrees. This high heat helps the cheese get crunchy. While the oven gets hot, pat your chicken dry with a paper towel. This is a pro tip many people skip. If the chicken is wet, the coating will slide off and get mushy. We want it to stick like glue! After drying, cut the chicken into even pieces so they all cook at the same speed. If one is huge and one is tiny, the tiny one will get tough while the big one stays raw.
- Mix the breadcrumbs, Parmesan cheese, and oregano in a bowl.
- Melt the butter and stir in the minced garlic.
- Dip each piece of chicken into the garlic butter.
- Roll the buttery chicken in the cheese mixture. Press down hard so the cheese sticks.
- Lay the chicken in a baking dish. Do not let the pieces touch each other.
- Bake for 18 to 22 minutes until the top is golden brown.
How to Get the Best Crust

The secret to a great crust is not moving the chicken. Once you put it in the pan, leave it alone! If you flip it too early, you might rip the skin off. I also like to add a tiny bit of oil spray on top before it goes in. This helps the breadcrumbs fry a little bit in the oven. It makes a loud crunch sound when you use a fork. This recipe might not work well if you use very thick chicken breasts without flattening them out first. Use a heavy pan to smack them a bit until they are the same thickness.
If you want it even cheesier, you can sprinkle more Parmesan on top during the last five minutes of cooking. This creates a second layer of gooey goodness. I once tried to use cheddar cheese instead, but it was too oily. Parmesan is better because it stays together and gets crispy rather than just melting into a puddle. Stick with the hard cheeses for the best results in this specific dish. It makes a huge difference in how the food feels in your mouth.
Perfect Side Dishes

What should you eat with this? I love serving it with pasta. A simple butter and garlic noodle goes perfectly with the chicken. If you want to be healthy, roasted broccoli is a great choice. You can put the broccoli on the same baking sheet as the chicken to save time. The juice from the chicken will flavor the veggies. It is a win-win for everyone! Sometimes I just serve it with a big green salad if I am not very hungry.
My kids like to dip the chicken in ranch dressing. I know that sounds a bit wild, but it actually tastes pretty good! The cool ranch and the hot garlic work well together. You could also use a red marinara sauce. This turns the meal into a quick version of chicken parmesan. Just add a little mozzarella on top at the end. It is very flexible and hard to mess up, which is why I love it so much. IMO, you can’t go wrong with extra sauce.
Cooking Success Tips
- Dry the Meat: Always use a paper towel to dry the chicken before you start.
- Don’t Crowd: Leave space between pieces so the air can make them crispy.
- Fresh Garlic: Use fresh cloves for a much stronger and better smell.
Storage and Reheating

If you have leftovers, you are lucky! This chicken makes a great lunch the next day. Put it in a box that closes tight and keep it in the fridge. It will stay good for about three days. When you want to eat it again, try not to use the microwave. The microwave makes the crust soft and soggy. Instead, put it back in the oven or an air fryer for five minutes. This brings back the crunch and makes it taste like it was just cooked.
I usually chop up the leftovers and put them on a salad. The cold chicken is still very tasty because the garlic flavor gets stronger overnight. You can also put it in a wrap with some lettuce and mayo for a quick sandwich. Just don’t leave it on the counter for too long. Put it away as soon as it cools down so it stays safe to eat. No one wants a tummy ache from old chicken!
Common Questions About This Dish
People often ask me if they can change things in this recipe. Yes, you can! Cooking is all about making things how you like them. If you hate garlic, use onion powder instead. If you want it spicy, add some red pepper flakes to the cheese mix. The main goal is to have fun and eat something delicious. Here are some of the most common things people worry about when making this meal for the first time.
Can I use frozen chicken?
Yes, but you must thaw it completely first. If it is still frozen in the middle, the outside will burn before the inside is cooked. Dry it well after it thaws.
What if I don’t have breadcrumbs?
You can crush up crackers or even cornflakes! Just make sure they are plain. They will still give you a nice crunch that tastes great with the cheese.
Is this recipe gluten-free?
Only if you use gluten-free breadcrumbs. The chicken, cheese, and garlic are all safe. Check the label on your crumbs to be sure!
How do I know the chicken is done?
The best way is to check the heat. It should be 165 degrees inside. The meat should be white all the way through, not pink or clear.
Can I cook this in an air fryer?
Yes! Set it to 375 degrees and cook for about 12 to 15 minutes. It gets very crispy in the air fryer because the air moves fast.
Time to Enjoy Your Meal
You now have all the secrets to making amazing Garlic Parmesan Chicken. It is a simple, tasty, and cheap meal that anyone can master. Just remember to dry the chicken and use plenty of cheese. Your family will be asking for seconds before they even finish their first plate. Go give it a try and see how easy it is to be a great cook!