Award-Winning Homemade Chili
Making a big pot of chili is one of my favorite things to do. There is nothing like the smell of meat, onions, and spices filling up the kitchen on a cold day. I have spent years trying different ways to make this dish perfect. My friends and family always ask for my secret recipe because it tastes so much better than the stuff from a can.
In this article, I will teach you exactly how to make award-winning chili at home. You will learn about the best meats to use and which spices make the flavor pop. I will also share my best tips for getting the right thickness. By the end of this page, you will be ready to win your local chili cook-off or just make a great dinner for your family.
Grab your favorite apron and let’s get started on this cooking adventure.
The Secret to Great Meat and Veggies
The foundation of any good chili starts with the stuff you put in the pan first. Most people just throw ground beef in a pot and hope for the best. I used to do that too, but I learned that taking a little extra time makes a huge difference. You want your meat to be brown and crispy on the edges, not gray and mushy.
Mixing different types of meat is a great way to add more flavor. I once made a mistake and used only very lean turkey because I thought it was healthier. The chili ended up tasting very dry and flat. Now, I always make sure there is enough fat to keep things juicy. You also need to chop your vegetables small so they blend into the sauce perfectly.
Choosing the Right Beef

Using the right kind of beef is very important for flavor. I like to use ground chuck that is 80% meat and 20% fat. This fat melts into the sauce and makes it taste rich. If you use meat that is too lean, the chili will feel thin in your mouth. Another trick I love is adding some small cubes of steak along with the ground beef. This gives the chili a chunky texture that feels like a real meal.
This mix works best for people who want a hearty bowl of food. The ground beef creates a thick base, while the steak bits give you something to chew on. It makes the dish feel more expensive and special than regular weeknight food. Just remember to brown the meat in small batches so the pan stays hot. If you crowd the pan, the meat will steam instead of browning.
The Power of Onions and Peppers

Vegetables provide the background flavor for your chili. I always start with a large white onion and plenty of garlic. You should cook them until they are soft and look a bit clear. I also add bell peppers for sweetness and jalapeños for a little kick. Cutting them into tiny squares ensures that you get a bit of everything in every single spoonful.
I recommend this for anyone who likes a balanced taste. The sweetness of the peppers cuts through the heavy fat of the meat. If you do not like spicy food, you can take the seeds out of the jalapeños before chopping them. This way, you get the pepper flavor without the burning heat. It is a simple step that helps everyone enjoy the meal.
Browning for Better Flavor

Browning your meat is where the magic happens. You want to see dark brown bits on the bottom of your pot. This is called the fond, and it is packed with flavor. I learned this lesson after making many pots of boring, light-colored chili. When you add liquid later, those brown bits lift off the bottom and mix into the sauce. It makes the whole pot taste deeper and more complex.
This step is perfect for cooks who want that professional restaurant taste. It takes about ten minutes longer, but it is worth every second. Make sure you do not drain all the fat away after browning. Leave about one tablespoon in the pot to cook your spices. That fat carries the spice flavor better than water or broth ever could.
Pro Tip for Extra Texture
- Sear the Steak: If you use steak cubes, sear them separately at a very high heat first. This keeps them tender inside while giving them a crusty outside.
Building the Perfect Sauce and Spice Blend
Once your meat and veggies are ready, it is time to build the liquid part of the chili. This is where many people get stuck. They might use too much tomato juice or not enough spice. A great chili should be thick enough to stand a spoon in, but not so thick that it looks like paste. It needs a balance of salt, heat, and a tiny bit of acid.
I have tried many different canned tomatoes over the years. Some are too sweet and others are too sour. I found that a mix of crushed tomatoes and tomato paste works the best. The paste helps thicken the sauce without needing to add flour or cornstarch. FYI, the longer you let these flavors sit together, the better they will taste the next day.
The Ultimate Spice Mix

Spices are the heart of this dish. I never use the pre-made packets from the store because they have too much salt. Instead, I make my own mix using chili powder, cumin, and smoked paprika. The smoked paprika is my secret weapon. It adds a wood-fire taste that makes people think you cooked the chili over an actual campfire. I also add a tiny bit of cinnamon to bring out the sweetness of the tomatoes.
This mix is great for people who want a unique flavor that stands out. It isn’t just spicy; it is warm and cozy. You can adjust the amounts to fit your taste. If you like it hotter, add some cayenne pepper. If you want it more earthy, add extra cumin. Just make sure to toast the spices in the pan with the meat for one minute before adding liquid. This wakes up the oils in the spices.
Liquid Gold Broth

Most people use water to thin their chili, but that is a missed chance for flavor. I always use a high-quality beef broth instead. It adds a salty, meaty depth that water just can’t match. Sometimes I even add a splash of dark coffee or a bit of unsweetened cocoa powder. It sounds weird, but it makes the chili look darker and taste much richer. You won’t actually taste the coffee; it just makes the beef taste more like beef.
This tip is for the serious home cook who wants to impress guests. It takes the dish from a simple stew to something truly award-winning. If your chili gets too thick while it simmers, just add a little more broth. It is much easier to thin a sauce than it is to thicken it later. Always keep an extra carton of broth on the counter just in case.
The Bean Debate

In some places, like Texas, putting beans in chili is a big no-no. However, in my house, we love them. Beans add a nice texture and make the meal go further for less money. I like to use a mix of kidney beans and black beans. I always rinse them in a colander first to get rid of the salty liquid from the can. This keeps the chili from becoming too salty or looking muddy.
Beans are perfect for families on a budget. They add protein and fiber without costing much. If you really hate beans, you can just leave them out and add more meat. That is the beauty of homemade chili; you can change it to fit your own rules. Just remember that if you skip beans, you might need a little less liquid in your pot.
Simmering for Success

You cannot rush a good chili. It needs time for all the flavors to get to know each other. I usually let mine simmer on low heat for at least two hours. If you try to eat it right after the meat is cooked, the spices will taste sharp and the tomatoes will taste raw. Slow cooking lets the meat get very tender and makes the sauce thick and glossy. IMO, chili is even better when you eat it the next day.
This is the best part for busy people. You can put it on the stove and mostly forget about it while you do other things. Just give it a stir every twenty minutes so the bottom does not burn. If you are in a big hurry, this recipe might not work as well. High heat will make the meat tough. Patience is the most important ingredient in any award-winning recipe.
Common Chili Mistakes
- Adding Salt Too Early: Broth and canned tomatoes have salt. Wait until the end to add more salt.
- Too Much Liquid: It is hard to fix soup-like chili. Start with less liquid and add more slowly.
Finishing Touches and Serving Ideas
How you serve your chili is almost as important as how you cook it. A plain bowl of brown stew can look a bit boring. Adding bright colors and fresh tastes on top makes it look much better. It also lets each person make their bowl exactly how they like it. I love setting up a chili bar when I have friends over so everyone can join in the fun.
I usually serve mine with cornbread or crackers. My kids love it over white rice or even on top of a baked potato. There are so many ways to enjoy this meal. It is also a very easy dish to freeze for later. I often make a double batch so I can have a quick lunch ready in the freezer for busy weeks.
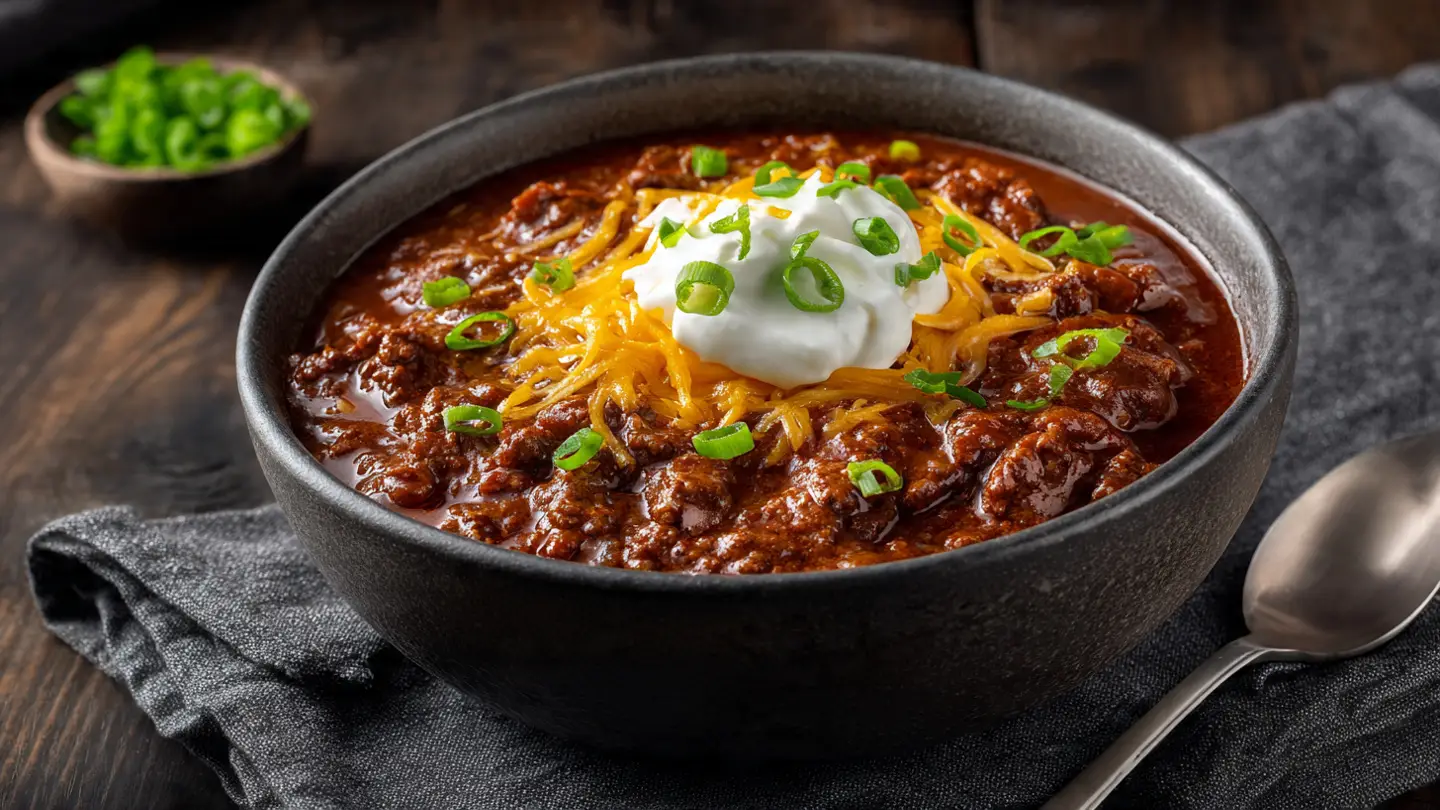
The Best Toppings

Toppings add fresh flavor and cool temperatures to the hot chili. My favorites are sharp cheddar cheese, a big dollop of sour cream, and sliced green onions. The cold sour cream feels great against the spicy sauce. I also like to add a squeeze of lime juice right before eating. The acid in the lime makes all the other flavors wake up and taste brighter. It is a small trick that most people forget.
This is perfect for picky eaters. If someone thinks the chili is too spicy, they can add more sour cream to calm it down. If someone loves cheese, they can pile it high. It makes the meal feel interactive and fun. Always use fresh ingredients for toppings. Bagged cheese is okay, but grating your own cheese makes it melt much better over the hot chili.
Side Dishes That Shine

Chili is a full meal on its own, but a good side dish makes it even better. I think sweet cornbread is the best partner for spicy chili. The sugar in the bread balances the heat of the peppers. If you don’t like cornbread, try some salty tortilla chips. They add a nice crunch that contrasts with the soft beans and meat. Some people even like to eat their chili with a peanut butter sandwich, which is a famous tradition in some parts of the country.
These sides are great for feeding a large crowd. Bread and chips are cheap and help fill everyone up. If you want to keep things light, a simple green salad with a citrus dressing works well too. The goal is to have something that cleans your tongue between bites of the heavy, rich chili. Choose whatever sounds good to you and your family.
Your Questions Answered
Can I make this in a slow cooker?
Yes! Brown the meat and veggies in a pan first. Then put everything in the slow cooker on low for 6 to 8 hours. It will taste great.
How do I make my chili thicker?
You can let it simmer without a lid. You can also mash some of the beans against the side of the pot. The starch from the beans will thicken the sauce.
Is this chili very spicy?
It has a medium heat. If you want it mild, leave out the jalapeños and use less chili powder. If you want it hot, add more cayenne pepper.
Can I freeze leftover chili?
Chili freezes very well. Put it in a sealed container or bag once it is cold. It will stay fresh for up to three months in the freezer.
What if I don’t have beef broth?
You can use chicken broth or even vegetable broth. If you only have water, add a bit more salt and spices to help the flavor stay strong.
Enjoy Your Homemade Masterpiece
You now have all the tools to make a bowl of chili that will win awards and hearts. By choosing the right meat, toasting your spices, and letting it simmer slow, you create a meal that is truly special. Go ahead and give it a try today!