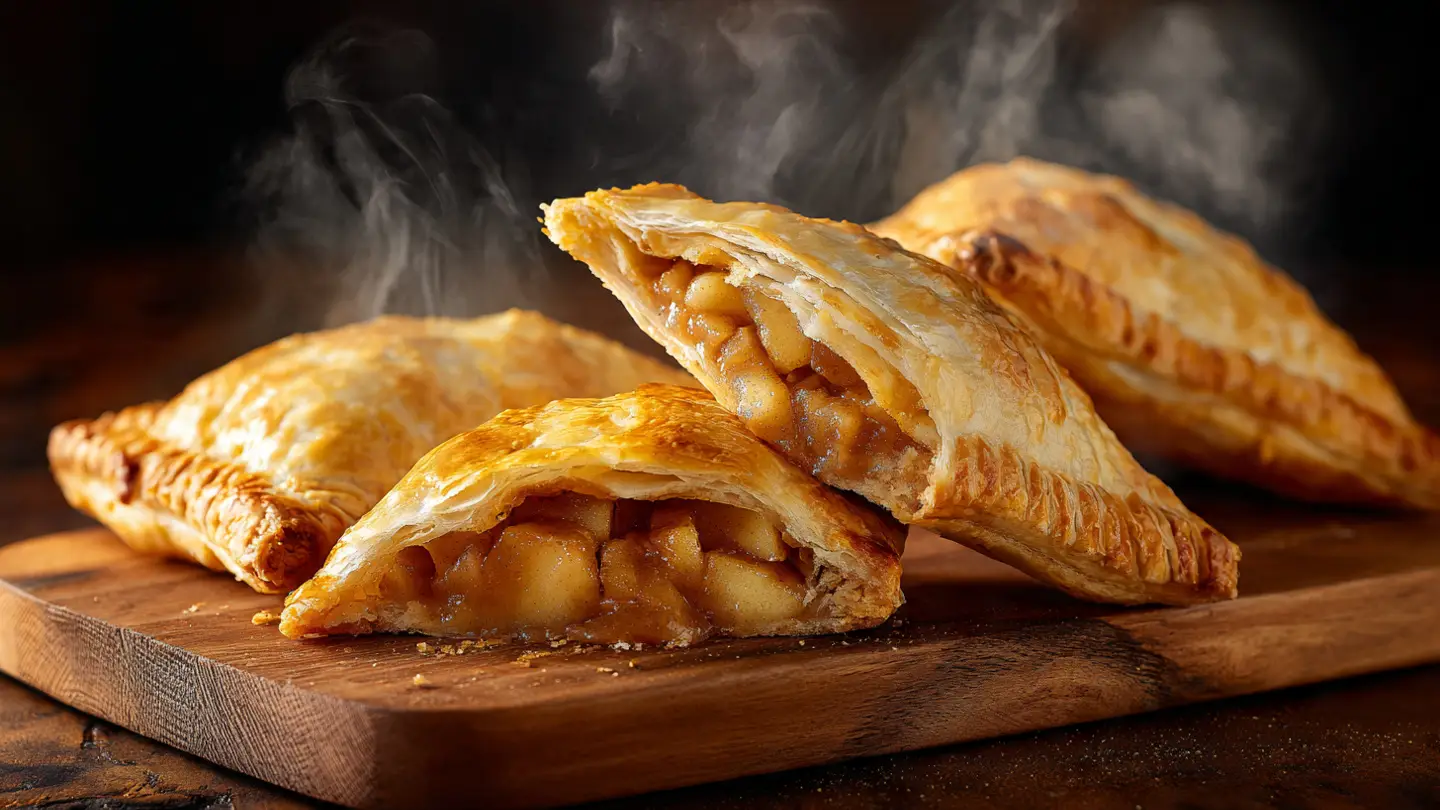
Best Ever Flaky Puff Pastry Apple Turnovers
Making warm apple turnovers at home is a great way to make your kitchen smell like heaven. You do not need to be a pro baker to get that perfect flaky crunch. I will show you how to turn a few apples and some store-bought dough into a treat that tastes like it came from a fancy shop. You can serve these for breakfast or as a sweet snack after dinner. Everyone will think you spent all day in the kitchen, but it is actually quite fast.
Today you will learn exactly how to cook the apples so they stay juicy but do not make the pastry soggy. We will also talk about how to get those golden layers that shatter when you take a bite. I made a lot of mistakes when I first started baking these, so I will tell you what to avoid. Get your apron ready because we are about to bake something amazing.
Check out the steps below to start your baking adventure!
Recipe Quick Info
- Prep Time: 20 minutes
- Cook Time: 25 minutes
- Servings: 8 turnovers
- Difficulty: Easy
The Best Ingredients for Crispy Turnovers
Choosing the right stuff is the first step to a great turnover. Not all apples or doughs act the same way when they get hot. I have tried many kinds of fruit and I found that firm apples are the winners every single time. If you use soft apples, they turn into mush and your pastry will get wet on the bottom. Nobody wants a soggy bottom on their dessert!
Frozen puff pastry is my favorite shortcut. It is better than making it by hand if you are busy. Just make sure you buy the kind made with real butter if you can find it. Butter makes the layers rise higher and taste much richer. FYI, keeping your dough cold is the most important rule in this whole recipe. If the dough gets too warm, the butter melts before it hits the oven and you lose all those nice flakes.
What You Will Need to Buy

- 2 large Granny Smith apples (peeled and chopped into small cubes)
- 1 box of frozen puff pastry (usually has 2 sheets)
- 1/4 cup brown sugar (packs more flavor than white sugar)
- 1 teaspoon ground cinnamon (gives that classic fall smell)
- 1 tablespoon unsalted butter (for cooking the apples)
- 1 teaspoon vanilla extract (makes everything taste better)
- 1 egg (for the egg wash to get that golden shine)
- A pinch of salt (to balance the sweetness)
- Optional: Coarse sugar for sprinkling on top
Using Granny Smith apples is a smart move because they are tart. The tart flavor cuts through the sweet sugar and the rich pastry. If you only have red apples, that is okay too, but the turnovers will be much sweeter. I usually stick with the green ones to get that perfect balance. The pinch of salt might seem weird for a dessert, but it actually makes the apple flavor stand out more.
Tools for Your Kitchen

You do not need fancy gear to make these. A sharp knife is vital for cutting the apples into tiny bits. If the apple pieces are too big, they will poke holes in your dough. I also recommend a rolling pin to gently flatten the pastry sheets. If you do not have one, a clean glass bottle works just as well in a pinch. It is all about being creative with what you have in your cupboards.
A baking sheet lined with parchment paper is a life saver. I learned this the hard way after scrubbing burnt sugar off my pans for hours. Parchment paper stops the turnovers from sticking and makes cleanup a breeze. You will also need a small bowl to whisk your egg and a fork to seal the edges of the dough. These basic tools are all it takes to reach turnover success.
How to Make the Perfect Apple Filling
The filling is the heart of the turnover. Many people just put raw apples inside the dough and hope for the best. I found that cooking the apples on the stove for a few minutes makes a huge difference. It lets the sugar turn into a thick syrup and softens the fruit just enough. If you skip this, the apples might still be crunchy when the pastry is finished baking. That is not a great surprise when you take a bite.
When you cook the filling, keep an eye on the liquid. You want it to be thick like honey. If it is too watery, it will run out of the sides of the pastry while it bakes. This creates a big mess on your tray and leaves your turnover empty. I like to let my filling cool down completely before putting it on the dough. If the filling is hot, it will melt the pastry dough instantly. This is a mistake I made once and my turnovers turned into flat pancakes.
Cooking the Apples Just Right

- Place your butter in a small pot over medium heat until it melts.
- Add your chopped apples, brown sugar, cinnamon, and salt to the pot.
- Stir everything together so the apples are coated in the brown goodness.
- Cook for about 5 to 7 minutes until the apples are tender but not mushy.
- Stir in the vanilla extract at the very end and turn off the heat.
- Move the apples to a plate and spread them out to cool faster.
The smell of the cinnamon and sugar cooking is the best part of the morning. You want the apples to look shiny and golden. If they start to look like applesauce, you have cooked them too long. It is better to have them a little firm because they will finish softening in the oven. IMO, this stovetop step is what makes this the best recipe ever. It builds a depth of flavor that raw fruit just cannot match.
Letting the Filling Cool Down

Patience is key here. I know you want to eat them right away, but cooling is a must. If you put warm fruit on cold puff pastry, the dough gets greasy. I usually put my plate of apples in the fridge for 15 minutes to speed things up. While the fruit cools, you can get your dough ready. This is a good time to preheat your oven to 400 degrees Fahrenheit too.
While the filling chills, you can also prepare your egg wash. Just crack one egg into a small bowl and add a splash of water. Whisk it with a fork until it is smooth. This egg wash acts like glue to keep the turnovers closed. It also gives the crust that beautiful brown color that looks so professional. Without it, your pastry will look pale and dull even when it is fully cooked.
Putting the Turnovers Together
Now comes the fun part where we build the turnovers. Puff pastry usually comes in square sheets. I like to cut each sheet into four smaller squares. This gives you a total of eight turnovers. You want to work quickly so the dough stays cold. If it starts feeling sticky or soft, put it back in the freezer for five minutes. Working with cold dough is the secret to getting those hundreds of thin, crispy layers.
When you fold the dough, you are making a triangle. You put the filling on one side and fold the other half over. Do not overfill them! It is tempting to pile on the apples, but the dough needs room to seal. If you put too much, the filling will squeeze out the sides. I usually use about one big spoonful of apples per turnover. It looks like a small amount, but it is plenty once the pastry puffs up around it.
Cutting and Filling the Dough

Lay your cold pastry sheet on a surface with a little bit of flour. Gently roll it out just a tiny bit to get rid of the fold lines. Cut it into four equal squares using a knife or a pizza cutter. Place a spoonful of your cooled apple mixture right in the middle of each square. Try to leave a little border around the edges so you have a place to press the dough together.
One trick I use is to keep the rest of the dough in the fridge while I work on one sheet at a time. This keeps everything at the right temperature. If you find the dough is sticking to your fingers, just dip them in a bit of flour. It is a simple fix that saves a lot of frustration. Remember, these do not have to look perfect. Homemade food should look a little bit unique and rustic.
Sealing the Edges with a Fork

Brush a little bit of your egg wash on two edges of the square. Fold the pastry over the filling to make a triangle. Press the edges down with your fingers first. Then, take a fork and press the tines into the edges. This creates a pretty pattern and locks the filling inside. It is like a zipper for your food! This step is very important because if they pop open, all the juice will run out.
After you seal them, use a small knife to poke two tiny slits in the top of each turnover. This lets the steam escape while they bake. If you do not poke holes, the steam will build up and might explode the side of your turnover. I forgot to do this once and my turnovers looked like little puffed-up pillows that had burst at the seams. It still tasted good, but it was not very pretty.
The Final Golden Touch

Once all your turnovers are on the baking sheet, brush the tops with the rest of the egg wash. Be careful not to let too much drip down the sides, as that can sometimes stop the layers from rising. If you want them to look extra special, sprinkle some coarse sugar on top. This adds a nice crunch and a little bit of sparkle. It makes them look like they belong in a bakery window.
Put the tray in the middle of your oven. Bake them for 20 to 25 minutes. You want them to be a deep golden brown. If they are light tan, they are not done yet. The darker color means the pastry is cooked all the way through the middle. If you pull them out too early, the inside layers might be doughy and soft. Let them get that rich color for the best texture and flavor.
Pro Baking Tips
- Cold Dough: Always keep puff pastry in the fridge until the very second you need to cut it.
- Cool Filling: Hot filling equals melted dough. Let your apples reach room temperature first.
- Oven Heat: Make sure your oven is fully preheated so the pastry gets a blast of heat to rise.
Serving and Storage Suggestions
When the turnovers come out of the oven, they will be very hot. The sugar inside stays hot for a long time, so do not bite into one right away! Let them sit on the baking sheet for at least 10 minutes. This also gives the pastry time to set so it stays crispy. These are definitely best when they are still warm, but they are also great at room temperature.
If you want to go the extra mile, you can make a quick glaze. Just mix some powdered sugar with a tiny bit of milk and drizzle it over the cooled turnovers. Or, serve them with a big scoop of vanilla ice cream. The cold ice cream melting over the warm, spicy apples is a match made in heaven. It is a simple way to turn a basic snack into a fancy dessert for guests.
How to Store Your Leftovers

If you have any turnovers left, you can store them in an airtight container. They will stay fresh at room temperature for about two days. If you put them in the fridge, they will last about four days. However, the fridge can make the pastry go soft. If that happens, do not worry! You can fix it easily. Just avoid using the microwave, as that will turn them into soggy bread.
The best way to reheat them is in the oven or an air fryer. Put them in at 350 degrees for about 5 minutes. This will bring back the crunch and warm up the filling perfectly. They will taste almost as good as the day you made them. I often make a double batch and freeze the unbaked turnovers on a tray. Then I just pop them in the oven whenever I want a fresh treat without all the work.
Fun Variations to Try

Once you master the apple version, you can try other fruits. Pear turnovers are amazing with a little bit of ginger. You could also use peaches in the summer or cherries in the spring. Just follow the same rule of cooking the fruit first to get rid of extra water. Some people even like to add a little bit of cream cheese inside with the fruit for a creamy surprise.
You can also change the spice. Instead of cinnamon, try using apple pie spice or a little bit of nutmeg. If you like nuts, chopped pecans or walnuts add a nice crunch to the filling. The possibilities are endless once you have the basic steps down. Baking is all about making things your own, so do not be afraid to experiment with your favorite flavors.
Common Baking Questions
Can I use homemade pie crust instead?
You can, but it will not be as flaky. Pie crust is more like a cookie, while puff pastry has many light layers. Both taste good, but the texture will be different.
Why did my turnovers leak all the juice?
This happens if the edges were not sealed tight or if the filling was too watery. Make sure to use a fork to press the edges and cook your apples until the syrup is thick.
Do I have to peel the apples?
It is best to peel them. Apple skin can get tough and chewy when cooked inside pastry. Peeling them makes the filling smooth and easy to eat.
Can I make these in an air fryer?
Yes! Air fry them at 350 degrees for about 10-12 minutes. Watch them closely so they do not burn. They come out very crispy this way.
My dough is too sticky to handle, what do I do?
Put the dough in the freezer for 5 to 10 minutes. This will firm up the butter and make it easy to work with again. Do not try to fight sticky dough!
Happy Baking!
You now have all the tools to make the best apple turnovers ever. Remember to keep your dough cold and your filling thick. These treats are perfect for sharing with friends or keeping all to yourself. Once you see those golden flakes, you will be so proud of what you made. Enjoy every crispy, sweet bite!