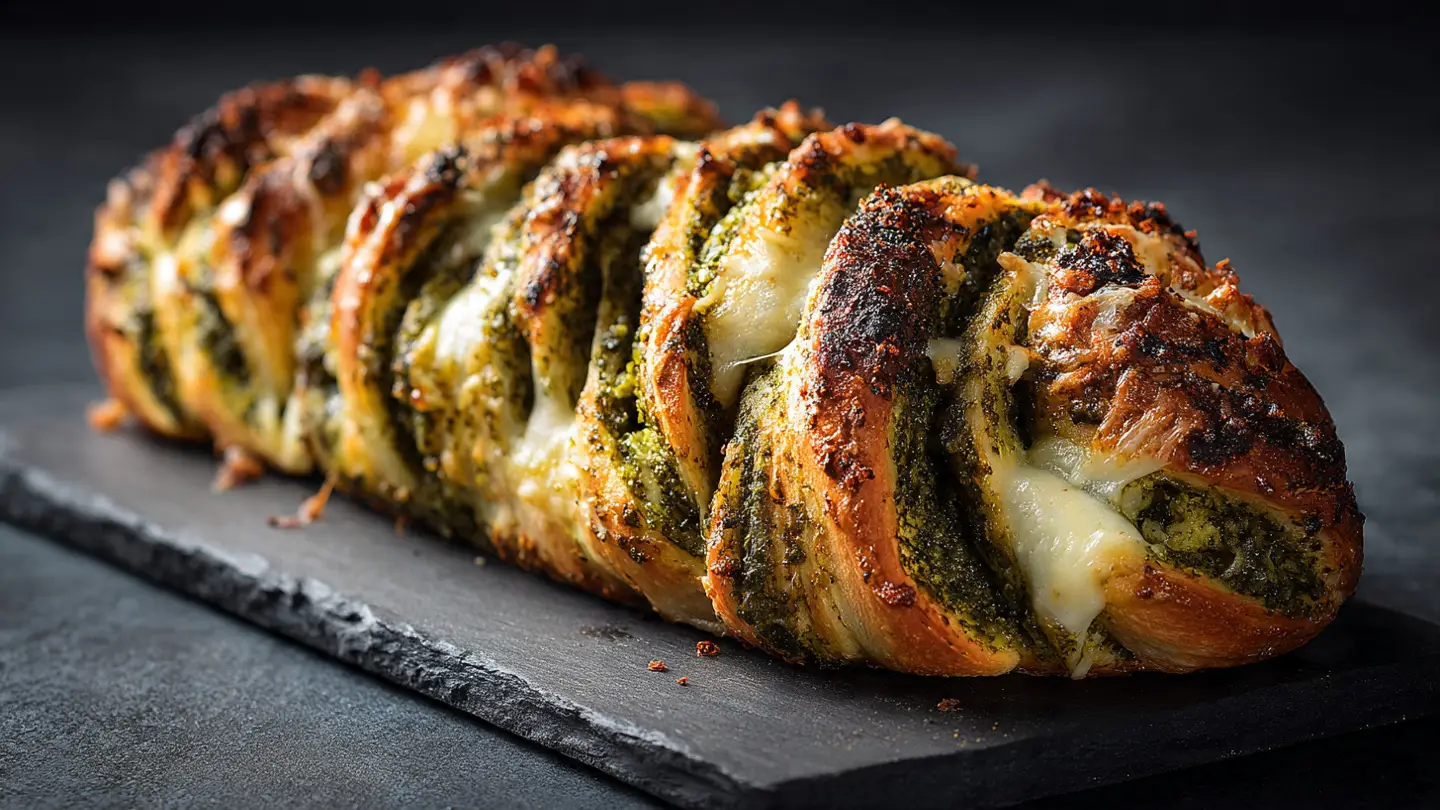
Cheesy Pesto Bread
Making bread at home feels like magic. You take flour and water, add some heat, and suddenly the house smells amazing. This Cheesy Pesto Bread is one of my favorite things to bake when I want something special but simple. It is basically a big, warm hug in food form. You get the crunch of the crust, the soft middle, and that punch of basil and garlic from the pesto. Plus, there is enough cheese to make anyone smile.
In this guide, I will show you how to mix the dough, swirl in the green sauce, and bake it until it is golden brown. You do not need to be a pro baker to do this. I will walk you through every step so your bread turns out great. Whether you want a side for your pasta or just a really good snack, this bread is the answer. It is fun to make and even better to eat with friends or family.
Grab your apron and let us get started on this tasty project!
Recipe Quick Info
- Prep Time: 20 minutes
- Cook Time: 25 minutes
- Servings: 8 people
- Difficulty: Easy
Everything You Need to Get Started
Before we turn on the oven, we need to gather our tools and food. Having everything ready on the counter makes cooking much more relaxing. I used to forget the salt or the yeast all the time. One time, I even made a whole loaf of bread and forgot the salt. It tasted like cardboard! Now, I check my list twice so I do not make that mistake again. You want to make sure your yeast is fresh too. If your yeast is old, the bread will stay flat and hard.
You will need a few bowls, a baking sheet, and some measuring cups. If you have a stand mixer, you can use it to save your arms some work. But if you do not have one, do not worry. Mixing by hand is a great way to feel how the dough is changing. It is actually quite relaxing to squish the dough between your fingers. It feels like play-dough for grown-ups!
The Simple Ingredients List

To make this bread, you only need a few basic things. Most of these might already be in your kitchen. First, you need all-purpose flour. This is the best kind for soft bread. You also need warm water. Make sure it is not too hot, or it will kill the yeast. Think of it like bath water for a baby. If it feels nice on your wrist, it is perfect for the yeast. You will also need a little sugar to feed the yeast and some salt for flavor.
- 3 cups of all-purpose flour
- 1 cup of warm water
- 1 packet of active dry yeast (about 2 and a quarter teaspoons)
- 1 teaspoon of sugar
- 1 teaspoon of salt
- 2 tablespoons of olive oil
- 1/2 cup of basil pesto
- 1 cup of shredded mozzarella cheese
- 1/4 cup of parmesan cheese
Choosing the Best Pesto and Cheese

The pesto is the star of the show here. You can buy a jar at the store to keep things easy. IMO, the refrigerated pesto tastes much better than the ones on the shelf. It stays bright green and tastes more like fresh basil. If you are feeling fancy, you can make your own with basil, nuts, and oil. But the store-bought kind works just fine for a busy weekday. It adds all that garlic and herb flavor without any extra chopping.
For the cheese, mozzarella is the best choice because it melts so well. It gives you those long, stretchy strings of cheese when you pull a piece away. I like to add a bit of parmesan too. It has a salty, sharp taste that goes great with the basil. You could even try cheddar if that is what you have in the fridge. Just make sure you use enough. There is no such thing as too much cheese in this recipe!
How to Make the Perfect Dough
Making dough is the most important part of the process. This is where the magic happens. When you mix the yeast with the water, it starts to wake up and blow little bubbles. Those bubbles are what make the bread light and fluffy. If your water is cold, the yeast will stay asleep. If it is boiling, the yeast will die. I always test the water with my finger first. It should feel warm but not stingy.
Kneading the dough is another big step. This means folding and pushing the dough over and over. It builds strength in the bread. At first, the dough will be sticky and messy. But after a few minutes of pushing and pulling, it becomes smooth and bouncy. It is a bit of a workout, but it is worth it. You will know it is done when you poke it and it springs back like a little pillow.
Mixing and Proofing the Dough

Start by putting your warm water, sugar, and yeast in a big bowl. Let it sit for five minutes. You should see foam forming on top. This means the yeast is alive and ready to work. Next, stir in the olive oil and salt. Slowly add the flour, one cup at a time. Keep stirring until it forms a shaggy ball. If the dough is too sticky to touch, add a tiny bit more flour. You want it to be soft but not stuck to your hands like glue.
Once the dough is mixed, put it on a clean counter. Push it away from you with the palms of your hands, fold it back, and turn it. Do this for about five to eight minutes. Now comes the hard part: waiting. Put the dough in a greased bowl and cover it with a towel. Let it sit in a warm spot for about an hour. It needs to grow until it is twice as big as it was. This is called proofing. While it grows, the flavors are getting better and the bread is getting air inside.
Rolling and Adding the Fillings

After the dough has doubled in size, punch it down. This is actually really fun! It lets the big air bubbles out so the bread has a nice even texture. Put the dough on a floured surface and roll it out into a big rectangle. It does not have to be perfect. Aim for something about the size of a large piece of paper. If it keeps shrinking back when you roll it, let it rest for five minutes and try again. Sometimes the dough just needs a break.
Now, spread your pesto all over the dough. Leave a small space around the edges so the green sauce doesn’t leak out too much. Sprinkle your mozzarella and parmesan cheese over the top of the pesto. It will look like a green and white pizza at this point. Try to spread the cheese evenly so every bite has a bit of everything. I once put all the cheese in the middle and the ends were very sad and plain. Lesson learned!
Shaping and Braiding the Bread

To get those pretty swirls, we are going to roll the dough up like a sleeping bag. Start from one of the long sides and roll it tight. Once you have a long log, use a sharp knife to cut it in half lengthwise. You will see all the layers of pesto and cheese inside. It might look a bit messy, but that is okay! Lay the two pieces side by side with the cut sides facing up. This lets everyone see the beautiful green filling.
Cross one piece over the other, back and forth, to make a simple twist or braid. Pinch the ends together so they stay put. Carefully lift the whole thing onto your baking sheet. It might feel a bit floppy, but just do your best. Even if it looks a little wonky, it will taste amazing once it bakes. Let it rest on the pan for another twenty minutes while you preheat your oven. This second rise makes the bread extra light and soft.
Pro Baking Tips
- Don’t Over-Flour: Using too much flour makes the bread dry. Add just enough so it doesn’t stick.
- Oven Temperature: Use an oven thermometer. Some ovens run hot or cold, which can burn your cheese or leave the middle raw.
- Fresh Herbs: If you have fresh basil, sprinkle some on top after baking for a bright pop of color.
Baking and Serving Your Creation
Now it is time for the best part: the oven. You want your oven nice and hot at 375 degrees. When you put the bread in, the heat makes the yeast give one last puff, and then the bread sets its shape. The cheese will start to bubble and turn brown, and the pesto will smell like a dream. Your kitchen will smell better than a fancy Italian restaurant! I usually set a timer for twenty minutes and then start checking on it.
Serving this bread is easy because it is so pretty. You can put the whole loaf on a big wooden board and let people tear pieces off. Or, you can slice it into thick pieces. It is best when it is still warm, but not burning hot. If you cut it too soon, the cheese might run out. Wait about ten minutes after it comes out of the oven. This gives the bread time to finish cooking on the inside.
How to Tell When It is Done

The bread should look deep golden brown on top. The cheese that is peeking out should be crispy and toasted. If you tap the bottom of the bread, it should sound hollow. That is a secret trick bakers use to know the middle is fully cooked. If it sounds like a heavy thud, it might need five more minutes. You can also use a thermometer to check the inside. It should be around 190 degrees. FYI, the smell is usually the biggest hint that it is ready!
If the top is getting too dark but the middle feels soft, cover it loosely with a piece of tin foil. This stops the top from burning while the inside finishes baking. Every oven is different, so keep a close eye on it during the last few minutes. My oven has a hot spot in the back corner, so I always rotate my pan halfway through. This helps the bread cook evenly so one side isn’t burnt while the other is pale.
Best Ways to Eat Pesto Bread

This bread is a meal all by itself if you are hungry enough! But it also goes great with a bowl of tomato soup. You can dip the cheesy edges right into the soup. It is also the perfect side for a big plate of spaghetti or a fresh salad. If you have leftovers, you can use slices to make the world’s best grilled cheese sandwich the next day. Just put a little extra cheese between two slices and toast them in a pan.
For a party, you can serve it with a little bowl of extra pesto or some balsamic vinegar and olive oil. People love pulling the bread apart with their hands. It is a very social food. Just make sure you have napkins ready because the pesto can be a little oily. It is messy in the best way possible. If you want to keep it simple, just eat it plain while it is still warm. You really don’t need anything else.
Storing and Reheating Tips

If you have any bread left over, do not throw it away! Wrap it tightly in plastic wrap or put it in a sealed container. It will stay fresh on the counter for about two days. If you want it to last longer, you can put it in the fridge for up to a week. You can even freeze it! I like to slice it before freezing. That way, I can just grab one slice and toast it whenever I want a quick snack.
To reheat the bread, the oven or an air fryer is much better than the microwave. A microwave can make the bread a little chewy or tough. Put a slice in the oven at 350 degrees for about five minutes. It will get that crispy crust back and the cheese will melt all over again. If you are in a rush, a toaster works great too. Just be careful not to let the cheese drip into your toaster!
Nutrition Facts (Per Serving)
- Calories: 280
- Total Fat: 14g
- Carbohydrates: 32g
- Protein: 9g
- Sodium: 450mg
Common Questions About This Bread
Can I use frozen bread dough instead?
Yes! Just thaw the dough first. Then roll it out and add the pesto and cheese. It saves a lot of time on a busy day.
What if I don’t like basil pesto?
You can use sun-dried tomato pesto or even just garlic butter. The steps are the same, but the flavor will be different and still very yummy.
My bread didn’t rise, what happened?
Your water might have been too hot and killed the yeast. Or, your yeast might be old. Always check the date on the packet before you start.
Can I make this bread vegan?
Sure! Use a vegan pesto and a dairy-free cheese. Most bread dough is already vegan since it is just flour, water, and yeast.
Can I add meat to the filling?
Yes, cooked bacon bits or small pieces of pepperoni taste great inside. Just don’t add too much or the bread might get too heavy to rise.
Happy Baking Everyone
This bread is a great way to bring some joy to your kitchen. It is warm, cheesy, and full of flavor. I hope you have a blast making it and sharing it with the people you love. Enjoy every bite of your homemade creation!