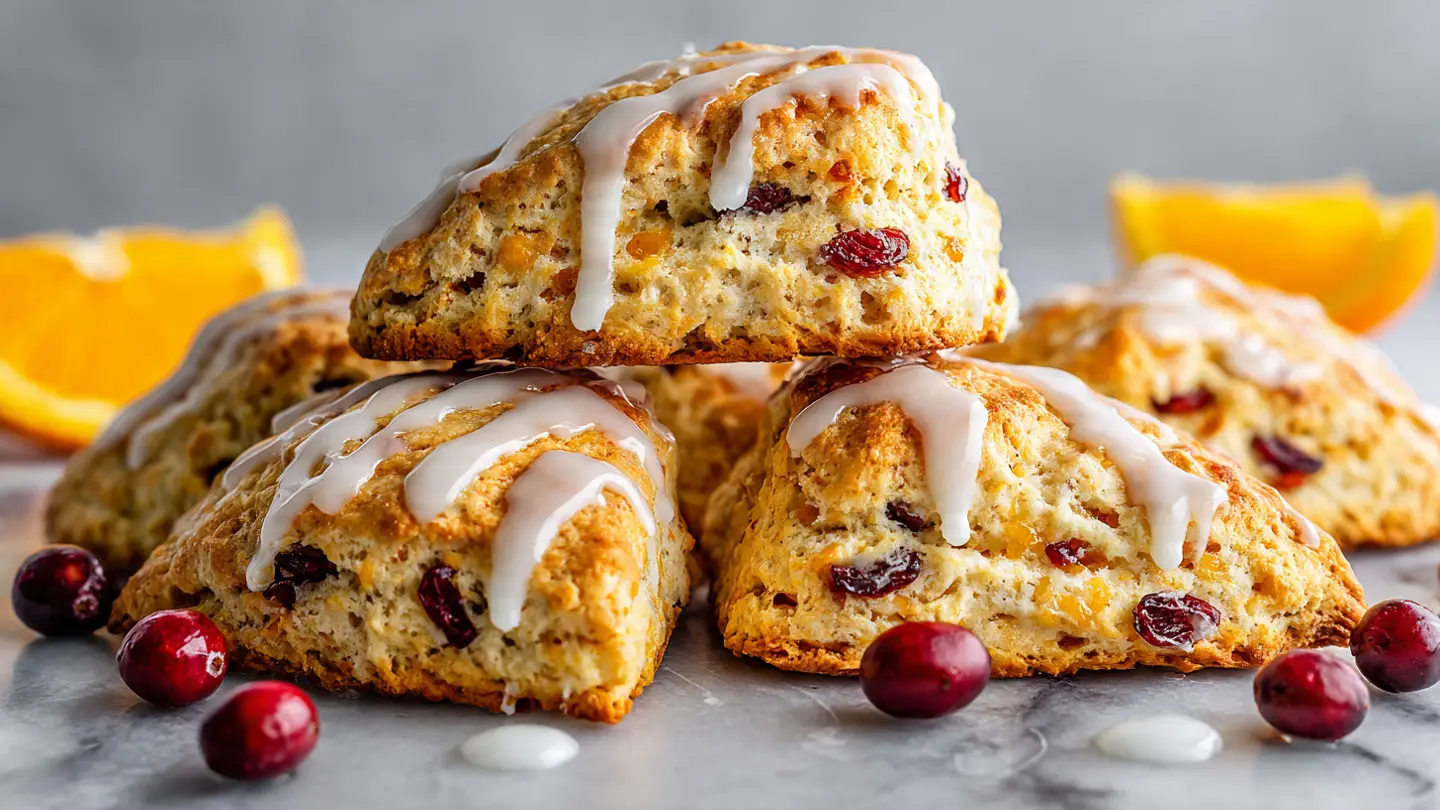
Cranberry Orange Scones with a Zesty Glaze
I love waking up to the smell of fresh bread and fruit in the kitchen. There is something very special about a warm scone right out of the oven. These cranberry orange scones are my favorite thing to make when I want a treat that feels fancy but is actually quite simple to bake. You get a little bit of tart flavor from the berries and a bright pop of sunshine from the orange peel.
In this guide, I will show you how to mix, shape, and bake these treats so they come out flaky every single time. We will also make a very easy glaze that goes on top to add a sweet finish. You do not need to be an expert baker to do this. I have made many mistakes in my own kitchen, and I will share what I learned so your baking goes smoothly. Get your apron ready because we are about to bake something delicious.
Keep reading to find the full list of items you need and the steps to follow.
The Joy of Baking Scones at Home
Baking at home is a great way to relax and make something with your hands. I remember the first time I tried to make scones. I worked the dough too much and they turned out hard like rocks. It was a sad day for my breakfast, but it taught me a big lesson about being gentle with dough. Now, I know exactly how to keep them light and soft. Scones are basically a cross between a biscuit and a muffin, and they are perfect for sharing with friends.
One thing I love about this specific recipe is how the colors look. The bright red cranberries look like little jewels inside the golden dough. When you add the orange glaze, it looks like something you would buy at a high-end bakery. But the best part is the taste. The orange makes the whole house smell amazing while they are in the oven. FYI, these are even better when they are still a little bit warm.
The Ingredients You Will Need

To make these scones, you only need a few basic things that you might already have in your pantry. Using fresh fruit makes a big difference in how the final product tastes. I always suggest using real butter instead of oil because it gives the scones that classic flaky texture. If you do not have dried cranberries, you can use raisins, but the flavor will be different. Here is what you need to gather before you start.
- 2 cups of all-purpose flour
- 1/3 cup of white sugar
- 1 tablespoon of baking powder
- 1/2 teaspoon of salt
- 1/2 cup of cold unsalted butter (cut into small cubes)
- 1/2 cup of dried cranberries
- 1 tablespoon of fresh orange zest (the orange skin)
- 1/2 cup of heavy cream (plus a little extra for brushing)
- 1 large egg
- 1 teaspoon of vanilla extract
Tools to Help You Bake

You do not need fancy machines to make these scones. In fact, using your hands or a simple fork is often better because you can feel the dough. I like to use a large bowl so the flour does not fly everywhere. A baking sheet lined with parchment paper is also a must-have. It keeps the scones from sticking to the metal and makes cleaning up much faster later on.
I also recommend having a sharp knife or a round cutter to shape the dough. If you do not have a cutter, a drinking glass works just fine. Just make sure to flour the edge of the glass so it does not stick. Having a small brush to put cream on the tops before baking helps them turn a beautiful golden brown color. Simple tools often lead to the best results in the kitchen.
How to Mix the Dough

Mixing the dough is the most important part of the whole process. First, you mix the flour, sugar, baking powder, and salt in your big bowl. Then comes the tricky part. You add the cold butter cubes. You need to mix the butter into the flour until it looks like small crumbs or peas. You can use a fork or a pastry tool for this. The key is to keep the butter cold. If the butter melts before it goes in the oven, you will lose those flaky layers.
After the butter is mixed in, toss in your cranberries and orange zest. In a smaller bowl, whisk the cream, egg, and vanilla together. Pour this wet mix into the dry mix. Use a fork to stir it gently. It will look a bit messy and shaggy at first, but that is okay. Do not keep stirring once the flour is gone. If you mix it too much, the scones will be tough. IMO, a few dry spots are better than over-mixing.
Step-by-Step Baking Instructions

Now it is time to turn that messy dough into beautiful scones. Follow these steps carefully to get the best shape and bake. I find that chilling the dough for a few minutes before cutting can help it hold its shape better, especially if your kitchen is warm. This is a small trick that most people forget to do.
- Preheat your oven to 400 degrees.
- Turn the dough out onto a floured surface and pat it into a circle about 1 inch thick.
- Cut the circle into 8 triangles, just like you are cutting a pizza.
- Place the triangles on your prepared baking sheet, leaving space between them.
- Brush the tops with a little bit of heavy cream.
- Bake for 15 to 18 minutes until the edges are golden brown.
- Let them cool on the pan for 5 minutes before moving them to a wire rack.
Making the Zesty Orange Glaze

The glaze is what takes these scones from good to great. It is very sweet and full of orange flavor. You only need two things: powdered sugar and fresh orange juice. I like to add a little more orange zest into the glaze too. It makes the scones look very pretty. You want the glaze to be thick enough to stay on the scone but thin enough to drizzle. If it is too thin, add more sugar. If it is too thick, add a drop of juice.
Wait until the scones are mostly cool before you put the glaze on. If the scones are too hot, the glaze will just melt and run off onto the plate. I usually use a spoon to drizzle it back and forth in a zig-zag pattern. It looks very professional that way. This glaze dries quickly, so it creates a nice little crunch on top of the soft bread. It is truly the best part of the recipe.
Recipe Quick Info
- Prep Time: 20 minutes
- Cook Time: 18 minutes
- Servings: 8 scones
- Difficulty: Easy
Tips for the Best Texture

If you want your scones to be the talk of the town, keep your ingredients cold. I sometimes put my flour in the fridge for ten minutes before I start. Cold butter creates steam in the hot oven, and that steam is what lifts the dough to make it flaky. If your hands are very warm, try rinsing them in cold water before you touch the dough. It sounds funny, but it really works to keep the butter from melting.
Another tip is to check your baking powder. Baking powder can go bad and lose its bubbles. If your scones do not rise, your powder might be old. You can test it by putting a little in a cup of hot water. If it bubbles a lot, it is still good. Also, try not to use a rolling pin. Use your hands to gently pat the dough down. This keeps the air inside the dough so the scones stay light and fluffy instead of smashed down.
How to Serve and Store Your Scones

These scones are best eaten on the same day you bake them. There is nothing like a fresh scone with a cup of hot coffee or tea. If you have leftovers, you can keep them in a sealed container for about two days. They might get a little soft, but you can put them in the oven for a few minutes to crisp them back up. Do not put them in the fridge because it can make them go stale faster.
You can also freeze these scones! I like to freeze the dough triangles before I bake them. When I want a fresh scone, I just take one out and bake it. You might need to add two or three minutes to the baking time if they are frozen. This is a great way to have a fancy breakfast on a busy morning without doing all the work. Serving them with a bit of extra butter or some orange marmalade is also a great idea.
Simple Variations to Try

Once you learn this base recipe, you can change it up. Instead of cranberries, you could use blueberries or even dark chocolate chips. Chocolate and orange go very well together. If you do not like orange, you can use lemon zest and lemon juice instead. The steps stay exactly the same. This makes the recipe very useful for any season of the year.
You can also make them mini-scones if you are having a party. Just cut the dough into smaller pieces and bake them for a shorter time. Watch them closely so they do not burn. Some people like to add a bit of nuts for a crunch. Chopped pecans or walnuts fit perfectly with the cranberry flavor. The possibilities are endless when you have a good dough to start with. Just remember to keep the fruit-to-dough ratio about the same.
Common Questions About Scones
Can I use frozen cranberries?
Yes, you can! Do not thaw them first. Just toss them in frozen. They might turn the dough a little pink, but they taste great.
Why are my scones flat?
This usually happens if the butter was too warm or the baking powder was old. Make sure your oven is fully heated before putting them in.
Can I use milk instead of heavy cream?
You can use whole milk, but the scones will not be as rich or flaky. Heavy cream has more fat, which makes the best texture.
How do I get a golden top?
Brushing the tops with cream or a beaten egg before baking is the secret. It helps the crust brown and shine in the oven.
Is the orange zest necessary?
The zest holds all the orange oil and flavor. Without it, the scones will just taste like plain cranberry. I highly suggest using it!
Time to Enjoy Your Treats
You now know all the secrets to making the best cranberry orange scones. From keeping your butter cold to drizzling that sweet glaze, you are ready to bake. These treats are sure to make your morning much brighter and tastier.