Focaccia Bread
I love the smell of fresh bread in my house. It makes everything feel cozy and warm. Focaccia is my favorite thing to bake because it is so hard to mess up. You do not need to be a master chef to get this right. It is a flat bread that is soft on the inside and crunchy on the bottom. You can eat it with soup, use it for sandwiches, or just snack on it while it is hot.
In this guide, I will show you how to make this bread from start to finish. We will talk about the best flour to use and why olive oil is your best friend here. You will learn the secret to those deep dimples on top of the bread. By the end of this page, you will feel ready to jump into the kitchen and start mixing. It is a fun project that looks very fancy but is actually quite cheap and easy to do.
Are you ready to make your kitchen smell like an Italian bakery? Let us get started with the basics!
Getting Ready for Your Best Bread Ever
Before you touch any flour, you need to understand why this bread is special. Focaccia is all about moisture. Most breads need a lot of kneading, but this one is much more relaxed. I remember the first time I made it, I thought the dough was too sticky. I almost added more flour, but I stopped myself. That was a good choice! Sticky dough is what makes the bread so light and airy.
You also need a lot of olive oil. Do not be shy with it. The oil fries the bottom of the bread in the oven, which gives it a great crunch. If you use too little, the bread will just be dry and boring. Think of the oil as a main ingredient, not just something to stop sticking. FYI, using a good quality oil makes a big difference in the final taste.
What You Need to Gather

To start, you need five simple things. Most of these are likely in your pantry right now. You need bread flour, warm water, salt, yeast, and olive oil. Bread flour is better than all-purpose flour because it has more protein. This helps the bread stay chewy and strong. If you only have all-purpose flour, it will still work, but the texture will be a little softer.
The water should be warm like a baby’s bath. If it is too hot, it will kill the yeast. If it is too cold, the yeast will stay asleep. I like to use instant yeast because you can just mix it right into the dry stuff. It saves a lot of time and worry. You also want flaky sea salt for the top. It gives a nice crunch and a pop of flavor when you take a bite. Here is a quick list of what to put on your counter:
- 3 and a half cups of bread flour
- 2 teaspoons of sea salt
- 2 teaspoons of instant yeast
- 2 cups of warm water
- Half a cup of olive oil (split up for different steps)
Mixing the Dough Without Stress

Mixing this dough is very easy. You do not need a big fancy mixer. I just use a large bowl and a sturdy spoon. First, whisk your flour, yeast, and salt together. Make sure they are mixed well so the yeast is spread out evenly. Then, pour in your warm water. You can also add a splash of olive oil here to make the dough rich.
Stir everything until you do not see any more dry flour. The dough will look very messy and shaggy. It will be much wetter than cookie dough or pizza dough. Do not worry! This is exactly how it should look. IMO, the wetter the dough, the better the holes inside the bread will be. Once it is mixed, cover the bowl with a clean towel or some plastic wrap. Let it sit in a warm spot for about 30 minutes. This gives the flour time to soak up the water.
Recipe Quick Info
- Prep Time: 15 minutes (plus 3 hours rising)
- Cook Time: 25 minutes
- Servings: 12 pieces
- Difficulty: Easy
Folding and Rising for Great Texture

Instead of heavy kneading, we use a trick called folding. Wet your hand with a little water so the dough does not stick to your fingers. Reach under one side of the dough, pull it up, and fold it over the top. Turn the bowl a little and do it again. Do this about four times. You will feel the dough getting stronger and smoother as you go.
Cover the bowl again and let it rise for an hour or two. You want it to double in size. It should look jiggly and have bubbles on the surface. This wait is the hardest part because you want to eat bread now! But patience is key. The yeast is busy eating the sugars in the flour and making gas. That gas stays inside the dough and makes it light and fluffy.
Dimples and Toppings to Make it Perfect

Now comes the fun part. This is where the magic happens! Once the dough has risen, pour it into a greased baking pan. Do not just use a little oil. Use a lot of oil so the bottom gets crispy. Use your fingers to spread the dough to the corners of the pan. If the dough shrinks back, just let it rest for ten minutes and try again. Sometimes the dough needs to relax its muscles.
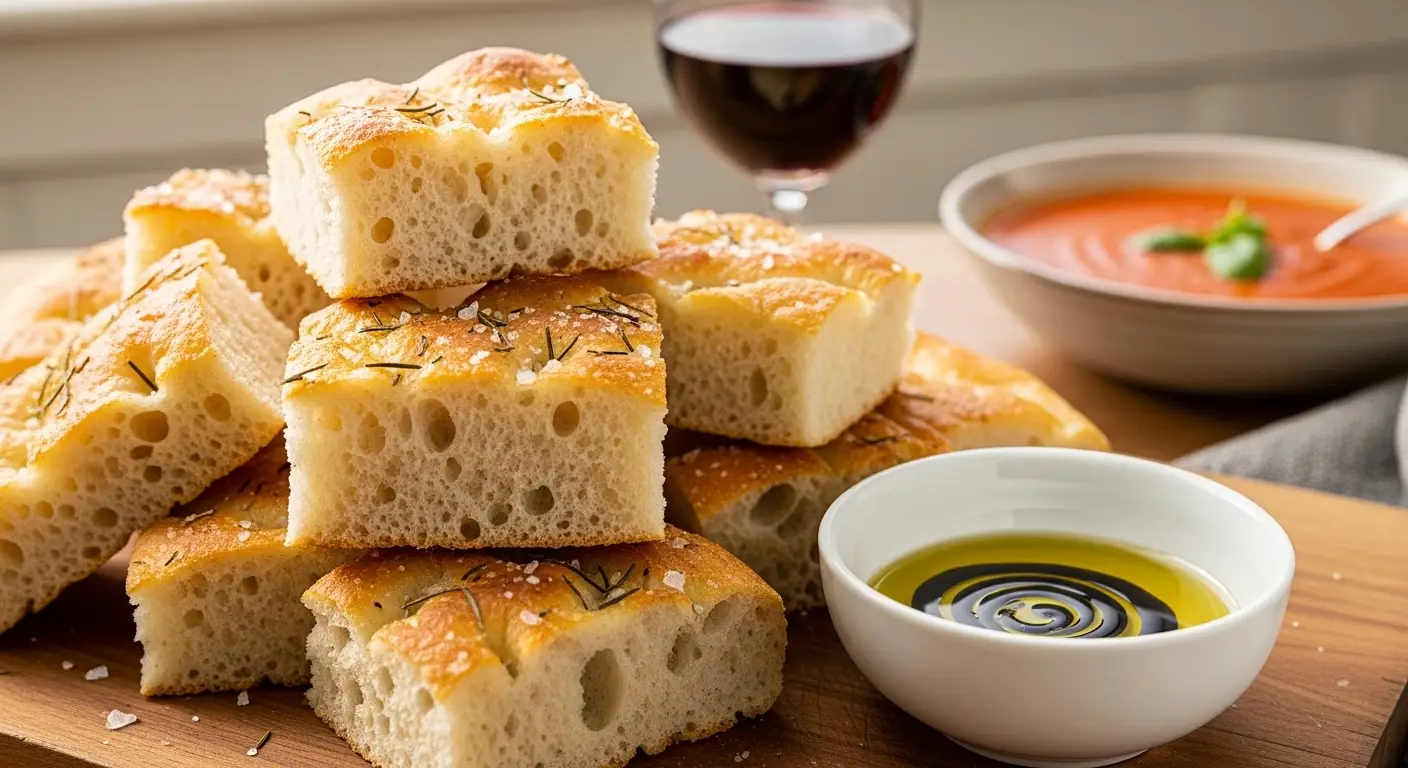
Poke your fingers all the way down into the dough. You want to make lots of deep holes. It should look like a piece of bubbly cheese. This is where the olive oil can pool up and soak into the bread. Sprinkle some flaky sea salt all over the top. If you want to be fancy, add some fresh rosemary, olives, or even sliced cherry tomatoes. Just do not use too many toppings because they can make the bread soggy.
Smart Baking Tips
- Oil the Pan: Use a metal pan if you can for the best crunch on the bottom.
- Wet Fingers: Dip your hands in olive oil before making dimples so they do not stick.
- Wait Twice: Give the dough a second rise in the pan for 45 minutes before baking.
Baking Until Golden Brown

The oven needs to be very hot. Set it to 425 degrees. This high heat is what gives you that perfect crust. Slide your pan onto the middle rack. Bake it for about 20 to 25 minutes. You are looking for a deep golden brown color on the top and sides. If it looks pale, it is not done yet. Do not be afraid of a little bit of dark brown on the edges.
Once it is out, let it sit in the pan for five minutes. This lets the bread soak up any extra oil on the bottom. Then, slide it onto a cooling rack. If you leave it in the pan for too long, the steam will make the bottom soft. You worked hard for that crunch, so do not lose it now! I once left mine in the pan and it got soggy. It was a sad day for my lunch. Learn from my mistake and use a rack.
The Best Ways to Serve it Up

Focaccia is the king of bread for serving. You can slice it into squares or long strips. It is great for dipping into a mix of olive oil and balsamic vinegar. If you have leftovers, which is rare, you can cut it in half and make a sandwich. A turkey and cheese sandwich on focaccia is way better than one on regular bread. You can also toast it the next day to make it crunchy again.
If you have extra bread, you can even cut it into cubes and bake them again to make croutons for a salad. They will be the best croutons you have ever had. The salt and oil are already in there, so they are full of flavor. Some people even put honey on their focaccia for a sweet and salty snack. It sounds weird, but it is actually really good! Just try it once and you will see what I mean.
Your Quick Questions Answered
I know that baking can feel a little bit scary. You might have some questions about what to do if things go wrong. Here are some of the most common things people ask me about this recipe. I want you to feel very confident before you start mixing your flour. Most of these answers will help you fix small problems before they even happen.
Can I use all-purpose flour instead of bread flour?
Yes! It will just be a little softer and less chewy. It still tastes great and works fine for this bread.
Why did my dough not rise after two hours?
Your yeast might be old or the water was too hot. Make sure the water is warm, not burning hot to your touch.
How do I store the bread for later?
Keep it in a bag at room temperature for two days. You can also freeze it in a bag for up to a month.
What pan is the best to use for baking?
A metal 9×13 inch pan is the best choice. It gets much hotter than glass and makes the bottom very crunchy.
Can I add cheese to the top of the bread?
Yes, parmesan or mozzarella are great. Add them in the last ten minutes of baking so they do not burn.
Happy Baking My Friends
Making bread should be a fun and happy thing. Do not worry if your first loaf is not perfect. It will still taste amazing because you made it yourself. Just remember to use plenty of oil and give the dough enough time to rest. You can do this! Now go enjoy your fresh bread.