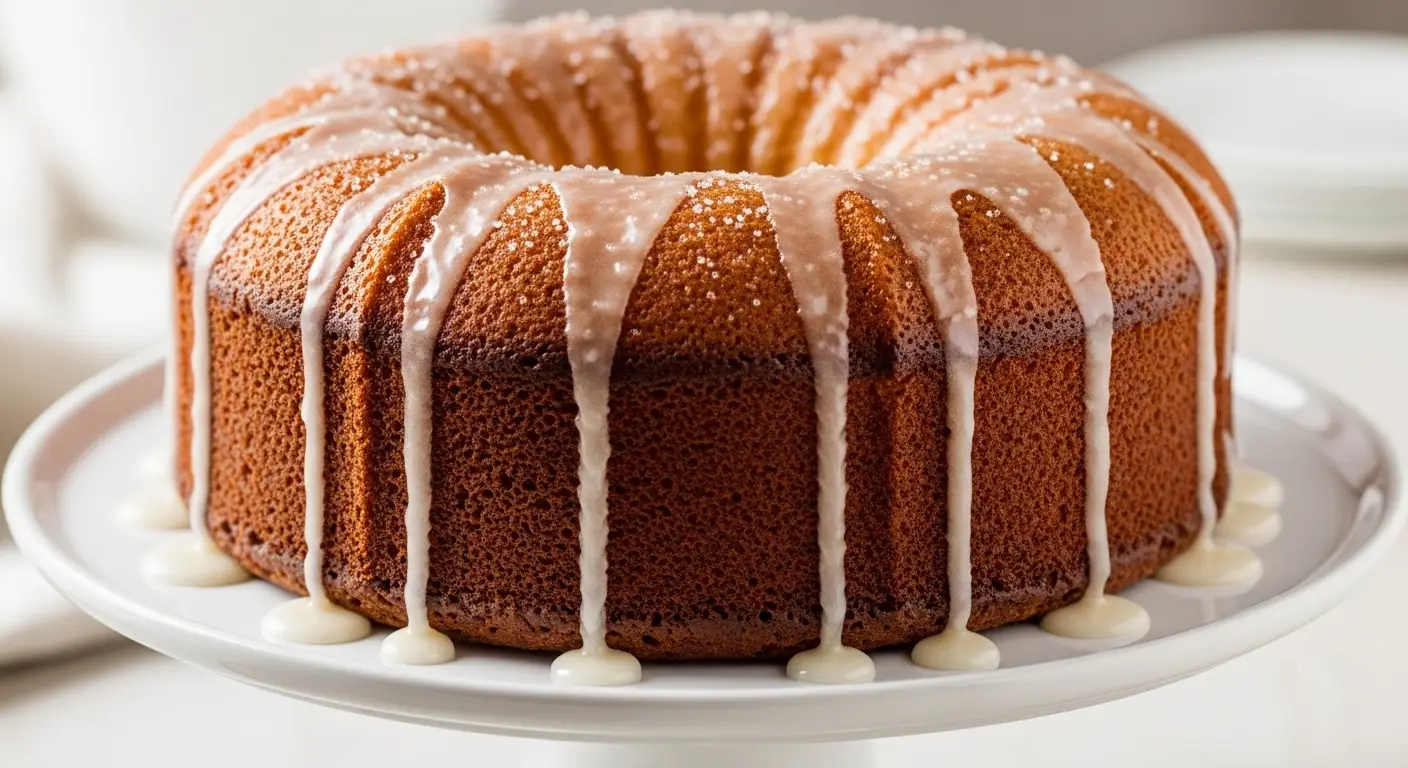
Kentucky Butter Cake
You are going to love this Kentucky Butter Cake. It is one of the most popular cakes for a good reason. Imagine a warm, golden pound cake that is soft on the inside. Then, you pour a sweet butter sauce all over it while it is still hot. The sauce soaks deep into the cake and makes it very moist. This cake is perfect for parties, family dinners, or just a quiet night at home.
I first tried this cake at a church bake sale many years ago. I remember taking one bite and thinking it was the best thing I ever ate. It was not just a dry yellow cake. It was rich and had a slight crunch on the edges from the sugar. I knew I had to learn how to make it myself. Since then, I have baked dozens of these for my friends and neighbors.
In this guide, I will show you every single step. We will talk about the ingredients you need and how to mix them. I will also share my secret for getting the glaze just right. This recipe is simple enough for kids to help, but the taste is good enough for a fancy restaurant. Let’s get our aprons on and start baking this tasty treat!
Check out the details below to see how to make it perfectly every time.
Getting Ready for Your Best Cake Ever
Before we start mixing, we need to make sure we have everything ready. Baking is like a science project where you can eat the results. If you skip a step or use the wrong temperature, the cake might not turn out right. I always tell people to read the whole recipe first. It helps you stay calm and avoid mistakes once the mixer is running.
One thing I learned the hard way is that temperature matters a lot. If your butter is too cold, your cake will have lumps. If your eggs are cold, the batter might split. I like to set my ingredients on the counter about an hour before I start. This lets everything get to room temperature. It makes a big difference in how the cake feels when you eat it.
The Ingredients You Need

You do not need anything fancy for this cake. Most of these items are probably in your kitchen right now. I always use all-purpose flour because it gives the cake a good structure. You will also need granulated sugar for sweetness. The butter is the most important part, so try to use a brand you really like. Salted or unsalted butter both work, but I prefer unsalted so I can control the salt myself.
- 3 cups all-purpose flour
- 2 cups granulated sugar
- 1 teaspoon salt
- 1 teaspoon baking powder
- 1/2 teaspoon baking soda
- 1 cup buttermilk
- 1 cup butter (2 sticks), softened
- 2 teaspoons vanilla extract
- 4 large eggs
Using buttermilk is a pro move. It makes the cake very tender. If you do not have buttermilk, do not worry! You can make a quick version by adding a spoonful of lemon juice to regular milk. Let it sit for five minutes before you use it. This little trick has saved me many trips to the grocery store. FYI, real buttermilk usually tastes a bit better, but the DIY version is a great backup.
Kitchen Tools for Success

You will need a large Bundt pan for this recipe. A Bundt pan has a hole in the middle which helps the thick batter cook evenly. I use a 10-cup or 12-cup pan. You also need a big bowl and a mixer. A stand mixer is great, but a hand mixer works just fine too. I usually use my hand mixer because it is easier to clean up afterward. I am all about making less work for myself!
A good rubber spatula is also helpful. You will want to scrape the sides of the bowl often. This ensures every bit of flour and sugar gets mixed in. Another tool you need is a wooden skewer or a long toothpick. This is for poking holes in the cake later. If you do not have a skewer, a clean knitting needle or even a thin chopstick can work in a pinch. Just make sure it is clean!
Recipe Quick Info
- Prep Time: 20 minutes
- Cook Time: 60 minutes
- Servings: 12 slices
- Difficulty: Easy
How to Bake the Kentucky Butter Cake
Now comes the fun part! Baking the cake is a steady process. You want to take your time mixing. The goal is to get plenty of air into the butter and sugar. This air makes the cake light instead of heavy like a brick. When I first started baking, I used to rush this part. My cakes were always flat and sad. Now I know that patience is the key to a fluffy crumb.
Make sure your oven is heated up all the way before you put the cake in. Most ovens take about 10 to 15 minutes to reach the right heat. If you put the cake in a cold oven, it will not rise correctly. I always turn my oven on to 325 degrees as the very first thing I do. By the time my batter is ready, the oven is perfect and waiting for me.
Step by Step Instructions

Follow these steps carefully to get the best results. Start by greasing your Bundt pan very well. I use butter and then a dusting of flour. Make sure you get every nook and cranny. Bundt pans have lots of shapes where the cake can stick. If the cake sticks, it might break when you try to take it out. That is a mistake I have made more than once!
- Preheat your oven to 325 degrees.
- In a big bowl, mix the flour, sugar, salt, baking powder, and baking soda.
- Add the butter, buttermilk, vanilla, and eggs.
- Beat the mix on low speed just to get it started.
- Turn the mixer to medium and beat for 3 minutes. This adds the air we need!
- Pour the batter into your prepared pan and smooth the top.
- Bake for 60 minutes or until a toothpick comes out clean.
While the cake is baking, your house will start to smell amazing. It smells like sweet vanilla and toasted butter. Try not to open the oven door too early. Opening the door lets the heat out and can make the cake sink in the middle. I usually wait until the 55-minute mark to check it. If the top is getting too brown, you can lightly cover it with a piece of foil.
Making the Sweet Butter Glaze

The glaze is what makes this cake a Kentucky Butter Cake. Without it, it is just a plain pound cake. The glaze is made of sugar, butter, a little water, and vanilla. You cook it on the stove until the sugar melts. Do not let it boil hard! You just want it nice and hot so it can soak into the cake. This part is a bit like magic because the liquid disappears into the cake and creates a sweet crust.
I once tried to skip the glaze because I was in a hurry. Big mistake! The cake was fine, but it was missing that special something. The glaze adds moisture and a sugary crunch to the outside. It also helps the cake stay fresh for longer. Make sure you use real vanilla extract here. The fake stuff just does not taste the same when it is the star of the show. IMO, the extra cost for real vanilla is totally worth it.
Soaking the Cake Perfectly

Once the cake comes out of the oven, do not take it out of the pan yet. This is very important. While the cake is still hot, take your skewer and poke holes all over the bottom. Go deep! You want at least 20 to 30 holes. Then, slowly pour the hot glaze over the cake while it is still in the pan. The holes act like little tunnels that carry the sweet butter sauce deep inside.
I like to pour the glaze in stages. I pour a little, wait a minute for it to soak in, and then pour more. If you pour it all at once, it might just sit on top or run down the sides. You want the cake to drink up every last drop. After you finish pouring, let the cake sit in the pan for about 20 minutes. This gives it time to firm up so it doesn’t break when you flip it over.
Tips for the Best Results
Even simple recipes have secrets. I have baked this cake for many years and I have picked up a few tricks. These small details can take your cake from good to great. Most people think baking is just about following the list, but how you handle the ingredients matters too. For example, never over-mix the batter once the flour is in. If you mix too much, the cake becomes tough.
Another tip is about the pan. If you have an old Bundt pan that always sticks, it might be time for a new one. Or, you can use a baking spray that has flour already in it. That stuff is a lifesaver! I also recommend placing the pan on a baking sheet while it is in the oven. Sometimes the glaze can drip a little when you pour it, and the sheet catches the mess. It keeps your oven clean and smoke-free.
Variations to Try

Once you master the basic recipe, you can get creative. I sometimes add a teaspoon of almond extract along with the vanilla. It gives the cake a wedding-cake flavor that people love. You can also toss some chocolate chips into the batter. Just coat them in a little flour first so they don’t sink to the bottom. I learned that trick after making a cake where all the chocolate was stuck to the bottom of the pan!
If you like fruit, you can serve the cake with fresh strawberries or raspberries. The tart fruit balances out the sweet butter sauce perfectly. Some people even like to add a pinch of cinnamon to the glaze. This makes it taste a bit like a snickerdoodle cookie. This cake is like a blank canvas. You can keep it simple or make it fancy depending on what you like.
How to Store Your Cake

This cake actually tastes better the next day. As it sits, the glaze settles and the flavors blend together. I always wrap mine tightly in plastic wrap or keep it under a cake dome. It stays fresh on the counter for about three to four days. If you need it to last longer, you can put it in the fridge. Just know that the butter will get firm when it is cold, so the cake might feel a bit harder.
You can also freeze this cake! It freezes very well. I usually cut it into slices and wrap each slice in foil. Then I put them all in a big freezer bag. When I want a treat, I just pull out a slice and let it thaw for an hour. It is great for when you have unexpected guests or just a late-night craving. FYI, you can even warm a slice in the microwave for ten seconds to make it taste fresh from the oven.
Success Tips
- Don’t Rush: Let the cake cool in the pan for exactly 20 minutes before flipping.
- Sift Flour: If your flour is lumpy, sift it for a smoother cake.
- Quality Butter: Use the best butter you can find for the richest flavor.
Common Baking Questions
Can I use a regular cake pan instead of a Bundt pan?
Yes, you can use two loaf pans or a 9×13 inch pan. The bake time will be shorter, about 40-45 minutes. Watch it closely!
Why did my cake stick to the pan?
You might not have greased the pan enough. Also, if you wait too long to flip the cake, the sugar in the glaze can act like glue.
My glaze turned into a hard crust. What happened?
You might have boiled the glaze too long. You only want the sugar to melt. If it cooks too much, it turns into candy.
Can I make this cake without alcohol?
Some recipes use rum, but mine uses only vanilla. It is totally kid-friendly and safe for everyone to eat.
Is buttermilk necessary for this recipe?
Yes, the acid in buttermilk reacts with the baking soda to help the cake rise and stay soft. Don’t skip it!
Time to Enjoy Your Creation
This Kentucky Butter Cake is a true classic that never goes out of style. It is sweet, buttery, and has the perfect texture. Whether you eat it plain or with fruit, it is sure to be a hit. Now go get your mixer and start baking. You can do this!