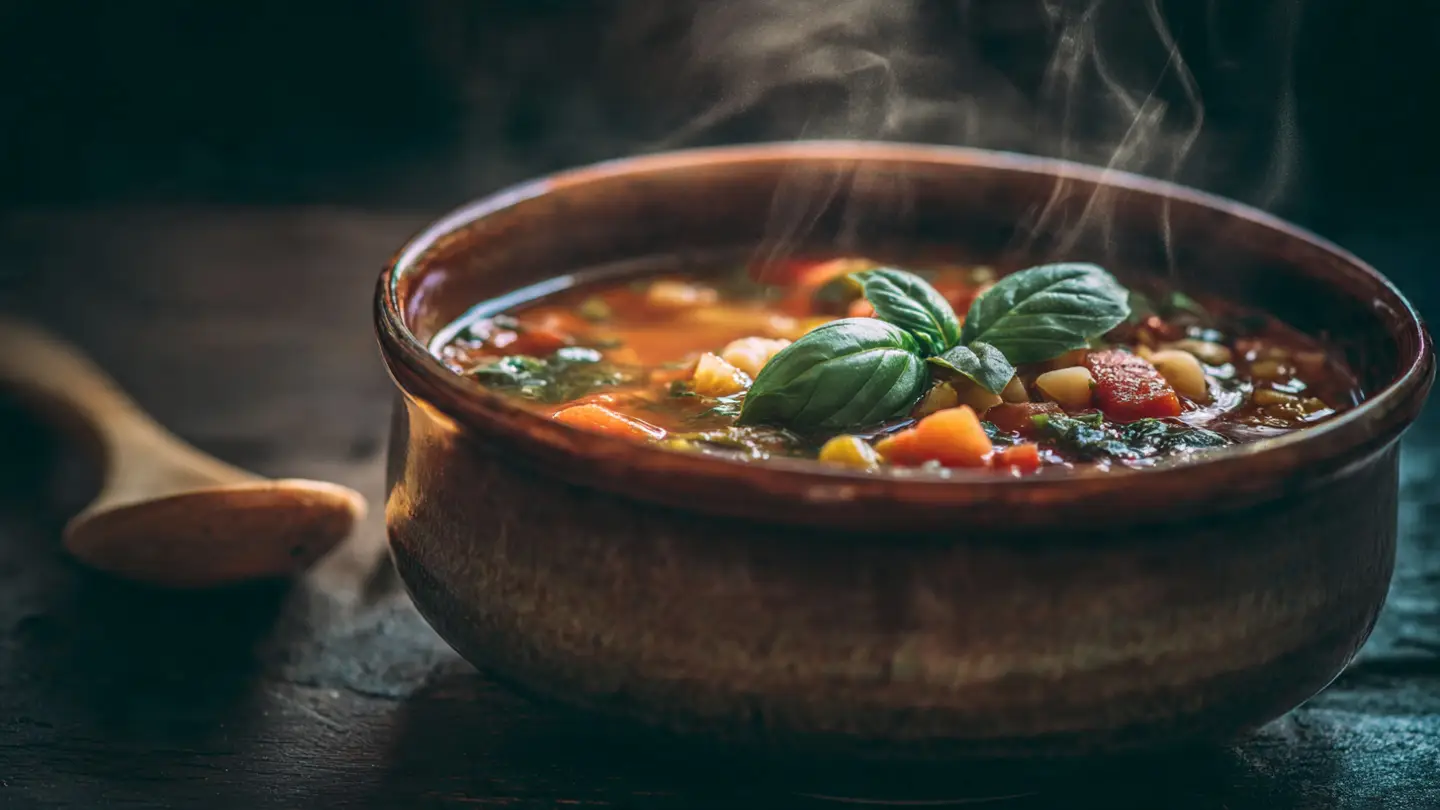
Minestrone Soup
I love a big bowl of soup when the weather gets cold. Minestrone is my favorite because it has everything you need in one pot. It is full of beans, pasta, and lots of colorful vegetables. You will learn how to pick the right ingredients and how to cook them so they stay yummy. I will also tell you my secret trick for making the broth taste extra rich and savory.
Making soup at home is much better than buying it in a can. You can choose what goes inside and it smells amazing while it cooks. This guide covers all the steps from chopping to serving. By the end, you will feel like a pro in the kitchen. Let’s get your big pot ready for some cooking fun.
Check out the steps below to start your soup journey.
Getting Ready for Your Soup
Before you turn on the stove, you need to get your tools and food ready. Making minestrone is mostly about chopping. If you do all the cutting first, the cooking part is very easy and fast. I usually put all my chopped veggies in small bowls so I can just grab them when I need them. This keeps the kitchen clean and helps me stay calm while I cook.
Choosing the Best Vegetables

The best thing about this soup is that you can use almost any vegetable. I always start with the basics. Onions, carrots, and celery are the three most important things. They give the soup a deep flavor that makes it taste like it came from a fancy restaurant. I like to cut them into small, even pieces so every spoonful has a little bit of everything.
You can also add seasonal items. In the summer, I put in fresh green beans and yellow squash. In the winter, I might add some kale or chopped cabbage. One time, I tried to put in too many potatoes, and it soaked up all my broth. That was a big mistake! Now I know to stick to just one or two starchy things so the soup stays like a soup and not a stew.
Picking Your Beans and Pasta

Beans make the soup filling and healthy. I usually use canned beans because they are fast and easy to use. Just make sure you wash them off in a colander first. This removes the salty liquid they sit in inside the can. Cannellini beans are my favorite because they are creamy and soft. Kidney beans also work great if you want a bit more color in your bowl.
Pasta is the next part of the puzzle. You want small shapes that fit on a spoon easily. I like to use ditalini, which look like tiny tubes. Little stars or small shells are also fun choices. Be careful not to overcook the pasta. If it sits in the hot soup too long, it gets mushy and big. To stop this, I often cook the pasta in a separate pot and add it to my bowl right before I eat. This keeps the noodles firm and tasty.
The Power of Tomato and Broth

The liquid is the heart of your minestrone. I use a mix of vegetable broth and canned tomatoes. Crushed tomatoes or diced tomatoes both work well. They turn the water into a rich, red sauce that tastes sweet and tangy. If you want it to be extra good, buy a high-quality broth from the store or make your own at home. It makes a huge difference in the final taste.
One secret I learned is to use a Parmesan cheese rind. You know that hard part at the end of a block of cheese? Do not throw it away! I drop it right into the pot while the soup simmers. It adds a salty, nutty flavor that you can’t get from salt alone. Just remember to fish it out before you serve the soup to your friends. Nobody wants to bite into a hard piece of cheese skin! FYI, this is a trick many chefs use in Italy.
Quick Prep Tips
- Sharp Knives: Use a sharp knife to cut veggies safely and quickly.
- Vegetable Scraps: Save your carrot peelings to make broth later.
- Can Opener: Check your can opener is clean before opening the beans.
The Cooking Process Step by Step
Now that your ingredients are ready, it is time to start the fire. Cooking minestrone is a slow process that builds layers of flavor. You don’t want to rush it. If you cook the onions too fast, they might burn and taste bitter. If you cook the soup too short, the vegetables will be crunchy instead of soft. I will guide you through the right order so everything turns out perfect.
Sautéing the Base Aromatics

I start by heating some olive oil in a large pot. Use medium heat so the oil doesn’t smoke. I toss in the onions, carrots, and celery first. These are called aromatics because they smell so good when they hit the hot oil. I cook them until the onions look clear and the carrots feel a bit soft. This usually takes about five to eight minutes of stirring.
During this step, I also add garlic. Garlic burns very easily. I wait until the other veggies are almost done before I put the garlic in. Stir it for just one minute until you can smell it really well. If it turns dark brown, it will taste bad, and you might have to start over. Trust me, I have done that before and it was not fun! Keep your eyes on the pot and keep things moving.
Adding the Liquid and Simmering

Once the base is ready, I pour in the tomatoes and the broth. This is when the magic happens. I turn the heat up to bring the liquid to a boil. As soon as it starts to bubble, I turn the heat back down to low. This is called a simmer. You want small bubbles, not big splashes. I let it cook like this for about twenty minutes so all the flavors can get to know each other.
While it simmers, I add my herbs. Dried oregano and basil are classic choices. You can also use a leaf called a bay leaf. It adds a nice earthy smell. This is the time to be patient. The longer it sits on a low flame, the better it will taste. I like to taste the broth with a spoon every now and then. This helps me decide if I need to add a pinch more salt or pepper. IMO, tasting as you go is the best way to be a good cook.
Adding the Finishing Touches

The last few minutes are for the things that cook fast. I throw in the beans and the zucchini at the very end. Zucchini gets mushy if you cook it for twenty minutes, so five minutes is plenty of time for it. If I am using spinach or kale, I stir that in last. The heat of the soup will wilt the leaves in about sixty seconds. It looks so pretty when the bright green leaves mix with the red broth.
I check the pasta too. If I didn’t cook it separately, I drop it in about ten minutes before I want to eat. Make sure you check the package to see how long your pasta needs. Once the noodles are soft, the soup is done! I turn off the stove and let it sit for a minute. This lets the temperature even out. Always remove the bay leaf and the cheese rind before you put the soup into bowls.
Serving and Storing Your Meal
You worked hard on your soup, so now you should enjoy it! How you serve it can make it feel even more special. I have some ideas on what to eat with it and how to save the leftovers. This soup is actually better the next day because the spices have more time to soak into everything. It is the perfect meal for a busy week.
Best Side Dishes for Soup

I think minestrone needs a crunchy friend. A big piece of crusty bread is the best choice. You can use it to soak up every last drop of the broth. I like to rub a little bit of butter or garlic on my bread before I toast it. A small side salad with a simple lemon dressing also tastes great. It adds a fresh crunch that goes well with the soft, warm soup.
If you want to be extra fancy, you can make cheese toast. Just put some cheese on bread and melt it under the broiler for a minute. Dipping cheesy bread into tomato soup is one of the best feelings in the world. It makes a simple dinner feel like a big treat. This soup works for kids and adults, so everyone will be happy at the table.
Saving Soup for Later

If you have leftovers, you are lucky! Put the soup in a container with a tight lid. It will stay good in your fridge for about four or five days. When you want to eat it again, just heat it up in a small pot or in the microwave. You might notice the soup looks thicker the next day. This is because the pasta and beans soak up the liquid. You can just add a splash of water or extra broth to make it thin again.
You can also freeze this soup. I put it in freezer bags and lay them flat. They take up very little space that way! It can stay in the freezer for up to three months. This is great for when you feel sick or are too tired to cook. Just remember that zucchini and pasta can get a little soft after being frozen. If that bothers you, you can freeze the soup without those items and add them fresh when you reheat it.
Common Questions About Minestrone
Can I make this soup in a slow cooker?
Yes! Put everything except the pasta and greens in. Cook on low for 6 to 8 hours. Add the pasta at the very end so it does not get too soft.
Is minestrone soup always vegetarian?
Most of the time it is. But some people add bacon or pancetta for flavor. If you are at a restaurant, it is best to ask what kind of broth they use.
What if I do not like beans?
You can leave them out! Just add more vegetables like potatoes or extra pasta to make the soup filling. Chickpeas are also a good swap for beans.
How do I make the soup spicy?
I like to add a pinch of red pepper flakes when I sauté the onions. It gives a nice warm kick without being too hot for kids.
Can I use frozen vegetables?
You sure can. Frozen peas, corn, or green beans work great. Add them at the end of the cooking time since they are already soft.
Enjoy Your Homemade Soup
I hope you feel ready to make your own big pot of minestrone. It is a healthy meal that tastes like a hug in a bowl. Remember to chop your veggies small and use a cheese rind if you can find one. Cooking should be fun and relaxed. Even if you make a small mistake, it will still taste good because you made it yourself. Happy cooking!