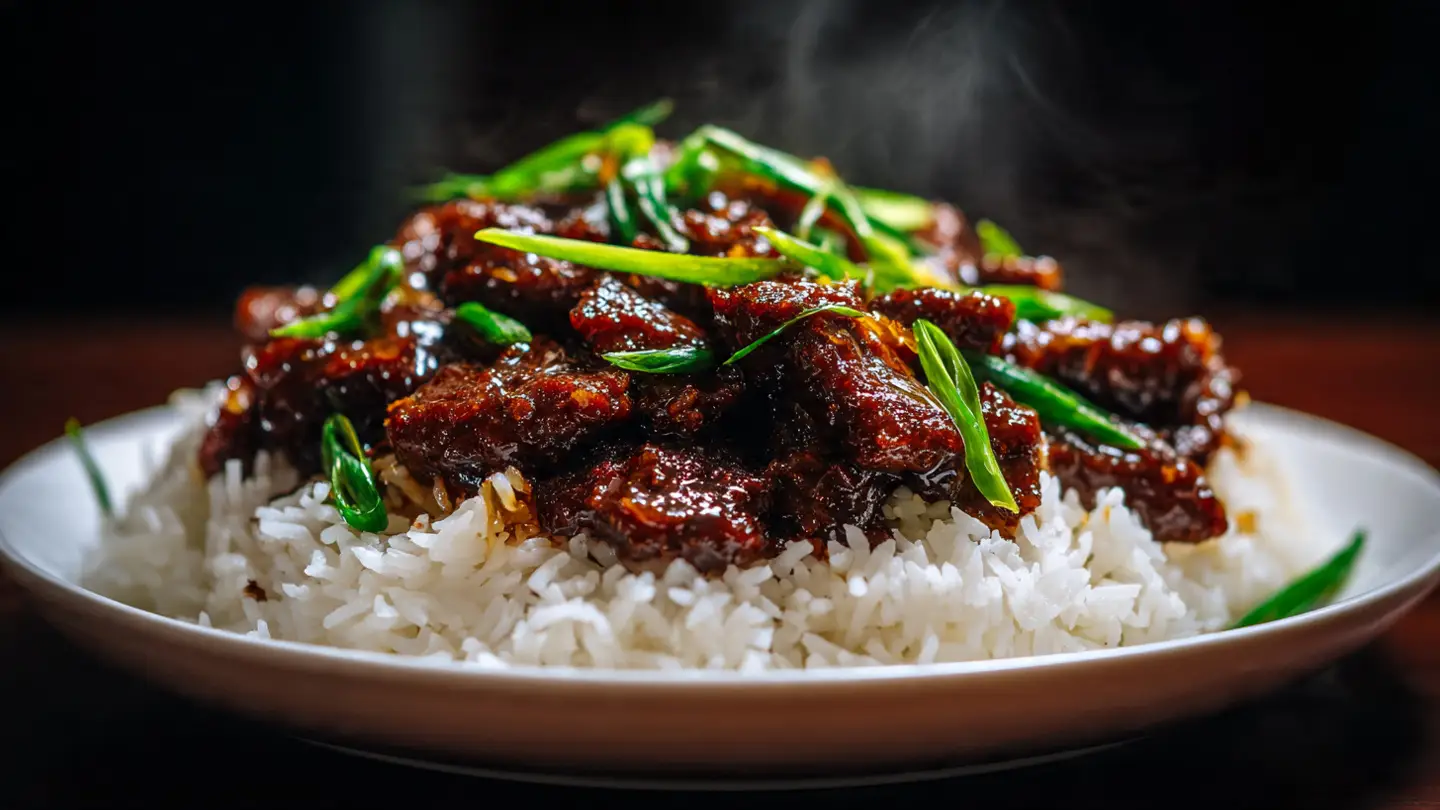
Mongolian Beef
Making Mongolian beef at home is a lot of fun. I used to think this dish was very hard to get right. It always looked so fancy at the big restaurants. The meat was so soft and the sauce was very shiny. I finally tried making it myself and I learned many good tricks. This food is sweet and salty and has a little bit of heat. It is a great meal for any night of the week.
You will learn how to pick the best beef for this dish. I will show you how to cut it the right way so it stays tender. We will talk about the sauce and how to make it thick and tasty. You will also see how to cook everything fast in a hot pan. By the end, you will feel like a pro cook in your own kitchen.
Ready to start cooking? Let’s go!
The Basics of Great Mongolian Beef
To make the best Mongolian beef, you need to understand the simple parts. It is not actually from Mongolia. It is a dish made in America that uses Chinese cooking styles. The main goal is to have crispy edges on the meat and a sticky sauce that coats every piece. If you get these two things right, your dinner will taste like it came from a shop.
The heat is very important here. You need a pan that gets very hot very fast. Most people use a wok, but a big frying pan works too. If the pan is not hot enough, the meat will just steam and get chewy. We want it to brown and get those little crunchy bits that everyone loves. It takes a little practice to be brave with the high heat, but it is worth it.
Choosing the Right Cut of Meat

I always use flank steak for this recipe. It is a long and flat piece of meat that has a lot of flavor. Flank steak is great because it has long fibers that are easy to see. This makes it easy to slice. If you cannot find flank steak, you can use skirt steak or even top sirloin. Just make sure the meat is not too fatty.
I once made a mistake and bought a very tough piece of stew meat. I thought it would get soft if I cooked it fast, but I was wrong. It was like chewing on a rubber band! Flank steak is the way to go because it reacts well to quick cooking. It stays juicy inside while the outside gets a nice crust from the starch and sugar.
This cut of meat is best for people who want a beefy taste without a lot of gristle. It is a bit lean, so you have to be careful not to overcook it. If you cook it for ten minutes, it will be dry. If you cook it for two minutes, it will be perfect. Flank steak is a bit expensive sometimes, so look for sales at the grocery store.
The Secret of Cutting Against the Grain

Cutting the meat is the most important step for tenderness. You have to look for the lines in the meat. These lines are called the grain. You must cut your knife across those lines, not with them. This breaks the long fibers into tiny pieces. When you eat it, your teeth don’t have to do much work. It just melts in your mouth.
I like to put my meat in the freezer for about 30 minutes before I cut it. It does not freeze solid, but it gets firm. This makes it much easier to get very thin slices. Thin slices are better because they cook in a flash. If the slices are too thick, the outside will burn before the inside is done.
Try to make each piece about the same size. This helps everything cook at the same time. IMO, thin strips about two inches long are the best shape. They pick up the sauce well and fit perfectly on a fork or chopsticks. If you cut with the grain by accident, the meat will be very hard to chew, so take your time on this part.
Why Cornstarch is Your Best Friend

Before the meat hits the pan, it needs a coat of cornstarch. This is a classic trick in many stir-fry dishes. The starch does two big jobs. First, it protects the meat from the high heat so it stays soft. Second, it creates a rough surface that the sauce can grab onto. Without it, the sauce would just slide off the meat and sit at the bottom of the plate.
I usually put my beef slices in a big bag with the starch and shake it up. You want every single piece to have a thin white coat. Don’t let the meat sit too long after coating it, or it will get soggy. Shake off any extra starch before you put it in the oil. Too much extra powder will make the oil messy and could burn.
This step is perfect for people who like that restaurant-style texture. It gives the beef a very slight crunch. It also helps thicken the sauce later without having to add a separate thickener. It is a simple step, but skipping it is a big mistake. I tried it once without the starch and it just felt like plain boiled beef. It was not very exciting at all.
Making the Perfect Sauce and Cooking
The sauce is where all the flavor lives. It is a mix of dark and light flavors. You need soy sauce for salt, brown sugar for sweetness, and ginger and garlic for spice. When these cook together, they turn into a thick syrup. This syrup is what makes the dish look so shiny and yummy. It is a very simple sauce, but the balance must be right.
Cooking is the fastest part of the whole process. You spend twenty minutes cutting and prepping, but only five minutes at the stove. This means you must have everything ready. Put your sauce in a bowl and your veggies in another. Once you start the fire, you cannot stop to go find the garlic. You have to be ready to move fast.
Quick Cooking Tips
- Small Batches: Cook the meat in two turns so the pan stays hot.
- Dry Meat: Make sure the beef is dry before adding starch so it gets crispy.
- Fresh Garlic: Use fresh garlic instead of the kind in a jar for more zing.
Mixing the Sweet and Salty Sauce

The sauce needs a lot of brown sugar. This might seem like too much sugar, but it is necessary. The sugar helps the sauce stick to the meat. It also balances out the salty soy sauce. I like to use dark brown sugar because it has a deep taste. It makes the sauce look very dark and rich. If you use white sugar, it will be sweet but it won’t have that same depth.
I add a little bit of water or beef broth to my sauce too. This keeps it from becoming too thick too fast. You want enough liquid so the sauce can bubble up and cover everything. I also add a tiny bit of red pepper flakes. It does not make it very spicy, but it adds a nice little kick. If you hate spice, you can leave that out.
This sauce is great for kids because it is mostly sweet. Most picky eaters love the taste of soy sauce and sugar together. FYI, if you use low-sodium soy sauce, you might need to add a pinch of salt. Regular soy sauce is usually plenty salty on its own. Always taste a tiny bit of the sauce before you pour it in the pan to make sure you like the balance.
Using Lots of Garlic and Ginger

Garlic and ginger are the heart of the flavor. You should use more than you think you need. I use about four or five cloves of garlic and a big piece of ginger. I grate the ginger so it is like a paste. This way, you don’t bite into a big hard piece of it. Grated ginger also releases more juice into the sauce, which makes it smell amazing.
When you put the garlic and ginger in the pan, they only need about thirty seconds. If they turn black, they will taste bitter. You just want to smell them. The moment the smell hits your nose, it is time to add the sauce. This keeps the flavors bright and fresh. I love how the kitchen smells when the ginger hits the hot oil.
This part of the dish is what makes it healthy-ish. Ginger is very good for your stomach. Garlic is good for your heart. Even though there is sugar in the sauce, these fresh ingredients add a lot of goodness. Just make sure you don’t use the dried powder. The powder is okay in a pinch, but fresh ginger is a million times better.
The Importance of Green Onions

Green onions are the only vegetable in traditional Mongolian beef. Most recipes use a lot of them. I cut them into long pieces, about two inches long. I add them at the very end of the cooking time. You don’t want to cook them until they are mushy. You just want them to wilt a tiny bit and get bright green. They add a nice crunch and a mild onion taste.
The white parts of the onion have a stronger flavor, while the green parts are pretty. I use both. If you don’t like onions, this might be a tough dish for you. But usually, the sweet sauce makes the onions taste great even to people who don’t love them. They help break up the richness of the meat and the sugar.
I sometimes add other veggies like broccoli or bell peppers if I want a bigger meal. This is a good way to feed more people. However, if you add too many veggies, the sauce might get watered down. If you add extra stuff, you should probably double the sauce recipe. It is always better to have too much sauce than too little.
Frying the Beef to Perfection

When it is time to fry, make sure your oil is very hot. I use an oil that can handle heat, like vegetable oil or peanut oil. Do not use olive oil because it will smoke and smell bad. You only need a thin layer of oil in the pan. Place the beef pieces in one by one so they don’t stick together in a big clump.
Let the meat sit for a minute before you move it. This lets the crust form. If you stir it right away, the starch might fall off. Once you see the edges getting brown, flip them over. The meat should only take two or three minutes to cook. It will look a bit dry and crispy at this point, but don’t worry. The sauce will fix that.
I have learned that if the pan gets too crowded, the temperature drops. The meat starts to leak juice and it boils instead of fries. This is why I cook in batches. It takes a few more minutes, but the result is way better. Crispy beef is the goal. If it is grey and soft, it won’t be as fun to eat. Patience is key during the frying stage.
Bringing it All Together

After the beef is fried, take it out of the pan. Pour out most of the oil but keep the brown bits in the bottom. Add your garlic and ginger, then the sauce. The sauce will bubble and get thick very quickly because of the sugar. Once it looks like a thick glaze, toss the beef back in. Mix it all up so every piece of meat is shiny and dark.
Throw in your green onions right at the end. Give it one last stir and turn off the heat. The sauce will continue to thicken as it cools for a minute. It should look like a dark mahogany color. It is a beautiful sight! I always feel so proud when the sauce coats the meat perfectly without being too runny or too thick.
This dish may not work if your sauce gets too hot and turns into hard candy. If you cook the sugar too long, it can get very sticky and tough. If the sauce looks like it is getting too thick, just add a splash of water. It is an easy fix. Serve it immediately while it is hot and the beef is still a little bit crispy under the sauce.
Serving Ideas and Sides

White rice is the best partner for Mongolian beef. The rice soaks up all that extra sweet and salty sauce. I like to use jasmine rice because it smells good and has a nice texture. You can also use brown rice or even noodles. Some people like to serve it over crispy fried rice noodles to add even more crunch to the meal.
If you want to keep it low in carbs, you can use cauliflower rice or put the beef in lettuce wraps. The big flavor of the beef works well with the fresh crunch of lettuce. I often serve a side of steamed bok choy or snap peas too. It adds some color to the plate and makes the meal feel more balanced. It is a very versatile dish.
One practical tip most blogs skip is to warm your plates. If you put hot beef on a cold plate, the sauce will thicken up too fast and get gummy. I just run my plates under hot water for a second and dry them. It keeps the food at the right texture while you eat. It makes a big difference in how the meal feels at the table.
How to Handle Leftovers
If you have any beef left over, it stays good in the fridge for a few days. The flavor actually gets a bit deeper as it sits. However, the beef will lose its crispiness. When you heat it up, do it in a pan with a tiny bit of water instead of the microwave. The microwave can make the meat feel a bit tough like leather.
You can also use the leftover beef to make a quick fried rice. Just chop up the beef into smaller pieces and toss it with cold rice, an egg, and some peas. It is like getting two meals for the price of one. I love doing this for lunch the next day. It is fast and tasty.
Alternative Options
- Chicken: Use chicken breast strips instead of beef.
- Tofu: Use firm tofu cubes for a meat-free version.
- Shrimp: Use large shrimp and cook them even faster than the beef.
Common Questions About This Dish
Can I make this dish less sweet?
Yes. You can use half the sugar. The sauce will be thinner and more salty. You might need a little extra cornstarch to help it thicken up.
What if I don’t have a wok?
A large cast iron pan or a stainless steel frying pan works great. Just make sure it is big enough so the meat isn’t crowded.
Why is my beef still tough?
You might have cut it with the grain instead of against it. Or, you might have cooked it too long. Try thinner slices next time.
Is this dish gluten-free?
Only if you use Tamari or a gluten-free soy sauce. Regular soy sauce has wheat in it. Also, check your cornstarch label.
Can I prep this in advance?
You can slice the beef and mix the sauce ahead of time. Don’t put the cornstarch on the meat until you are ready to cook.
Time to Eat Your Creation
Making Mongolian beef at home is a great way to save money and eat well. It is faster than ordering food and tastes much fresher. Once you master the thin slicing and the hot pan, you can make this any time. Enjoy your delicious meal!