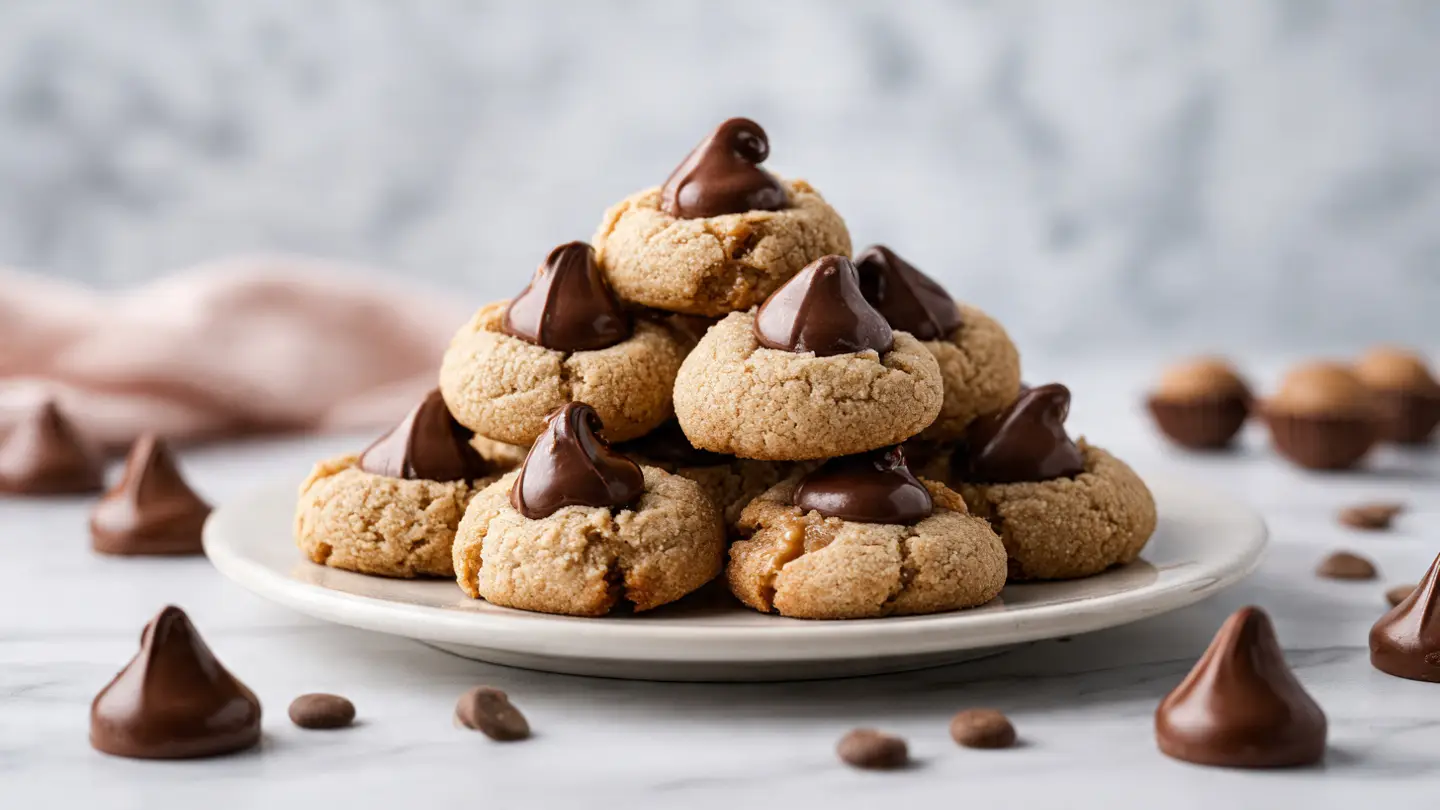
Peanut Butter Blossoms with Hershey’s Kisses
Peanut butter blossoms are the best cookies for any party. They have a soft peanut butter base and a chocolate candy on top. These cookies look like little stars and taste like a dream. You only need a few simple things from your kitchen to make them. I love making these because they are fun to build and even better to eat. Everyone asks for the recipe when I bring them to school or work.
In this post, I will show you how to make the perfect dough. You will learn the secret to keeping the chocolate from melting too fast. I will also share how to get that pretty sugar coating on every bite. These are great for big groups or just a snack at home. Kids love to help press the chocolate into the warm cookies. It is a great way to spend time together in the kitchen.
Get your apron ready and turn on your oven. Let’s start baking these tasty treats!
Recipe Quick Info
- Prep Time: 20 minutes
- Cook Time: 10 minutes
- Servings: 36 cookies
- Difficulty: Easy
The Best Ingredients for Cookie Success
Choosing the right items makes a big difference in how your cookies taste. You do not need fancy brands to make a good cookie. Simple store brands work just fine for most of these parts. I usually buy the big bag of chocolate kisses so I have extra to snack on while I work. Having everything ready on the counter makes baking much faster and less messy. My kitchen used to get very messy before I started doing this.
What You Need to Buy

The first thing you need is creamy peanut butter. Do not use the natural kind that has oil on top because it makes the dough too runny. You also need soft butter, white sugar, and brown sugar. Brown sugar keeps the cookies soft and chewy for a long time. One large egg helps hold everything together so the cookies do not crumble when you take a bite.
For the dry parts, you need all-purpose flour, baking soda, and a little bit of salt. The salt helps the peanut butter taste even stronger. Finally, you need a lot of Hershey’s Kisses. I like the plain milk chocolate ones best, but you can try other flavors too. Make sure you peel the silver paper off the chocolate before you start baking. It saves a lot of time later when the cookies are hot.
The Importance of Butter Temperature

Using soft butter is a big deal for this recipe. If the butter is too cold, it will not mix well with the sugar. If it is melted, the cookies will turn out flat like pancakes. I usually take my butter out of the fridge an hour before I want to bake. This lets it get soft slowly at room heat. It should feel like clay when you press it with your finger. If you forget to take it out, you can cut it into small cubes to help it warm up faster.
I learned this lesson the hard way. One time I used cold butter and my dough was very lumpy. The cookies did not spread at all and felt like rocks. Now I always check the butter first. This step is the key to a soft and puffy cookie. Soft butter also makes it easier for kids to help stir the bowl without getting tired arms.
How to Make the Perfect Cookie Dough
Making the dough is the most fun part of the whole process. It starts with mixing the wet parts and then adding the dry parts slowly. You want to make sure you do not mix it too much or the cookies will be tough. A hand mixer or a big spoon both work well here. I like to use a mixer because it makes the sugar and butter look like fluffy clouds. This fluffiness is what makes the cookies light and airy.
Mixing the Wet and Dry Parts

Start by beating the butter, peanut butter, and both sugars together. Do this until the mix looks pale and smooth. Then, crack the egg and add a splash of vanilla. Mix it again until it looks like thick cream. In a separate small bowl, whisk your flour, baking soda, and salt. Adding the salt to the flour first makes sure it is spread out evenly. You do not want one cookie to be very salty and another to have no salt at all.
Slowly pour the flour mix into the peanut butter mix. Turn your mixer to a low speed so the flour does not fly out and cover your face in white dust. Stop mixing as soon as you do not see any more white streaks. The dough should be thick and a little bit sticky. If it feels too soft, you can put it in the fridge for ten minutes. This makes it easier to roll into balls without it sticking to your palms.
Rolling and Sugar Coating

Now it is time to shape the cookies. Scoop out a small piece of dough about the size of a bouncy ball. Roll it between your hands until it is a round sphere. Then, drop the ball into a small bowl of white sugar. Roll it around until every side is covered in sparkles. This sugar makes the outside of the cookie crunchy and sweet. It also makes the cookies look very pretty on a plate. FYI, this is the best part for kids to help with.
Put the balls on a baking sheet lined with parchment paper. Leave about two inches between each ball. They will spread out a little bit while they cook. I once put them too close together and they all melted into one giant cookie. It still tasted good, but it did not look like a blossom! Putting them in neat rows helps them bake evenly so every cookie is done at the same time. Check your oven to make sure it is at 375 degrees before you put them in.
Baking and Adding the Kisses

Bake the cookies for about eight to ten minutes. They are ready when the edges look dry and slightly brown. Do not wait for the tops to turn dark brown or they will be too hard. As soon as you take the tray out, wait just one minute. Then, take a Hershey’s Kiss and press it right into the center of each cookie. The cookie will crack around the edges. This is why they are called blossoms. The cracks look like flower petals opening up.
The heat from the warm cookie will melt the bottom of the chocolate. This acts like glue and keeps the chocolate from falling off later. Be careful not to touch the chocolate after you press it in. It will stay soft for a long time. If you move the cookies too soon, the chocolate might tip over or smear. I usually let mine sit on the tray for five minutes before moving them to a wire rack to cool down all the way. IMO, they are best when the chocolate is still a tiny bit soft.
Tips for the Best Peanut Butter Blossoms
Even simple cookies can have some tricks to make them better. I have made these dozens of times and learned a lot along the way. Sometimes the chocolate melts too much, or the cookies get too dry. These tips will help you avoid those common problems. You want a cookie that stays soft for days. Nobody likes a cookie that breaks a tooth! Following these small steps will make you look like a pro baker to your friends and family.
Keeping the Chocolate Shape

A common mistake is putting the chocolate on too early. If the cookie is too hot, the whole kiss will melt into a brown puddle. If you wait too long, the cookie will be too hard and it will break when you press the chocolate in. Waiting one or two minutes after they leave the oven is the sweet spot. If your kitchen is very warm, you can put the cookies in the fridge for five minutes after adding the chocolate. This helps the kiss stay tall and pointy.
Another trick is to put your bag of chocolate kisses in the freezer for ten minutes before you start. Cold chocolate does not melt as fast as room-heat chocolate. This keeps them looking perfect even on a hot tray. I started doing this during the summer and it changed everything. Now my cookies always look like the ones in the pictures. It is a small step that makes a huge difference in the final look of your dessert tray.
Storage and Saving for Later

These cookies stay fresh for about five days if you put them in a box with a lid. Make sure the chocolate is completely hard before you stack them. If you stack them while the chocolate is soft, you will have a big mess. I like to put a piece of wax paper between the layers. This keeps the bottoms of the cookies from sticking to the chocolates below them. You can also freeze the dough balls before baking if you want to save them for next month.
If you freeze the finished cookies, they can last for three months. Just take them out and let them sit on the counter for an hour before you eat them. They taste just as good as the day you made them. I often keep a bag of dough balls in my freezer. That way, if a friend comes over, I can bake fresh cookies in just ten minutes. It makes my house smell amazing and everyone feels welcome. Just remember to add the chocolate after they bake, not before!
Pro Baking Secrets
- Dough Scoop: Use a small ice cream scoop so every cookie is exactly the same size.
- Sugar Choice: Use large sanding sugar for extra crunch and a bright sparkle.
- Cooling: Never leave cookies on a hot metal tray for more than five minutes or the bottoms will burn.
Variations to Try

You do not have to stick to just milk chocolate. There are many kinds of Hershey’s Kisses at the store. You can use the dark chocolate ones for a richer taste. The white and black striped ones look very cool on a peanut butter cookie. Some people even use the ones with caramel inside. Just be careful because the caramel gets very hot! You can also change the sugar you roll the dough in. Using red or green sugar makes them look great for the holidays.
If someone has a nut allergy, you can use sunflower butter instead of peanut butter. It tastes a little different but still works well. This may not work if you use a very oily almond butter, so stick to thick nut butters. You can also add a tiny pinch of cinnamon to the dough for a warm flavor. I like to experiment with one small batch to see what tastes best. Cooking is all about having fun and trying new things in your own kitchen.
Frequently Asked Questions
Why did my cookies come out flat?
Your butter was likely too soft or melted. Try chilling the dough for 30 minutes before baking to help the cookies hold their shape better in the oven.
Can I use chunky peanut butter?
Yes, you can! It adds a nice crunch to the cookies. However, the dough might be a bit more crumbly, so press the balls together firmly when rolling.
How do I stop the chocolate from melting?
Freeze the Hershey Kisses for 15 minutes before using them. Also, wait 2 minutes after the cookies come out of the oven before pressing the chocolate in.
Can I make the dough ahead of time?
Absolutely. You can keep the dough in the fridge for up to 2 days. Just let it sit out for a few minutes so it is soft enough to roll into balls.
Do I have to roll them in sugar?
You do not have to, but the sugar gives them a classic look and a nice crunch. Without it, the cookies might look a bit plain and taste less sweet.
Enjoy Your Sweet Treats
These peanut butter blossoms are a classic for a reason. They are easy to make and bring a smile to everyone who eats them. Now that you know all the secrets, you can make a perfect batch every time. Happy baking and enjoy your cookies!