Pear Brie Cheese Salad Skewers
Are you looking for a snack that looks fancy but is very easy to make? These Pear Brie Cheese Salad Skewers are exactly what you need. They take a classic salad and put it on a stick. This makes them perfect for parties or a quick healthy treat at home. You get the crunch of the pear, the creamy taste of the cheese, and a little bit of green from the spinach. It is a mix of flavors that everyone seems to love.
I first made these for a small family dinner. I wanted something that would not fill everyone up before the main meal. These were a big hit. Even the kids liked them because they could pick them up and eat them in one bite. You do not need any special skills to make these. If you can slice fruit and push a stick through cheese, you can make this recipe today. Let me show you how to do it perfectly every single time.
Check out the steps below to make your own batch of these yummy snacks!
Why This Snack Works So Well
This recipe is great because it balances different textures. The pear is firm and juicy. The Brie cheese is soft and buttery. When you put them together, they feel good in your mouth. Most people like a mix of sweet and salty. The fruit provides the sweet part, while the cheese and a tiny bit of salt provide the savory part. It is a simple idea that feels very special when you serve it on a platter.
You can also change things up based on what you have in your kitchen. If you do not have pears, apples work just fine. If you do not like Brie, you can try a different soft cheese. This flexibility makes it a stress-free choice for busy days. Plus, they look very colorful. The white cheese, green leaf, and pale pear look beautiful together. It is an easy way to make your table look nice without spending a lot of money.
The Simple Ingredients You Need

To make these skewers, you only need a few things from the store. First, get some fresh pears. Look for ones that are ripe but still firm. If they are too soft, they will fall off the stick. You also need a wedge or a wheel of Brie cheese. I usually buy the standard kind at my local grocery store. It does not have to be the most expensive brand to taste great. You will also need some large fresh spinach leaves or arugula for a bit of green color and a peppery taste.
The extras are what make the flavor pop. I like to use a little bit of honey or balsamic glaze to drizzle over the top. A few chopped walnuts or pecans add a nice crunch. Do not forget the wooden skewers or toothpicks. If you are serving a big crowd, small toothpicks work best. For a smaller snack, longer bamboo sticks are fun to hold. Keep things simple and high quality for the best results. IMO, the fresh fruit is the most important part of this whole list.
How to Pick the Best Pears

Picking the right pear is a skill I learned the hard way. One time, I bought pears that were way too soft. As soon as I tried to put them on the stick, they turned into mush. It was a big mess! Now, I always look for pears that feel firm when I give them a gentle squeeze near the stem. Bosc pears are my favorite for this because they hold their shape very well. They have a brown skin and a sweet, spicy flavor that goes perfectly with cheese.
Anjou pears are also a great choice. They stay green even when they are ripe. If you want a bit of color, Red Anjou pears look stunning on a white plate. Avoid Bartlett pears if you are making these ahead of time. They tend to get soft very fast. A good tip is to buy your pears a day or two early. If they are too hard, leave them on the counter. If they are just right, put them in the fridge to stop them from ripening more. This keeps them perfect for your party.
Prepping Your Cheese and Fruit

Preparation is the key to making these skewers look professional. Start by washing your pears and drying them well. You do not want them to be slippery. I leave the skin on because it adds color and vitamins. Slice the pear into thick chunks about one inch wide. If the pieces are too thin, they might split when you poke them. Once sliced, I usually toss them in a little bit of lemon juice. This is a pro tip that most people skip, but it stops the fruit from turning brown and ugly.
For the Brie, it helps if the cheese is very cold. Cold cheese is much easier to cut into neat squares. If the cheese gets too warm, it sticks to the knife and gets messy. I like to cut the Brie into cubes that are roughly the same size as the pear chunks. Do not worry about the white skin on the outside of the Brie. It is called the rind, and it is totally safe and yummy to eat. It also helps the cheese cube hold its shape on the toothpick. Cutting everything into even sizes makes the skewers look much better on the plate.
Recipe Quick Info
- Prep Time: 15 minutes
- Cook Time: 0 minutes
- Servings: 12 skewers
- Difficulty: Very Easy
Building the Perfect Skewer

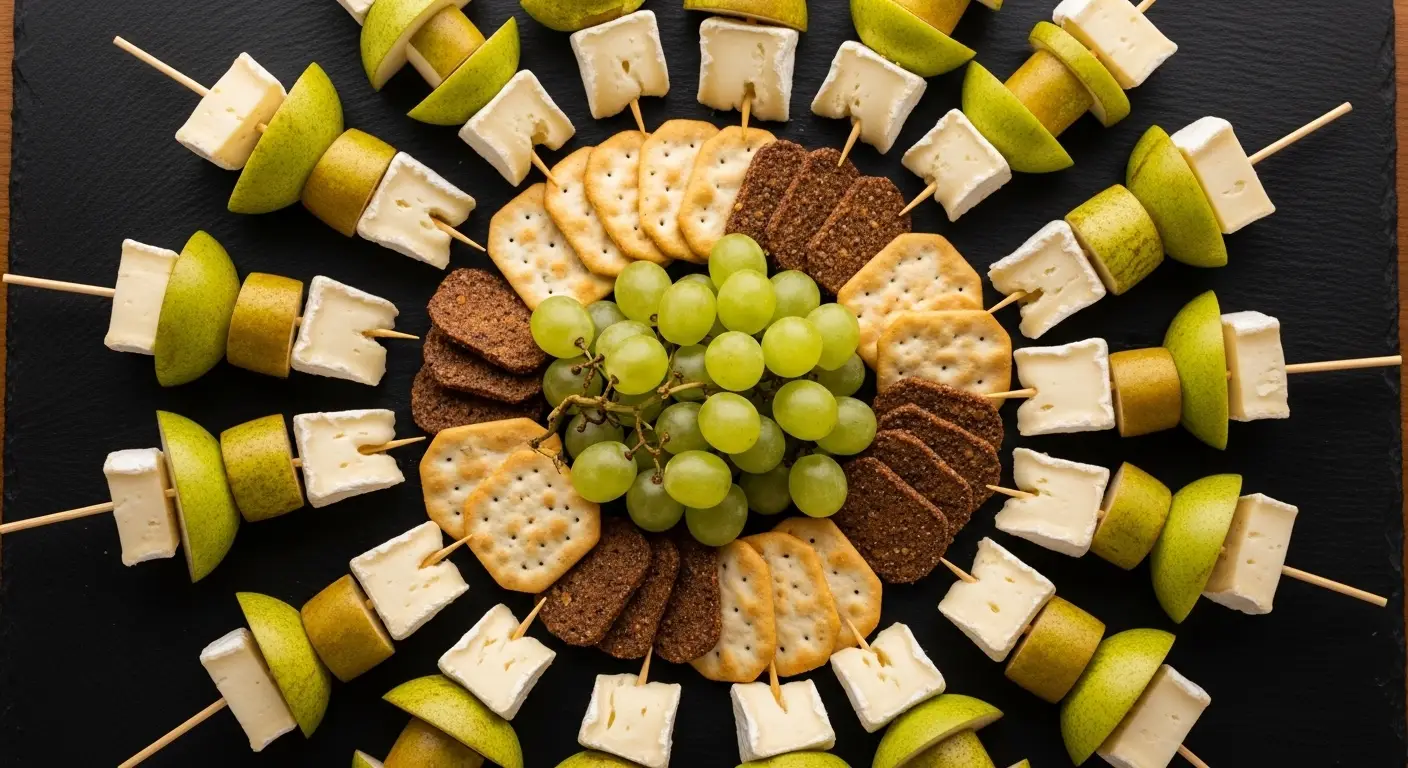
Now comes the fun part! Building the skewers is like a little craft project. Start by taking your toothpick or small skewer. First, slide on a piece of the pear. I like to put the pear at the bottom because it is the most solid part and acts like a base. Next, take a fresh spinach leaf. Fold the leaf in half or thirds so it is a small, thick square. Slide that onto the stick. The green leaf provides a beautiful contrast against the white cheese and the light fruit.
Finally, add the cube of Brie cheese on top. I usually put the cheese last because it looks like a little snowy cap. You can also do it in a different order if you like. Some people put the cheese in the middle so it is sandwiched between fruit and greens. Just make sure the stick goes through the center of each item. This keeps them from spinning around or falling off when someone picks them up. It is a very fast process once you get into a rhythm. FYI, making these with a friend makes the work go twice as fast!
Adding the Finishing Touches

While the skewers are tasty on their own, a few toppings can make them amazing. My favorite thing to add is a drizzle of balsamic glaze. You can buy this in a squeeze bottle at the store. It is thick, dark, and sweet. Just a tiny bit over each skewer adds a lot of flavor. If you prefer something lighter, honey works wonders too. A local wildflower honey gives a nice floral note that matches the pear beautifully. It makes the whole snack feel like a fancy dessert and an appetizer at the same time.
To add some texture, I love using nuts. Crushed walnuts or pecans are the best choice. You can sprinkle them over the platter right before you serve. The crunch of the nut goes so well with the creamy cheese. If you want to be extra fancy, you can use candied pecans. Just be careful if you have guests with nut allergies! You can also sprinkle a tiny bit of cracked black pepper on top. It sounds strange, but the pepper cuts through the sweetness and makes the cheese taste even richer. These small touches take the dish from “good” to “wow.”
Best Ways to Serve These

Presentation is half the fun with this recipe. I like to use a dark plate or a slate board. The white cheese and green leaves really stand out against a dark background. You can arrange them in neat rows or in a circular pattern like a star. If you are serving them at a party, make sure to put out a small bowl for the used toothpicks. It keeps your table looking clean. These skewers are best served at room temperature, so take them out of the fridge about 15 minutes before your guests arrive.
These skewers are great for many occasions. They work for holiday parties, bridal showers, or even just a fancy lunch at home. I often serve them alongside a bowl of salty crackers or some toasted baguette slices. Since they are light, they do not ruin the appetite for dinner. They are also naturally gluten-free as long as you do not serve them with bread. This makes them a safe and easy choice for almost any guest. People always appreciate a healthy option among all the heavy party food.
Pro Kitchen Secrets
- Stop the Brown: Always use lemon juice on your pears to keep them looking fresh for hours.
- Cold Cutting: Freeze your Brie for 10 minutes before slicing to get perfect cubes that do not stick.
- Leaf Size: Pick the smallest spinach leaves in the bag so they do not hang off the sides too much.
Tips for Making Ahead

I know life gets busy, and sometimes you need to prep early. You can make these skewers a few hours before your event. The trick is to keep the pear from turning brown. Like I mentioned before, the lemon juice bath is vital. After you assemble the skewers, place them in a single layer in a flat container. Do not stack them, or the cheese might get squished. Cover the container tightly with plastic wrap or a lid. This keeps the air out and the fruit fresh.
However, I have to give you a small warning. This recipe might not work well if you make it the night before. Brie cheese starts to sweat if it sits out or stays in a container too long. Also, the pears can start to release juice, which makes the spinach leaf a bit soggy. For the best taste and look, try to make them no more than three or four hours before you eat. If you are in a huge rush, you can cut the cheese and the fruit ahead of time and just put them on the sticks right before the party starts.
Common Questions About Fruit Skewers
People often ask me how to keep these fresh or how to change the flavors. Making food for others can be a bit scary if you are not sure about the details. Here are some quick answers to help you feel like a pro in the kitchen. These answers cover everything from the best cheese to how to handle leftovers if you actually have any left!
Can I use a different cheese instead of Brie?
Yes! Goat cheese or sharp cheddar cubes work great. Just make sure the cheese is firm enough to stay on the toothpick without crumbling apart.
How do I keep the pears from turning brown?
Toss the pear chunks in a bowl with a little lemon or lime juice. The acid in the juice stops the fruit from changing color when it hits the air.
What if I cannot find good pears?
Apples are a perfect backup! Use a sweet red apple or a tart green one. They stay crunchy and taste delicious with the creamy Brie cheese.
Are these skewers healthy for kids?
Yes, they are very healthy. They have fruit, calcium from the cheese, and vitamins from the spinach. Most kids find the stick format fun to eat.
Can I add meat to these skewers?
Absolutely. A thin slice of salty prosciutto or ham folded up on the stick goes perfectly with the sweet pear and the soft Brie cheese.
My Final Thoughts on This Recipe
Making Pear Brie Cheese Salad Skewers is a simple way to bring a lot of joy to your table. They are fresh, tasty, and look like they took a lot of work even though they are very fast. Everyone will love the mix of sweet fruit and creamy cheese. Give them a try at your next gathering and watch them disappear!