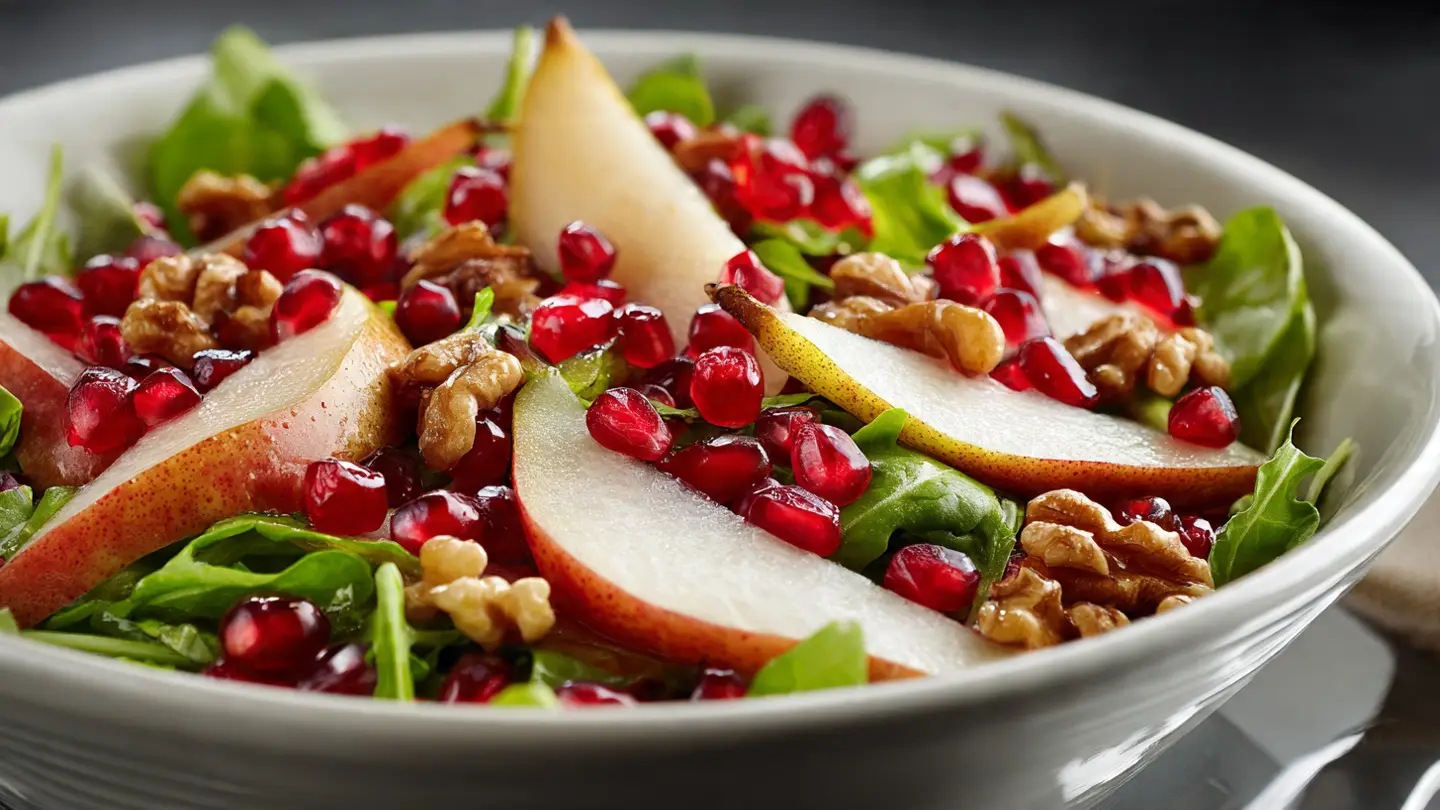
Pear Pomegranate Salad
Making a great salad is like putting together a puzzle. You need something crunchy, something sweet, and something tangy to make it all fit. My Pear Pomegranate Salad is exactly that kind of recipe. It looks like a fancy dish you would find at a high-end restaurant, but you can make it in your own kitchen in less than twenty minutes. This salad uses fresh fruit and bright colors to make any meal feel special.
In this article, I will show you how to pick the best pears and how to get those tricky seeds out of a pomegranate. You will learn how to whisk a simple dressing that tastes much better than the stuff in a bottle. This dish works well for a quick lunch, but it also looks beautiful on a holiday table. It is one of my favorite ways to eat more fruit during the colder months when these ingredients are at their best.
Give this fresh and colorful salad a try today!
Gathering Your Fresh Ingredients
Before you start chopping, you need to make sure you have everything on your counter. Having all the items ready makes cooking much faster and less stressful. This salad relies on fresh produce, so the quality of your fruit really matters. I always look for pears that are just starting to get soft but still have a good snap to them. If they are too mushy, the salad will get watery.
Pomegranates can be a bit scary if you have never used them before. They look like big red ornaments, and the seeds inside are like little rubies. You can buy the seeds in a small cup at the store to save time, but I think fresh ones from the whole fruit taste better. Don’t worry about the mess; I have a trick for that later. Here is what you need to gather from the store or your pantry.
The Salad Base and Fruit

The main part of this dish is the greens. I like to use a spring mix or baby spinach because the leaves are soft and easy to eat. You will need about five cups of greens for a big family salad. Next, grab two large pears. I usually go for Bartlett or Bosc pears because they hold their shape well. You want them to be sweet but firm enough to slice into pretty pieces.
Of course, you need one large pomegranate. These are full of juice and add a great pop when you bite into them. To add a bit more crunch, I like to include some nuts. Pecans or walnuts are perfect here. If you want a little bit of salt, some crumbled feta cheese or goat cheese makes a huge difference. The creamy cheese pairs perfectly with the crisp fruit.
Items for the Honey Dressing

A good dressing should be simple and not hide the flavor of the fruit. For this recipe, I use extra virgin olive oil as the base. It is healthy and smooth. You will also need apple cider vinegar. This gives the salad a nice tang that wakes up your taste buds. If you do not have apple cider vinegar, lemon juice works as a good backup, though it will taste a bit more sour.
To make it sweet, I add a big spoonful of honey. IMO, honey is the best sweetener for fruit salads because it blends so well. A tiny bit of Dijon mustard helps keep the oil and vinegar from separating. Finally, a pinch of salt and black pepper is all you need to finish it off. I keep these items in my pantry all the time so I can whip up this dressing whenever I want.
Recipe Quick Info
- Prep Time: 15 minutes
- Cook Time: 0 minutes
- Servings: 4 people
- Difficulty: Easy
How to Put the Salad Together
Now that your ingredients are ready, it is time to build the salad. There is a specific order to doing things that keeps the lettuce from getting soggy. I learned this the hard way after making many limp salads in the past. You want to prep your fruit first, then make the dressing, and only mix it all together right before you sit down to eat. This keeps everything crunchy and fresh.
One time, I sliced my pears too early and they turned brown before my guests arrived. It didn’t look very good! Now I know to wait until the last minute or use a little trick to keep them bright. Following these steps will help you avoid the mistakes I made. Let’s get started with the preparation of the most important parts of the dish.
Prepping the Pears and Pomegranate

Start by washing your pears under cool water. I don’t peel them because the skin has a lot of fiber and a nice color. Slice them into thin wedges or bite-sized cubes. If you are worried about them turning brown, you can toss them in a bowl with a squeeze of lemon juice. This is a practical cooking tip that many people forget, but it keeps the fruit looking beautiful for much longer.
Now for the pomegranate. The best way to get the seeds out without making your kitchen look like a crime scene is the water method. Cut the fruit into quarters. Submerge one piece at a time in a big bowl of water and use your fingers to pull the seeds away from the white skin. The seeds will sink to the bottom, and the white bits will float. It is much cleaner and faster than hitting the fruit with a spoon!
Mixing the Homemade Dressing

Find a small jar with a lid or a medium bowl. Pour in three tablespoons of olive oil and two tablespoons of apple cider vinegar. Add one tablespoon of honey and a teaspoon of mustard. Shake the jar hard or whisk the bowl fast until the mixture looks thick and smooth. You want the honey to fully melt into the vinegar so you don’t get a big sticky glob in one bite.
Taste a little bit of the dressing with a leaf of lettuce. Does it need more salt? Is it too sour? You can add a tiny bit more honey if you like things sweeter. I usually make a double batch of this and keep it in the fridge for later in the week. It stays good for about five days. Just remember to shake it again before you use it because the oil will get hard in the cold fridge.
Tossing the Salad Components

Put your greens into a very large bowl. You need space to move the leaves around without them falling out. Pour about half of your dressing over the greens and toss them gently with tongs or large spoons. You want every leaf to have a light coating of oil. Don’t drown the lettuce, or it will lose its crunch very fast. You can always add more dressing later if people want it.
After the greens are ready, add the pear slices, pomegranate seeds, and nuts. I like to save most of the cheese for the very top so it doesn’t get lost at the bottom of the bowl. Toss it one more time very lightly. Using your hands is actually a great way to do this if you want to be extra gentle. Just make sure they are clean! Serve it immediately while the pears are still crisp.
Simple Substitutions
- The Greens: Use kale if you want a heartier salad, but massage it with oil first.
- The Cheese: Try feta for a salty bite or blue cheese for a very strong flavor.
- The Nuts: Sunflower seeds work great if you have a nut allergy in the family.
Tips for the Best Results
Even a simple salad can be improved with a few expert tricks. I have spent a lot of time figuring out how to make this recipe work for different situations. Whether you are meal prepping for work or hosting a big dinner party, these ideas will help you succeed. It is important to think about the textures and how they change over time. Nobody likes a soggy salad, so timing is everything here.
I also want to talk about how to make this meal more filling. On its own, it is a great side dish. But sometimes I want it to be my whole dinner. Adding some protein or different grains can turn this light snack into a full meal. Let’s look at how to customize your Pear Pomegranate Salad to fit your needs perfectly.
Making the Salad Ahead of Time

If you want to take this to work, do not mix it in the morning. The vinegar will wilt the lettuce by lunchtime. Instead, put the dressing at the very bottom of a tall glass jar. Add the pomegranate seeds and nuts next. Then put the pears on top of those. Finally, fill the rest of the jar with your greens. This keeps the wet stuff away from the leaves.
When you are ready to eat, just shake the jar or dump it into a bowl. The pears might brown a little, but they will still taste great. FYI, this is the best way to eat healthy when you are busy. I usually prep the pomegranate seeds on Sunday so they are ready to grab all week long. They stay fresh in an airtight container for about four or five days without any trouble.
Adding Protein and Grains
To make this salad a full meal, I often add grilled chicken or salmon. The savory meat tastes amazing with the sweet pears. If you don’t eat meat, you can add a cup of cooked quinoa or farro. These grains add a chewy texture and keep you full for a long time. It makes the salad feel much more substantial and “heavy” in a good way.
Another option is to add roasted chickpeas. They give a nice salty crunch that replaces the nuts if you want something different. I have even tried adding a hard-boiled egg on the side. The creamy yolk goes well with the honey dressing. This salad is very flexible, so do not be afraid to experiment with what you have in your fridge. Just keep the fruit as the star of the show.
Choosing the Perfect Pear

Selecting the right pear is the most important step. If the pear is too hard, it will taste like a potato. If it is too ripe, it will turn into mush when you toss the salad. My favorite trick is to press gently near the stem. If it gives just a little bit, it is ready to eat. This is called the “check the neck” rule. It is a tip most people skip, but it works every time.
Bosc pears have a brown, rough skin and stay very firm, which I love for a crunchy salad. Bartlett pears are very sweet and juicy but get soft fast. Anjou pears are a good middle ground. Avoid using canned pears for this recipe. They are way too sweet and soft, and the texture will ruin the fresh feel of the dish. Stick to the produce aisle for this one!
Can I use dried pomegranate seeds?
You can, but they are very chewy and not juicy. Fresh seeds are much better for this salad because they provide a burst of flavor that dried ones lack.
Enjoy Your Fresh Salad
This Pear Pomegranate Salad is a simple way to bring fresh flavors to your table. It balances sweet, tangy, and crunchy elements in every bite. Whether you make it for yourself or for guests, it is sure to be a hit. Just remember to use fresh pears and toss it at the last minute for the best crunch!