Pumpkin Pie Cheesecake
I love the smell of spices in my kitchen when the leaves turn brown. It makes my house feel cozy and warm. One of my favorite things to bake is pumpkin pie cheesecake. It is the best of two worlds. You get the creamy taste of cheesecake and the spicy kick of pumpkin pie. It is a real crowd pleaser at any party or holiday dinner.
In this long guide, you will learn how to build this cake from the bottom up. I will show you how to make a crunchy crust and a silky filling. We will also talk about how to keep the top from cracking. By the end of this, you will be able to bake a dessert that looks like it came from a fancy bakery.
Check out my steps below to start your baking journey today!
Getting Ready for Your Big Bake
Before you turn on the oven, you need to get your tools and kitchen ready. Baking is like a fun science project. You have to be careful with how you measure things. I once tried to guess the amount of flour and the cake turned out like a brick! That was a sad day for my family. Now, I always use a scale or level measuring cups. You should also make sure your kitchen counter is clean and you have enough space to move around.
It is also very important to check your fridge. Most of the stuff in this cake needs to be at room temperature. This is a big secret that many people miss. If your cream cheese is cold, it will stay lumpy. No one wants a lumpy cake. Take your eggs, butter, and cheese out of the fridge at least two hours before you start. This makes everything mix together much better and keeps the cake smooth and pretty.
Picking the Best Ingredients

To make a great cake, you need great stuff. I always buy the full-fat cream cheese in the silver blocks. Do not use the kind that comes in a tub or the low-fat version. The fat is what makes the cake stay firm and taste rich. For the pumpkin, make sure you buy pure pumpkin puree. Do not buy the can that says pumpkin pie mix. That mix already has sugar and spices in it. If you use it, your cake will be way too sweet and messy.
I also like to use fresh spices. If your cinnamon has been in the cabinet for five years, it might not taste like anything. Give it a sniff! It should smell strong and sweet. I also add a little bit of ginger and cloves. These spices give the cake that classic fall flavor. Sometimes I even add a tiny pinch of black pepper. It sounds weird, but it makes the other spices pop. Just a little bit goes a long way!
Preparing Your Baking Pan

The pan you use matters a lot. You need a springform pan. This is the kind where the sides pop off. If you use a regular cake pan, you will never get the cheesecake out in one piece. I learned this the hard way during my first try. I had to eat the cake with a spoon right out of the pan! It still tasted good, but it looked like a disaster. A 9-inch pan is usually the perfect size for this recipe.
You also need to wrap the pan in foil. Use the heavy-duty kind if you can. Wrap it around the bottom and up the sides. This keeps water out because we are going to bake the cake in a water bath. If water gets inside, the crust will get soggy and gross. I usually use two or three layers of foil just to be safe. It acts like a little raincoat for your cake while it sits in the oven. It is a simple step that saves the whole dessert.
Pro Tips for a Smooth Start
- Temperature Check: Put eggs in warm water for 5 minutes if you forgot to take them out.
- Foil Trick: Use wide foil so there are no seams at the bottom of the pan.
Building the Perfect Cheesecake Layers
Now comes the fun part where we actually build the cake. A pumpkin pie cheesecake has two main parts. The first part is the crust. Some people like a thin crust, but I like mine thick and crunchy. It gives you something solid to hold onto. The second part is the filling. This is where all the creamy pumpkin goodness lives. Mixing them is easy if you take your time and do not rush.
When you mix the filling, you have to be gentle. If you whip it too fast, you will put too much air in the batter. Air bubbles make the cake rise up like a souffle and then crash down. When it crashes, it cracks. I use a low speed on my mixer to keep things calm. It takes a little longer, but the result is much better. You want a heavy, dense cake that feels like a big hug in your mouth.
Making the Graham Cracker Crust

I think the crust is just as important as the filling. For this cake, I use graham cracker crumbs, melted butter, and a little sugar. You can crush the crackers in a bag with a rolling pin or use a blender. I like to leave a few tiny chunks for extra crunch. Mix the crumbs with the butter until it feels like wet sand. If it is too dry, it will fall apart. If it is too oily, it will be hard to eat.
Press the mix into the bottom of your pan. You can use the bottom of a flat measuring cup to push it down. This makes it even and tight. I like to bake the crust by itself for about 10 minutes before adding the filling. This makes it extra crunchy and keeps it from getting soft. FYI, you can also use ginger snap cookies instead of graham crackers. It gives the cake a spicy kick that tastes amazing with the pumpkin!
Mixing the Creamy Pumpkin Filling

Once the crust is cool, it is time for the filling. Start by beating the cream cheese and sugar until it is very smooth. Scrape the sides of the bowl often. This is the only time you should really beat it hard. Once it is smooth, add the pumpkin and spices. It will turn a beautiful orange color. It looks like a sunset in a bowl! My kids love to watch the colors change as the white cheese mixes with the orange pumpkin.
Add the eggs one at a time. This is my biggest tip. Do not dump them all in at once. Mix each egg just until the yellow disappears. Over-mixing at this stage is what causes those big cracks on top. After the eggs are in, I add a splash of vanilla. It makes everything smell like a dream. If you want it even fancier, you can add a little bit of sour cream. It adds a nice tang that cuts through the heavy sweetness of the sugar.
Setting Up the Water Bath

A water bath sounds scary, but it is just a big pan of hot water. You put your cake pan inside a larger roasting pan. Then, you fill the big pan with hot water until it reaches halfway up the sides of the cake pan. The water keeps the oven air moist. It also keeps the cake at a steady temperature. This is the best way to prevent cracks and keep the edges from getting too brown or dry.
Be very careful when you move the pan into the oven. You do not want to splash water into the cake or onto yourself. I usually put the pans in the oven first, then pour the water in using a kettle. It is much safer that way! This method takes a bit more work, but it is worth it for a perfect top. IMO, a cheesecake without a water bath is just not as good. It makes the texture feel like velvet instead of just regular cake.
Baking and Cooling Slowly

Baking a cheesecake takes a long time. You have to be patient. It usually takes over an hour. You know it is done when the edges are firm but the middle still jiggles a little bit like Jell-O. Do not wait for the middle to be solid, or you will over-bake it. Once it is done, turn off the oven and crack the door open just a tiny bit. Let the cake sit in there for an hour. This slow cooling helps the cake settle without shrinking too fast.
After the oven, let it sit on the counter until it is at room temperature. Then, put it in the fridge. This is the hardest part because you have to wait at least six hours, or even better, all night. The flavor actually gets better the longer it sits. I always make my cake the day before I need it. It takes away all the stress on the day of the party. A cold cheesecake is much easier to slice and tastes much richer than a warm one.
Decorating and Serving Your Masterpiece
The final step is making your cake look pretty. Even if it has a small crack, you can hide it with toppings! No one will ever know. Serving a cheesecake is also about the presentation. Use a sharp knife and clean it after every single cut. This keeps the slices looking sharp and clean like you see in a magazine. If the knife is messy, the slices will look smudged and dull.
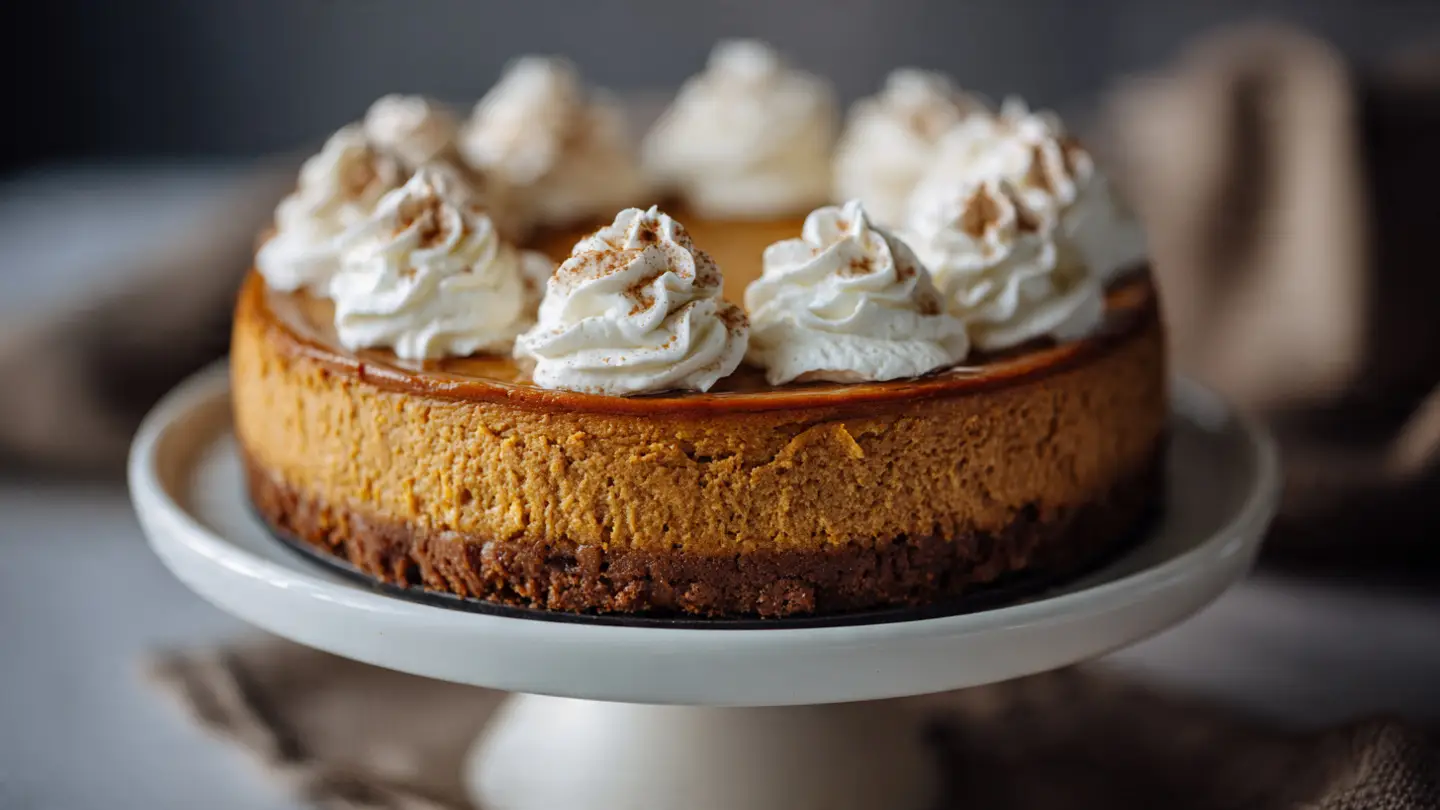
You can get creative with what you put on top. Some people like it plain, but I think a little extra sweetness helps. Think about what goes well with pumpkin. Whipped cream is a classic choice. You can also use caramel or nuts. The goal is to add a different texture or a new flavor that makes people go “wow.” It is your chance to show off your hard work and make the dessert feel special for your guests.
Adding Whipped Cream and Spices

Fresh whipped cream is so much better than the stuff from a can. I make mine with heavy cream, a little powdered sugar, and vanilla. Beat it until it forms stiff peaks. You can spread it all over the top or pipe little stars around the edge. It looks very elegant! After the cream is on, I like to dust the whole thing with a little extra cinnamon or pumpkin pie spice. It adds a nice smell and makes the white cream pop against the orange cake.
If you want to be extra fancy, you can add some toasted pecans on top of the cream. The crunch of the nuts goes great with the soft cake. Another idea is to put a few ginger snap cookies around the base of the cake. It tells people what flavor to expect. I usually stick to just a few simple decorations. You don’t want to hide the beautiful orange color of the cheesecake itself. Let the pumpkin be the star of the show!
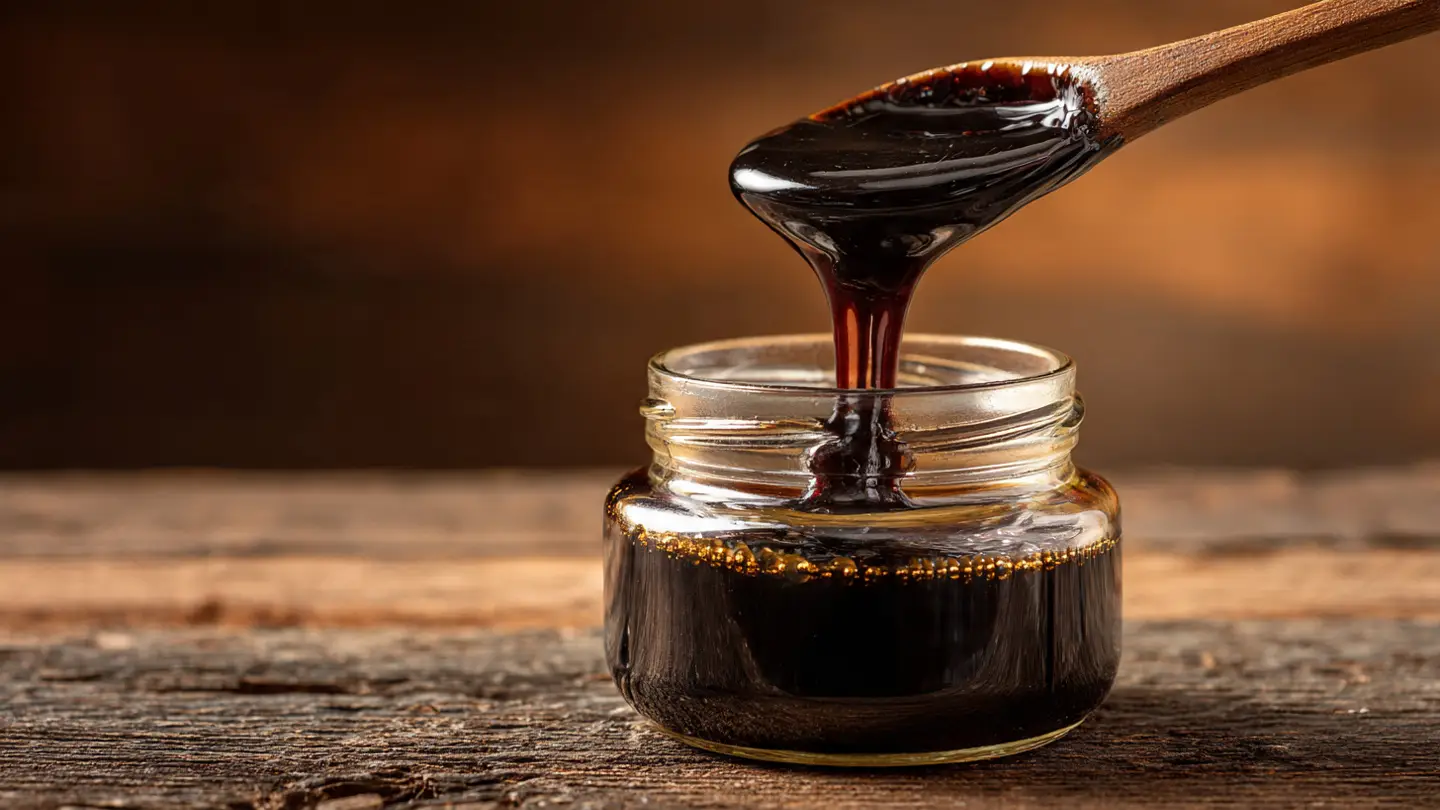
Drizzling with Sweet Caramel

Caramel and pumpkin are best friends. A thick caramel sauce makes this dessert feel very expensive. You can buy a jar at the store or make your own with sugar, butter, and cream. I like to warm it up just a little bit so it flows easily. Drizzle it in a zig-zag pattern over the whole cake. It looks like art! The salt in the caramel also balances the sweet pumpkin filling. It is a flavor match made in heaven.
One thing to remember is to add the caramel right before you serve the cake. If it sits in the fridge for too long, the caramel might get hard or sink into the cake. If you have guests who don’t like caramel, you can put it in a small bowl on the side. That way, everyone can choose how much they want. My friend always asks for extra caramel on her slice, while my dad likes his totally plain. Having options is always a good idea at a big dinner!
Common Questions About Pumpkin Cheesecake
Why did my cheesecake crack on top?
Cracks happen if the oven is too hot or if you mix the eggs too fast. Using a water bath and cooling the cake slowly in the oven helps stop them.
Can I use fresh pumpkin instead of canned?
Yes, but it must be very smooth. Roast a sugar pumpkin, scoop the meat, and blend it well. Canned is easier and often smoother for baking.
How long does it stay fresh in the fridge?
It stays good for about 4 to 5 days. Keep it covered so it does not smell like other food. It actually tastes best on day two!
Can I freeze pumpkin cheesecake?
Yes! Wrap it tight in plastic and foil. It can stay in the freezer for up to one month. Thaw it in the fridge before you eat it.
What if I don’t have a springform pan?
You can use a regular pie dish, but it will be hard to get slices out. You might have to serve it more like a soft pie than a tall cake.
Happy Baking Everyone
Making a pumpkin pie cheesecake is a labor of love that fills your home with joy. It takes time, but seeing your family enjoy a slice makes it all worth it. I hope my tips help you bake the best cake ever. Enjoy your yummy fall treat!