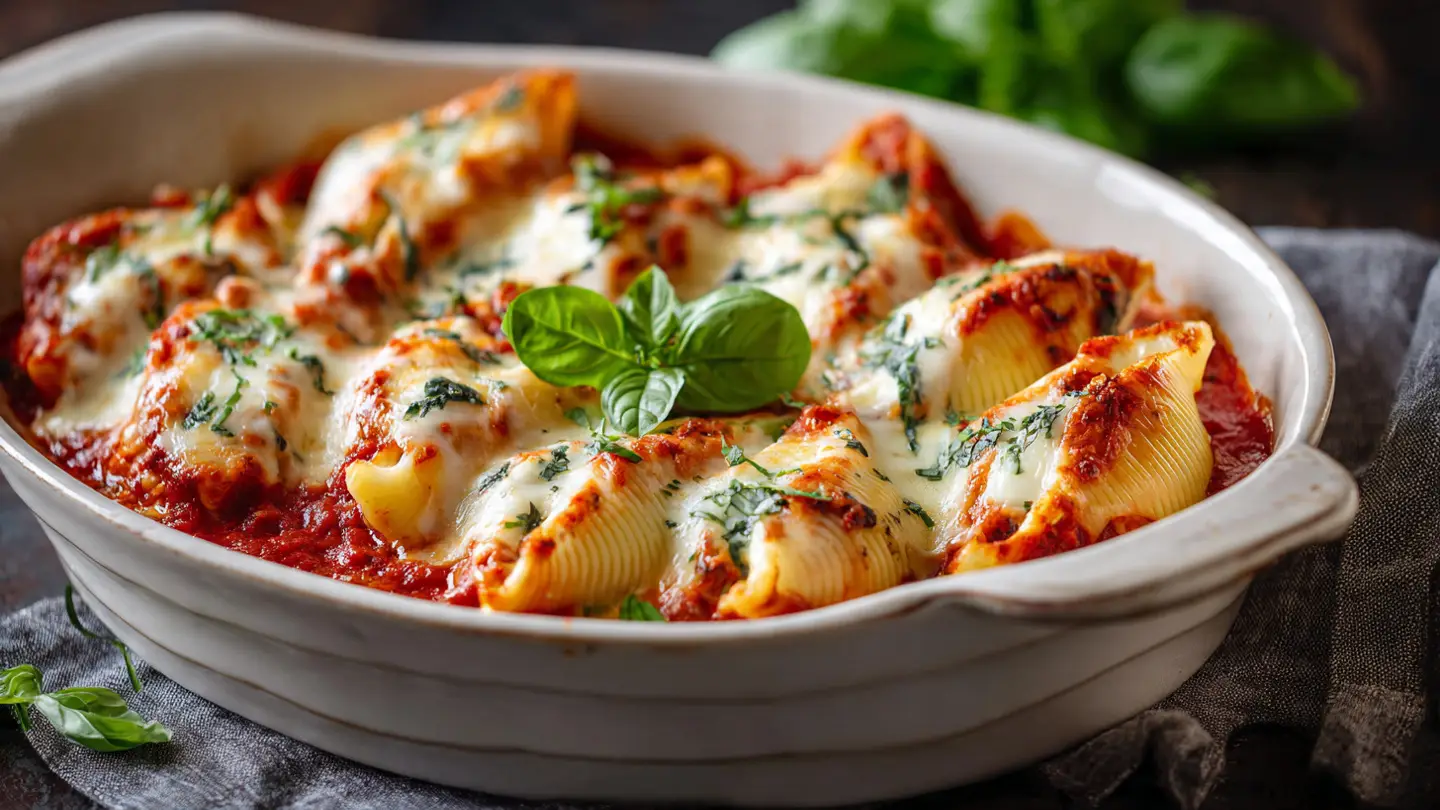
Savory Baked Ziti with Ricotta and Fresh Italian Herbs
Baked ziti is a classic meal that almost everyone loves. It is a warm, cheesy, and filling dish that makes your house smell like a real Italian kitchen. I have made this dish many times for my friends and family. It is one of those meals that feels like a big hug in a bowl. You do not need to be a professional chef to make this taste amazing. All you need are some simple ingredients and a little bit of time.
In this article, I will show you how to make the best savory baked ziti. You will learn which pasta to buy and how to make the cheese extra creamy. I will also talk about why fresh herbs make such a big difference in the flavor. By the time you finish reading, you will be ready to cook a dinner that looks and tastes like it came from a fancy restaurant. Get your apron ready because we are going to make something delicious!
Check out my steps below to master this cozy meal.
Picking the Best Ingredients for Your Pasta
Before you start cooking, you need to have the right stuff in your kitchen. Not all pasta is the same, and the cheese you pick will change how the dish feels in your mouth. I like to use high-quality items because they make the final taste much better. This dish uses simple parts, so each part needs to shine. If you use cheap cheese, it might not melt as well, and your dinner could end up a bit greasy.
You should try to find the freshest herbs you can. Fresh basil and parsley add a bright pop that dried herbs just cannot match. It makes the dish feel light even though it has a lot of cheese. I always look for a good red sauce too. You can make your own or buy a jar that has very few ingredients. The less junk in the sauce, the better your ziti will taste at the end of the day.
Choosing the Right Ziti Shape

The shape of the pasta is very important for this recipe. Ziti is a long, smooth tube that holds onto sauce very well. Some people like to use penne, which has ridges, but ziti is the traditional choice for this bake. The smooth surface lets the sauce slide around, while the hollow middle catches little pockets of ricotta cheese. It is like a tiny surprise in every single bite you take.
If you cannot find ziti at your store, do not worry. You can use large shells or rigatoni as a backup. The goal is to have a pasta with a hole inside. This allows the cheese and sauce to get inside the noodle. I once tried to make this with spaghetti because I was out of ziti, and it was a total mess! It did not hold the cheese right and felt very heavy. Stick to the tubes for the best results.
The Power of Fresh Ricotta Cheese

Ricotta cheese is the heart of this dish. It is a soft, white cheese that is very creamy and a little bit sweet. When you bake it, it stays soft and acts like a fluffy cloud between the layers of pasta. I always suggest buying whole milk ricotta instead of the low-fat kind. The full-fat version melts better and has a much richer flavor that makes the dish feel special.
I have learned a good trick over the years. Before you add the ricotta to the pasta, mix it with an egg. The egg helps the cheese stay together so it does not turn into liquid in the oven. This makes your baked ziti look much neater when you scoop it onto a plate. Without the egg, the cheese can sometimes get lost in the red sauce. This extra step only takes a minute but makes a huge difference.
Why Fresh Herbs are Better Than Dried

Fresh herbs are the secret weapon for great Italian cooking. While dried herbs are okay for a quick meal, fresh basil and parsley bring a special magic to baked ziti. Basil smells like summer and adds a sweet, peppery taste. Parsley adds a bit of crunch and a clean flavor that cuts through all the heavy cheese. It balances the whole meal so you can eat a big plate without feeling too stuffed.
I like to chop my herbs right before I use them. This keeps the oils inside the leaves so the flavor stays strong. If you chop them too early, they might turn brown and lose their smell. IMO, adding a handful of fresh herbs at the very end makes the dish look beautiful too. The bright green color against the red sauce and white cheese is very pretty. It shows your guests that you put a lot of love into the food.
Pro Tip for Better Flavor
- Sauté the Garlic: Cook fresh minced garlic in a little oil before adding your red sauce to the pan. This makes the sauce taste way better than just pouring it from a jar.
How to Assemble and Bake Your Ziti
Once you have all your items ready, it is time to put the dish together. This part is like building a tasty tower. You want to make sure every layer has enough sauce and cheese. If you just throw it all in a pile, some parts might be dry while others are too soggy. Taking your time to layer the ingredients will make the texture perfect. I find this part of cooking very relaxing and fun to do.
The oven does most of the hard work for you. It melts the cheese and bubbles the sauce until everything is hot and gooey. You want the top to be a little bit crunchy but the inside to stay soft. This mix of textures is what makes baked ziti a fan favorite. I usually bake mine for about thirty minutes, but every oven is a little bit different. You should keep an eye on it to make sure the cheese does not burn.
Boiling the Pasta the Right Way

The biggest mistake people make is overcooking the pasta before it goes into the oven. You should cook the ziti for about two minutes less than what the box says. This is called “al dente,” which means it still has a little bit of a bite. The pasta will finish cooking inside the sauce while it is in the oven. If you cook it all the way in the water, it will turn into mush when you bake it. Nobody likes mushy pasta!
I always add a big pinch of salt to the water once it starts boiling. This seasons the pasta from the inside out. Do not add oil to the water, though. Oil makes the pasta slippery, and then the sauce will not stick to it. Just give it a stir every now and then so the tubes do not stick to the bottom of the pot. Drain it well and you are ready for the next step.
Layering the Cheese and Sauce

Building the layers is where the flavor comes together. I start with a thin layer of sauce on the bottom of the pan. This stops the pasta from sticking to the glass. Then, I put in half of the cooked ziti. On top of that, I drop big spoonfuls of the ricotta mixture. I also like to add some shredded mozzarella cheese here. The mozzarella is what gives you those long, stretchy cheese strings when you pull a slice out.
After the first layer, I repeat the process. More sauce, the rest of the pasta, and more cheese. Make sure to spread the sauce all the way to the corners. You want every single noodle to be covered so they stay moist. I usually save the most mozzarella for the very top layer. This creates a golden brown crust that looks amazing. This may not work if you run out of sauce, so always keep an extra jar nearby just in case.
Getting the Perfect Golden Top

The best part of baked ziti is the crispy cheese on top. To get this, I bake the dish covered with foil for the first twenty minutes. This keeps the moisture inside and melts the cheese evenly. Then, I take the foil off for the last ten minutes. This allows the heat to hit the top directly. The cheese will start to bubble and turn a light brown color. That is when you know it is done!
If you like it extra crispy, you can turn on the broiler for one or two minutes at the very end. Be very careful, though! The broiler is very hot and can burn your dinner in seconds. I have burned a few pans of ziti because I got distracted by my phone. FYI, stay right by the oven if you use the broiler. Once it looks perfect, take it out and let it sit for five minutes. This helps the sauce thicken up so it does not run all over your plate.
Adding the Final Herb Garnish

Once the ziti comes out of the oven, it needs a finishing touch. This is when I add the fresh herbs I talked about earlier. Sprinkling fresh basil over the hot cheese makes the smell even stronger. The heat from the pasta wakes up the herbs and makes them taste even better. It also makes the dish look like it was made by a pro. I like to use a mix of basil and a little bit of dried oregano for an extra kick.
You can also add a sprinkle of parmesan cheese at this stage. It adds a salty flavor that goes great with the sweet tomato sauce. I find that this final step is what makes people ask for the recipe. It shows that you care about the small details. Even though it is a simple meal, these little things make it feel special. It is the perfect way to end your cooking process before everyone sits down to eat.
Common Mistakes to Avoid
- Rinsing the Pasta: Never rinse your pasta after boiling. The starch on the outside helps the sauce stick to the noodles.
- Too Much Sauce: If the pasta is swimming in sauce, it will be watery. Use just enough to coat everything well.
Answers to Common Ziti Questions
Can I make baked ziti ahead of time?
Yes! You can build the layers and keep it in the fridge for a day. Just bake it when you are ready for dinner. It might need a few extra minutes in the oven since it is cold.
What is the best way to reheat leftovers?
I like to use the oven at 350 degrees. Cover it with foil so it does not dry out. A microwave works too, but the cheese stays softer in the oven.
Can I add meat to this recipe?
Totally! You can add cooked ground beef or Italian sausage to the red sauce. Just make sure to drain the grease first so the dish isn’t too oily.
Why did my ricotta turn out grainy?
This usually happens if the cheese gets too hot too fast or if it is low-fat. Using whole milk ricotta and an egg helps keep it smooth and creamy.
Can I freeze baked ziti?
Yes, it freezes very well. Wrap it tightly in foil and plastic wrap. It can stay in the freezer for up to three months. Thaw it in the fridge before baking.
A Cheesy Ending to a Great Meal
Baked ziti is a wonderful meal that brings people together. It is easy to make and tastes like a dream. By using fresh herbs and good cheese, you can make a simple dinner feel very fancy. I hope you enjoy making this in your own home soon. Your family will surely love every cheesy bite you serve them!