Strawberry Shortcake Cups
Making dessert should be fun and easy. I love fruit, and strawberries are my favorite snack. These Strawberry Shortcake Cups are the best way to enjoy them. They look fancy but they are very simple to build. You do not need to be a professional baker to make these look great for your family.
In this article, you will learn how to make every part of this treat. We will talk about the cake, the berries, and the fluffy cream on top. I will show you how to put them in small cups so everyone gets their own. It is the perfect sweet bite for a sunny day or a birthday party.
Check out the steps below to start your baking adventure!
Why You Will Love These Sweet Cups
Small desserts are better than big ones because they are easy to carry. You do not need a plate or a fork if the cup is small enough. These treats stay fresh and do not make a mess like a big cake does. Kids love having their own special cup that they do not have to share with anyone else.
Fresh fruit makes this dessert feel light and healthy-ish. Even though there is sugar, the berries add a nice pop of vitamin C. I have made these for many backyard parties, and they always disappear first. They are also very cheap to make if you buy berries when they are on sale at the store.
Recipe Quick Info
- Prep Time: 20 minutes
- Cook Time: 15 minutes
- Servings: 12 cups
- Difficulty: Easy
The Ingredients You Need

To start, you need the right stuff from the store. You will need fresh strawberries that are bright red and firm. Do not pick the mushy ones! You also need sugar to make the berries juicy. For the cake part, you can use a box mix or make a simple yellow cake from scratch. My favorite way is using a soft pound cake because it holds up well inside the cup.
- 2 pints of fresh strawberries
- 1/2 cup of white sugar
- 1 loaf of pound cake (store-bought is fine!)
- 2 cups of heavy whipping cream
- 1 teaspoon of vanilla extract
- Small clear plastic or glass cups
Preparing the Fresh Strawberries

Wash your berries in cold water first. Take off the green leafy tops with a small knife. Slice the berries into small pieces so they fit easily into the cups. Put all the sliced fruit into a big bowl and pour half of your sugar over them. Stir them gently so the sugar covers every piece of fruit.
Let the berries sit for about thirty minutes. This is a very important step that many people skip! The sugar pulls the water out of the fruit and makes a sweet red syrup. This syrup soaks into the cake later and makes it taste amazing. If you use frozen berries, they might be too watery, so fresh is always the best choice here.
How to Bake or Prep the Cake

If you are using a store-bought cake, just cut it into small squares. The squares should be about one inch big. If you want to bake your own, make sure the cake is completely cool before you cut it. A warm cake will melt the cream and make the whole cup a big gooey mess. I learned that the hard way when I was in a rush once!
You can also use biscuits or angel food cake if you prefer a different texture. Pound cake is heavy and buttery, while angel food cake is light and airy. IMO, pound cake is better because it does not get too soggy from the strawberry juice. Lay the cubes out on a tray so they are ready when you start building your cups.
Making the Fluffy Whipped Cream

Real whipped cream tastes much better than the stuff in a spray can. Pour your cold heavy cream into a large bowl. Add the rest of the sugar and the vanilla extract. Use a hand mixer to beat the cream until it looks like thick clouds. You want it to be stiff enough that it stays on a spoon without falling off.
Be careful not to mix it for too long! If you keep going after it is thick, it will turn into butter. That would be a very sad mistake for your dessert. Keep the cream in the fridge until the very second you are ready to use it. Cold cream stays fluffy much longer than room temperature cream.
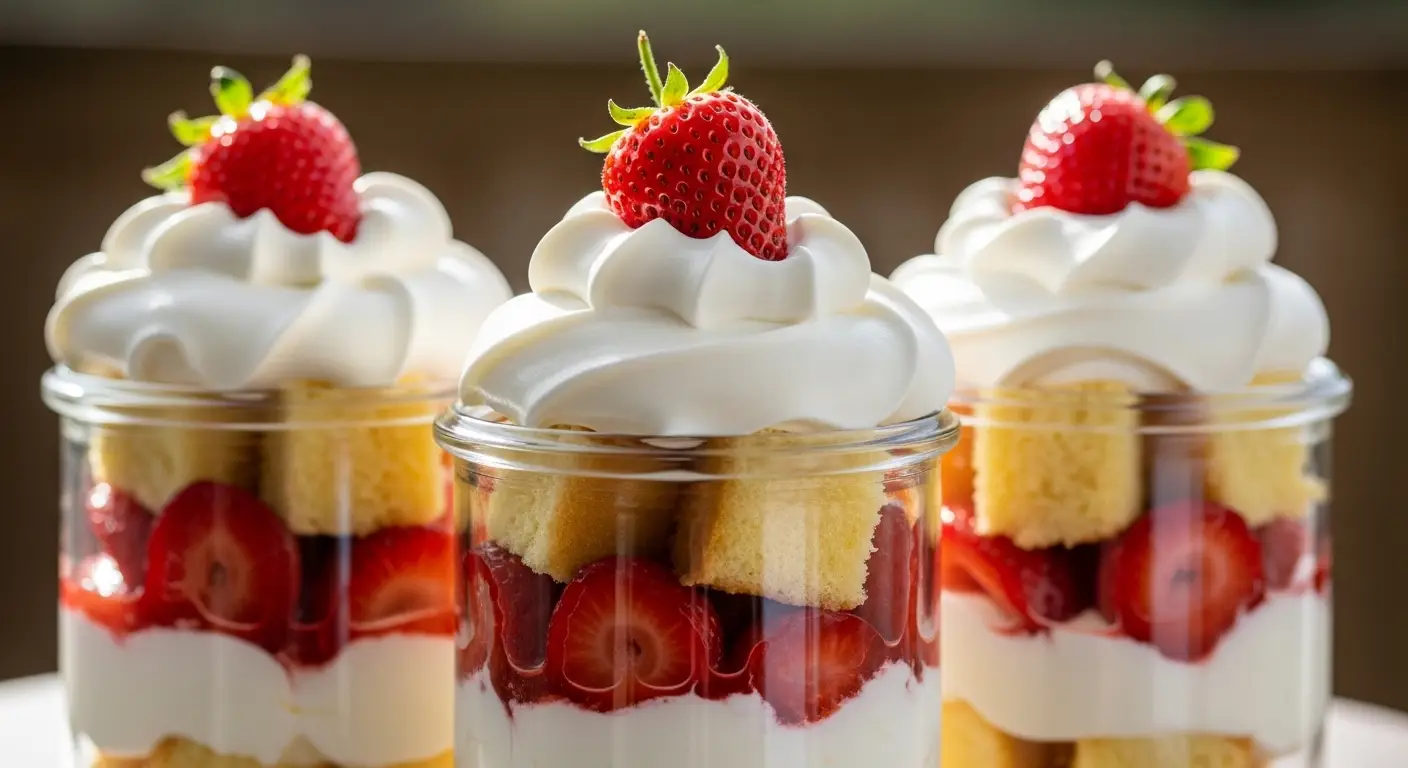
Assembling the Dessert Cups

Now comes the fun part where we put it all together. Put two or three cubes of cake at the bottom of each cup. Use a spoon to add a big scoop of the juicy strawberries on top of the cake. Make sure you get some of that red syrup in there too! Next, add a big dollop of your homemade whipped cream.
Repeat the layers one more time if your cups are tall enough. I like to finish with a big swirl of cream on the very top. You can even put one tiny slice of a fresh berry on the peak to make it look pretty. It looks like something from a fancy bakery, but you did it all by yourself at home! Would you like to see how many layers you can fit?
Pro Baking Tips
- Keep it Cold: Always chill your bowl and beaters before making whipped cream for the best volume.
- Drain the Berries: If the berries are too juicy, use a slotted spoon so the cake doesn’t turn into mush.
Serving and Storing Your Treats

These cups are best when you eat them right away. The cake is soft and the cream is cold. If you need to make them ahead of time, keep them in the fridge. They will stay good for about four hours. After that, the cake might get a little too soft from the berry juice. FYI, do not freeze these because the cream will change texture.
If you are taking these to a party, put them in a cooler with some ice. Since they are in cups, you can just hand them out to friends. They are easy to hold while walking around and talking. Everyone will ask you for the recipe because they look so cute and taste so fresh.
Common Questions About This Recipe
Can I use different fruits?
Yes! You can use blueberries, raspberries, or peaches. Just follow the same steps with sugar to make them juicy.
What if I don’t have pound cake?
You can use vanilla cupcakes or even glazed donuts cut into pieces. Any sweet bread or cake works well.
How do I keep the cream from melting?
Make sure the cake and berries are completely cold before adding the cream. Keep the cups in the fridge until serving.
Is this recipe gluten-free?
It can be! Just use a gluten-free cake or biscuit. The fruit and whipped cream are already naturally gluten-free.
Can I make the whipped cream ahead of time?
You can make it 1-2 hours early. Keep it in a sealed bowl in the fridge. Stir it gently before using it.
Enjoy Your Strawberry Dessert
These Strawberry Shortcake Cups are a simple way to bring a smile to anyone’s face. They use easy ingredients and take very little time to build. You now have a perfect recipe for summer parties or a special family dinner tonight. Enjoy every sweet bite!