3-Ingredient Chili Cheese Dip
Are you looking for a snack that tastes great but takes no time to make? I love food that makes people happy without keeping me in the kitchen for hours. This 3-ingredient chili cheese dip is my favorite way to feed a hungry crowd fast. It is warm, gooey, and full of flavor. You only need three simple items from the store to get started.
In this post, I will show you how to mix, heat, and serve this cheesy treat. You will learn the best ways to cook it and what chips work best. This recipe is so easy that even a kid can help out. Get ready to make the best dip you have ever tasted!
Check out the steps below to start cooking right now!
Why This Dip Is a Total Winner
I remember the first time I made this for a big football game at my house. I was running late and did not have time to cook a big meal. I found a can of chili and a block of cheese in my pantry. I threw them together and everyone went wild for it! It taught me that simple food is often the best food. You do not need twenty items to make something that tastes like a dream.
One thing I learned the hard way is that the type of chili matters. Once, I used a chili with huge chunks of vegetables. It did not melt well with the cheese and looked a bit messy. Now, I always tell people to pick a smooth chili if they want a dip that looks like the ones in restaurants. It is a small change that makes a huge difference in how the dip feels in your mouth.
What You Need to Buy

To make this dip, you only need three things. First, get one block of cream cheese. It should be the 8-ounce size. Make sure it is the full-fat kind because it melts much better than the low-fat version. This cheese is the base of the dip and makes it very creamy. If you forget to let it sit out to get soft, the dip might have little white lumps. It still tastes good, but it is not as pretty.
Next, grab one can of chili. You can choose chili with beans or without beans. I like the kind without beans because it is easier to scoop with a chip. Last, you need two cups of shredded cheddar cheese. You can buy the bag that is already shredded to save time. This adds that sharp, salty flavor that everyone loves. Just three items and you are ready to go!
Gather Your Kitchen Tools

You do not need fancy tools for this recipe. A basic glass baking dish is perfect. I usually use a square one that is 8 inches by 8 inches. If you want to make a giant batch, you can use a bigger pan and double the food. You will also need a can opener to get into that chili. A sturdy spoon is helpful for spreading the layers out evenly so every bite has everything in it.
If you do not want to use an oven, you can use a microwave-safe bowl instead. I sometimes use my slow cooker if I want the dip to stay warm for hours. This is great for long parties where people graze on snacks all afternoon. Just make sure your tools are clean and ready before you start. Having everything out on the counter makes the process feel fast and fun.
How to Layer the Dip

The secret to a great dip is how you put it together. Start by spreading the soft cream cheese on the bottom of your dish. Use your spoon to push it into the corners. It should look like a smooth white floor at the bottom of the pan. This layer acts like a cushion for the heavier toppings. It also keeps the chili from sticking to the bottom of the dish while it cooks.
After the cream cheese is down, pour the whole can of chili on top. Use your spoon to spread the chili until it covers all the white cheese. Try to make it level so it heats up at the same speed. It looks a bit like a cake at this point. Do not mix them together yet! Keeping them in layers makes the final result look much nicer when you pull a chip through it. This is the part where my kids usually ask if they can help.
Adding the Cheesy Top

Now comes the best part. Take your shredded cheddar cheese and sprinkle it all over the chili. I like to make sure I cover every single spot. You want a thick orange blanket on top. This cheese will melt into a gooey crust that holds the heat inside the dip. If you love cheese as much as I do, you can even add a little extra. There is no such thing as too much cheese in my house!
Sometimes I use a mix of different cheeses. A bag of Mexican blend cheese works great too. It has a little bit of spice and melts very fast. The cheddar gives it a classic look, though. Once the cheese is on, the dip is ready for the heat. Make sure the cheese is spread to the very edges of the pan. This creates a crispy edge that some people fight over because it is so crunchy and tasty.
Recipe Quick Info
- Prep Time: 5 minutes
- Cook Time: 20 minutes
- Servings: 8 people
- Difficulty: Very Easy
The Best Ways to Cook Your Dip
Cooking this dip is hard to mess up. I usually use my oven because I love how the cheese gets bubbly and slightly brown on the edges. I set the heat to 350 degrees. It usually takes about fifteen to twenty minutes. You know it is done when the cheese is melted and you see little bubbles popping around the sides. It smells like a backyard barbecue inside your house when this is in the oven.
If you are in a big rush, the microwave is your friend. Put the dish in for three minutes, then check it. You might need another two minutes to get the middle hot. Just be careful because the cheese can get very hot very fast. I once burned the roof of my mouth because I was too excited to eat! Let it sit for one minute after it stops cooking. This lets the layers set up so they do not run everywhere when you dip your chip.
Baking in the Oven

Using the oven is the gold standard for this recipe. The dry heat makes the cheese on top stay a bit firm while the inside gets soft. I always put my dish on the middle rack. This ensures the bottom doesn’t burn before the top is ready. If you want a really crusty top, you can turn on the broiler for the last sixty seconds. Stay right there and watch it, though! It can go from perfect to burnt in a heartbeat.
One limitation of the oven is that it makes the dish very hot. You must use oven mitts to take it out. I always place the hot dish on a wooden board or a thick towel on the table. This protects my table from the heat. The oven method is best if you have guests coming over in thirty minutes. You can put it in, clean up the kitchen, and it will be piping hot right when the doorbell rings. FYI, the smell will make your neighbors jealous.
Using the Slow Cooker

The slow cooker is a secret weapon for party hosts. I use this when I am having a long movie night. Put the cream cheese on the bottom, then the chili, then the shredded cheese. Set it to the low heat setting. It will take about an hour to get perfectly melted. The best part is that you can leave it on the “warm” setting all night. The dip stays perfect and never gets cold or hard.
I once tried to cook this on the “high” setting and forgot about it. The edges got a bit dark and dry. Lesson learned: always use “low” for cheese dips in a slow cooker. It is much gentler on the dairy. This method is also great because it saves space in your oven if you are cooking other things like wings or pizza. Just plug it in a corner and let it do the work while you relax with your friends.
Microwave for Fast Snacks

When I want a snack right now, I use the microwave. This is perfect for a Tuesday night when you just want something yummy while you watch TV. Since microwaves can heat unevenly, I recommend a small change. Cook it for two minutes, then give it a very gentle stir. Then cook it for another minute. This helps the heat reach the center of the cream cheese block without burning the edges of the chili.
Make sure you use a bowl that is safe for the microwave. Do not use anything with metal on it! Also, cover the bowl with a paper towel. Sometimes the chili can pop a little bit when it gets hot. The paper towel keeps your microwave clean. This is the fastest way to get from hungry to happy. It may not have the brown crust of the oven version, but the taste is exactly the same.
What to Dip in the Bowl

A dip is only as good as what you put in it. I always suggest thick tortilla chips. They are strong enough to hold a big scoop of heavy chili and cheese. Thin chips might break off in the bowl, which is frustrating. Corn chips are also a classic choice. They have a strong corn flavor that tastes great with the beef in the chili. I think they are the perfect match for this specific recipe.
If you want to be a little healthy, you can use vegetables. Celery sticks are great because they are crunchy and act like a little edible spoon. Bell pepper slices also work well. I even know some people who put this dip on top of a baked potato! It turns a simple snack into a full meal. IMO, having a few different options for dipping makes the snack table look much more exciting for your guests.
Pro Tips for Success
- Better Scooping: Use “scoop” shaped chips to get the most dip in every bite.
- Extra Spice: Add a small can of diced green chiles if you want a little kick.
- Soft Cheese: Always use room temperature cream cheese for the smoothest texture.
Creative Ways to Change the Flavor
Even though this recipe only has three ingredients, you can change it up if you feel brave. I sometimes add a layer of cooked ground beef if I want it to be very filling. You could also swap the beef chili for white chicken chili for a totally different look and taste. The beauty of this dish is how hard it is to break. As long as you have cheese and something savory, it will likely taste good.
I have also tried adding toppings after it comes out of the oven. Fresh green onions or chopped tomatoes add a nice crunch and a bright color. It makes the dish look like it came from a fancy restaurant. If you like heat, throw some jalapeño slices on top before you bake it. Just remember that the basic three ingredients are the stars. Everything else is just a bonus to make it your own.
Make it Spicy

If you love spicy food, this dip is a great canvas. You can buy “hot” chili instead of the mild kind. You can also mix a little hot sauce into the chili layer before you add the cheese. I like to add a dash of cayenne pepper for a slow heat that builds up. It makes the dip perfect for a cold winter day when you want to feel warm from the inside out.
Another way to add spice is through the cheese. Look for Pepper Jack cheese in the store. It has little bits of peppers inside it. When it melts, it spreads that spicy flavor throughout the whole top layer. Just be careful if you are serving kids. I usually make one spicy bowl and one mild bowl so everyone can have a good time. It is easy to do when the recipe is this fast!
Try a Meatless Version

You can easily make this recipe for friends who do not eat meat. Just buy a can of vegetarian chili. Most stores have several types made with beans, tofu, or meat substitutes. The cheese and cream cheese are already vegetarian, so you just need to swap that one can. I have served this to meat-eaters who could not even tell the difference because the cheese is so flavorful.
Vegetarian chili often has more beans, which makes the dip very thick. You might need to bake it for five extra minutes to make sure the beans are hot all the way through. This version is also very high in fiber, which is a nice plus. I like to top the meatless version with some fresh cilantro or a squeeze of lime juice. It gives it a fresh, zesty finish that balances the heavy beans and cheese perfectly.
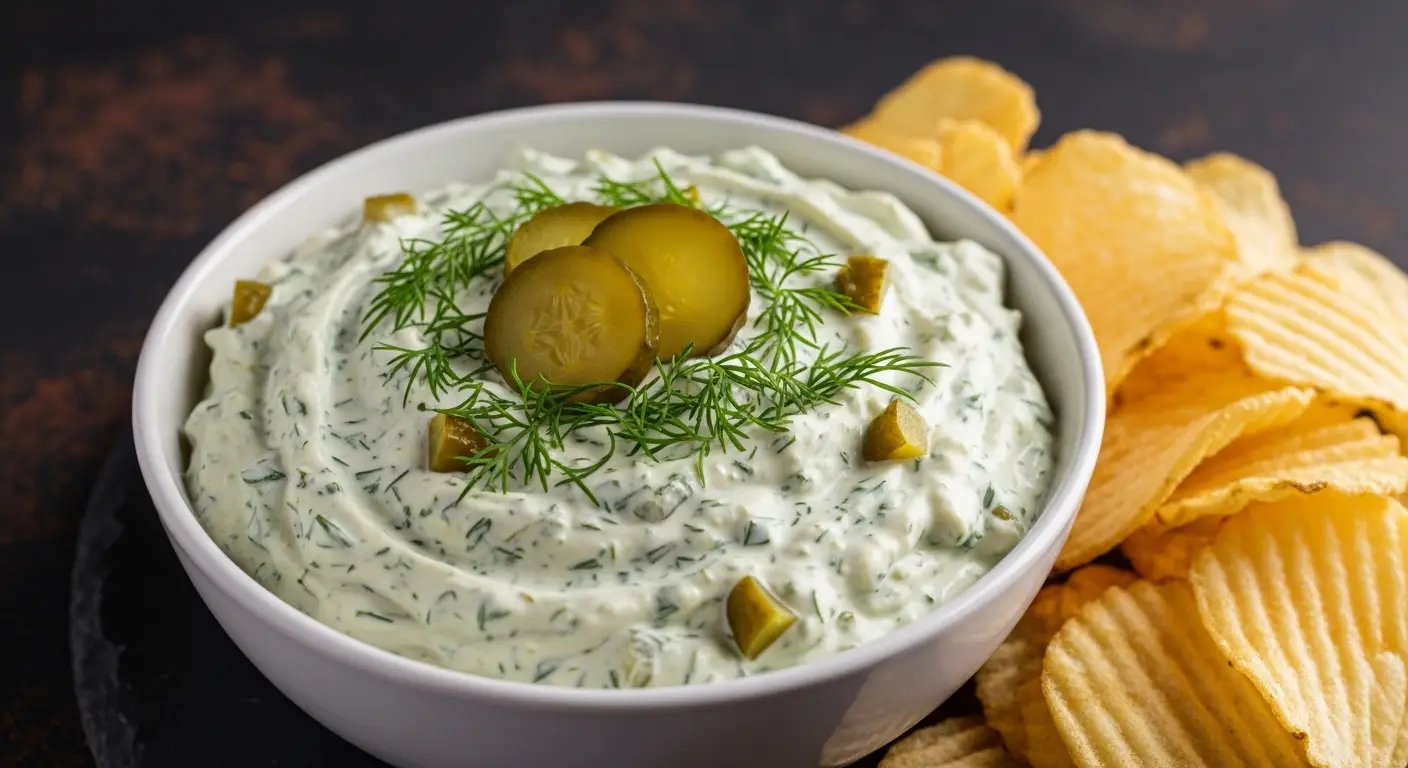
Adding Fresh Garnishes

Garnishes are like the jewelry for your food. They make it look finished and pretty. My favorite garnish is simple chopped green onions. They add a little bit of bite that cuts through the rich fat of the cheese. I also like to put a big dollop of sour cream right in the middle of the dish after it cooks. It stays cool while the dip is hot, which is a fun mix of temperatures.
You can also use black olives or diced red onions. If you want to get really fancy, try adding a sprinkle of fresh parsley. It makes the orange and brown colors of the dip pop. I usually put the garnishes in small bowls on the side. This lets people customize their own plate. Some people hate onions, while others want a mountain of them! Giving people choices is the mark of a great host.
Saving and Reheating Leftovers

If you have any dip left over, do not throw it away! It stays good in the fridge for about three to four days. Put it in a container with a tight lid. When you want to eat it again, the cheese will be hard. That is normal. Just put a scoop on a plate and heat it in the microwave for thirty seconds. It will become gooey and delicious all over again. I think it tastes even better the next day because the flavors have time to mingle.
One tip most blogs skip is how to fix the dip if it gets oily when you reheat it. Sometimes the cheese separates. If that happens, just give it a quick stir with a spoon. The oil will mix back in and it will look smooth again. I do not recommend freezing this dip, though. The cream cheese can get a strange, grainy texture after being frozen and thawed. It is so fast to make fresh that you really do not need to freeze it anyway.
Your New Favorite Party Questions
Can I make this dip in advance?
Yes! You can layer the cheese and chili in the dish the day before. Cover it with plastic wrap and keep it in the fridge. Just add 5 minutes to the bake time since it starts out cold.
What if I don’t have a baking dish?
You can use a pie tin or even a small metal cake pan. As long as it is safe for the oven and has sides to hold the dip in, it will work just fine.
Is this dip gluten-free?
Most chili and cheese are gluten-free, but you must check the labels. Some canned chili uses flour to make it thick. Always read the back of the can to be safe!
Why is my dip watery?
This usually happens if the chili has a lot of liquid. You can drain a little bit of the liquid off the top of the can before you pour it on the cream cheese to prevent this.
Can I use homemade chili?
Absolutely! If you have leftover chili from dinner, it works great. Just use about 2 cups of it to cover the cream cheese layer.
Enjoy Your Cheesy Creation
This 3-ingredient chili cheese dip is a true lifesaver for busy people. It is simple, cheap, and loved by everyone who tries it. Now that you know the secrets of layering and cooking, you can make it any time you want. Enjoy every cheesy bite!