Kale Chips
Do you want a snack that is salty and crunchy but also good for you? Most people think kale is just a boring green leaf. I used to think that too. Then I tried baking it in the oven. It turns into a light, crispy chip that melts in your mouth. It is much better than a greasy potato chip. I will show you how to make them perfectly every single time.
Making kale chips is very easy, but you can mess it up if you are not careful. If the leaves are wet, they will get soggy. If the oven is too hot, they will burn in a second. I have burned many batches of kale in my life! You will learn the right way to dry, oil, and bake these greens today. Your kids might even ask for seconds of this vegetable snack.
Are you ready to turn a bunch of leaves into a bowl of crunchy goodness?
The Secret to Crispy Kale Chips
The main goal when making these chips is to remove all the water. Kale is full of moisture. If that water stays on the leaf, the oven will steam the kale instead of frying it. Steamed kale is soft and chewy. We want it to snap when you bite it. This means you need to be very patient when drying the leaves after you wash them. I usually wash my kale an hour before I want to cook it so it can sit out and dry.
Another secret is how much oil you use. You do not need a lot. If you use too much oil, the chips will feel heavy and oily on your tongue. If you use too little, the salt will not stick. Finding that middle ground is the key to a great snack. I like to use my hands to rub the oil into every tiny wrinkle of the kale. It ensures every bite is seasoned and ready to crisp up in the heat.
What You Need to Get Started

You do not need many things to make this recipe. That is the best part! You just need a big bunch of kale. You can find this at any grocery store. I prefer curly kale because the bumps and ridges catch the salt and oil very well. You can also use Dinosaur kale, which is flatter, but it feels a bit different. Both work fine for this snack.
Besides the greens, you need a good oil. Extra virgin olive oil is my favorite choice. It has a nice flavor that goes well with the earthy taste of the kale. You will also need fine sea salt. I do not recommend thick salt because it just falls off the chips. Gather a large baking sheet and some parchment paper too. This keeps the chips from sticking to the pan.
Preparing the Kale the Right Way

First, you must wash the kale. I put mine in a big bowl of cold water and swish it around. This gets rid of any dirt or tiny bugs. After washing, I use a salad spinner to get most of the water off. If you do not have a spinner, you can pat the leaves with a clean towel. Make sure they feel totally dry before you move to the next step. FYI, wet kale is the number one reason for soggy chips.
Next, you have to take the leaves off the stems. The stems are very thick and tough. They will not get crunchy in the oven. I hold the stem with one hand and pull the leaf off with the other. Then, I tear the big leaves into pieces about the size of a potato chip. Do not make them too small! They shrink a lot when they cook. I learned this the hard way when I ended up with kale dust instead of chips.
Recipe Quick Info
- Prep Time: 15 minutes
- Cook Time: 15-20 minutes
- Servings: 2 people
- Difficulty: Very Easy
How to Season for Maximum Flavor

Put your dry kale pieces into a large bowl. Drizzle about one tablespoon of olive oil over them. Now, use your hands. This is the messy part but it is the most important part. Massage the oil into the leaves. You want every single piece to look shiny. If a piece is dry, it will just turn brown and taste like burnt paper. Rubbing the oil in makes the kale tender and helps it cook evenly.
Once the leaves are shiny, sprinkle on your salt. I use about half a teaspoon of sea salt for one big bunch. You can always add more later, so do not go crazy at first. If you like a bit of spice, you can add some garlic powder or nutritional yeast. Nutritional yeast makes them taste like cheese! It is a great trick if you do not eat dairy. Just make sure the spices are mixed in well.
The Proper Way to Bake

Preheat your oven to 300 degrees. Some people use a higher heat, but I think that is a mistake. High heat burns the edges before the middle gets crispy. A lower heat takes a few more minutes but gives you a better chip. Line your baking sheet with parchment paper. This helps the air move around the leaves so they get dry and crunchy on both sides.
Spread the kale out on the pan. Do not pile the leaves on top of each other. If they are crowded, they will stay soft. Every piece needs its own space to breathe. I usually need two baking sheets for one bunch of kale. It might seem like a lot of work, but it makes a huge difference. Put the pans in the oven and set a timer. You are halfway to a great snack!
Checking for Doneness

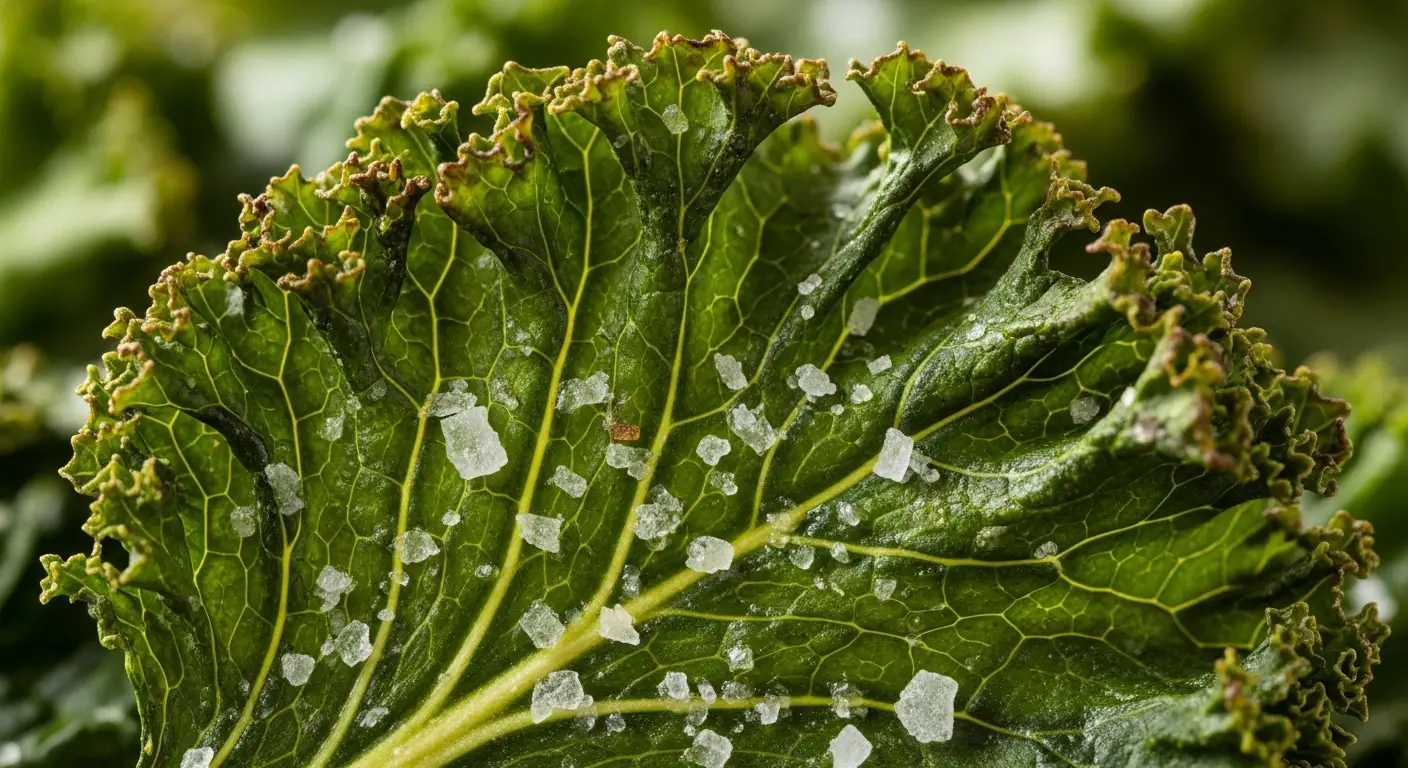
Bake the chips for about 10 minutes, then rotate the pans. This helps if your oven has hot spots. Check them again after another 5 or 7 minutes. You are looking for a dark green color. They should feel stiff when you touch them. If they still feel soft or floppy, they need more time. Be careful not to let them turn brown. Brown kale tastes very bitter and not very good.
I usually take one chip out and let it cool for 30 seconds. If it snaps when I bite it, the batch is done. If it is still chewy, I leave the rest in for two more minutes. Once they are ready, take the pans out of the oven. Let them sit on the tray for a few minutes. They actually get even crispier as they cool down. It is hard to wait, but it is worth it!
Serving and Storing Your Chips

These chips are best when you eat them right away. I love to eat them while they are still a little warm from the oven. They go great with a sandwich or just as a snack while watching a movie. If you have leftovers, you can put them in a container. Use a glass jar or a plastic tub with a tight lid. However, they do not stay crispy for very long. IMO, they are best within the first 24 hours.
If your chips get soft the next day, do not throw them away! You can put them back in the oven for three minutes at 300 degrees. This will bake out the moisture and make them snap again. It is a quick fix that saves your snack. Just watch them closely so they do not burn during the second bake. I have done this many times when I made too much kale for one sitting.
Common Mistakes to Avoid
- Wet Leaves: Always make sure the kale is 100% dry before adding oil.
- Too Much Oil: Using too much makes the chips heavy and soggy.
- Crowded Pan: Piling leaves on top of each other prevents them from crisping.
- High Heat: Cooking above 325 degrees often leads to burnt, bitter leaves.
Fun Flavor Ideas to Try

Once you master the basic salt and oil recipe, you can get creative. I love experimenting with different spices. For a taco flavor, try adding a little cumin and chili powder. For a savory kick, use onion powder and black pepper. The oily surface of the kale acts like glue for these powders. Just remember to add the spices before you put the tray in the oven so the flavors can toast.
Another great option is lemon zest. After the chips come out of the oven, grate a little bit of lemon skin over the top. The bright scent makes the earthy kale taste fresh. Some people even use a tiny drop of maple syrup for a sweet and salty mix. Just be careful with liquids, as they can make the chips lose their crunch. Stick to dry spices for the best results every time.
Why This Snack is Great for Everyone

Kale chips are a perfect snack for almost any diet. If you are vegan, these are great because they are just plants. If you are on a low-carb diet, these are much better than crackers or bread. Even people who hate salads usually like these chips. The texture is so light that it does not feel like you are eating a giant pile of greens. It is a sneaky way to get more vitamins into your day.
I think these are also great for budget cooking. A big bag of kale is usually very cheap. You get a lot of snacks for just a couple of dollars. Compared to buying pre-made kale chips at the store, making them at home saves a lot of money. Store-bought ones can be five dollars for a tiny bag! Plus, when you make them yourself, you know exactly what is in them. No weird chemicals or extra sugar here.
Common Questions About Kale
Can I use frozen kale for chips?
No, frozen kale has too much water. It will never get crispy in the oven. Always use fresh bunches for the best results.
Why do my kale chips taste bitter?
Kale can be bitter if it burns or if the oven is too hot. Try a lower temperature next time and pull them out sooner.
How long do kale chips stay fresh?
They are best for 1 day. In a dry container, they might last 2 or 3 days, but they often lose their crunch quickly.
What is the best oil for kale chips?
Olive oil is best for flavor. Avocado oil is also good because it can handle heat well. Avoid using butter as it has water in it.
Do I have to use parchment paper?
It is not required, but it helps a lot. It stops the chips from sticking and makes clean-up much easier for you later.
Enjoy Your Healthy Snack
You now know how to make the best kale chips ever. Remember to dry the leaves well, massage the oil in, and bake them low and slow. It is a simple snack that makes eating greens fun. Go grab a bunch of kale and start baking!