5-Step Homemade Sourdough English Muffins
I love waking up to the smell of fresh bread. There is something special about making your own breakfast from scratch. For a long time, I thought english muffins were too hard to make. I thought you needed a special oven or fancy tools. I was wrong. You only need a simple pan and a little bit of time. These sourdough english muffins are way better than the ones from the store. They have big holes for butter and a tangy taste that stays on your tongue.
In this guide, I will show you how to turn your sourdough starter into golden, fluffy muffins. You will learn the best way to mix the dough and how to cook them on a stove. This recipe is great because it uses up your extra starter. Even if you are new to baking, you can do this. I have made many mistakes so you do not have to. Let us get into the kitchen and start baking together.
Ready to see how easy it is to make these at home?
Getting Ready for Your Sourdough Bake
Before we start mixing, we need to talk about your starter. A sourdough starter is like a small pet. It needs water and flour to stay alive. For this recipe, your starter should be bubbly and active. If it has been in the fridge for a week, feed it the night before. This ensures your muffins rise high and feel light. If the starter is flat, the muffins will be heavy like rocks. Nobody wants a breakfast rock!
I remember one time I tried to bake with a cold starter right from the fridge. I was in a rush and thought it would be fine. The muffins did not rise at all. They looked like flat cookies and tasted very sour. It was a big lesson for me. Now, I always wait until I see those little bubbles on top. It makes a huge difference in how the bread feels in your mouth. You want that soft, airy middle that everyone loves.
Recipe Quick Info
- Prep Time: 20 minutes
- Cook Time: 15 minutes
- Servings: 12 muffins
- Difficulty: Easy
The Ingredients You Will Need

You do not need many things to make these muffins. Most of these items are already in your kitchen. Using fresh ingredients helps the flavor. I like to use whole milk because it makes the bread soft. You can use water if you want, but the muffins might be a bit more chewy. Honey adds a tiny bit of sweetness that balances the sour taste perfectly.
- 1 cup active sourdough starter
- 1 tablespoon honey or sugar
- 1 cup warm milk (not hot!)
- 3 cups all-purpose flour
- 1 teaspoon salt
- Cornmeal for dusting the pan
Step 1: Mixing the Dough

First, grab a large bowl. Put your starter, warm milk, and honey inside. Stir them until they look like a cloudy soup. Slowly add the flour and salt. Use a big spoon to mix it all together. The dough will feel sticky and messy. Do not worry! That is exactly how it should look. Sticky dough leads to those big holes we want in an english muffin.
If the dough feels too dry, add a tiny splash of milk. If it is like soup, add a tablespoon of flour. I once added too much flour because I was scared of the stickiness. The muffins came out dry and tough. Now I know that a little mess is a good sign. Keep mixing until you do not see any more dry white flour. Cover the bowl with a clean cloth and let it rest for about 30 minutes.
Step 2: The Long Rest

Sourdough takes time to grow. After the quick rest, you want to leave the dough alone. This is where the magic happens. The tiny yeasts in the starter eat the flour and create air. You can leave the bowl on your counter for 8 to 12 hours. Most people do this overnight. You go to sleep, and the dough does all the hard work for you.
By the next morning, the dough should be much bigger. It might even have bubbles on the surface. If your house is very cold, it might take longer. I once put my dough near a cold window in winter. It did not grow at all! I learned to move the bowl to a warmer spot, like on top of the fridge. Warmth helps the yeast stay happy and active. Once it has doubled in size, you are ready for the next part.
Step 3: Shaping the Muffins

Now it is time to get your hands dirty. Put some flour on your counter so the dough does not stick. Gently tip the dough out of the bowl. Do not press too hard or you will pop all the air bubbles. I use a knife or a bench scraper to cut the dough into 12 even pieces. Try to make them about the same size so they cook evenly in the pan.
Roll each piece into a small ball with your palms. Then, gently flatten them until they look like thick pancakes. I like to dip each side into cornmeal. The cornmeal gives them that classic crunch on the outside. It also stops them from sticking to the pan. Place them on a baking sheet lined with parchment paper. Let them sit for another hour to puff up one last time.
Step 4: Cooking on the Stove

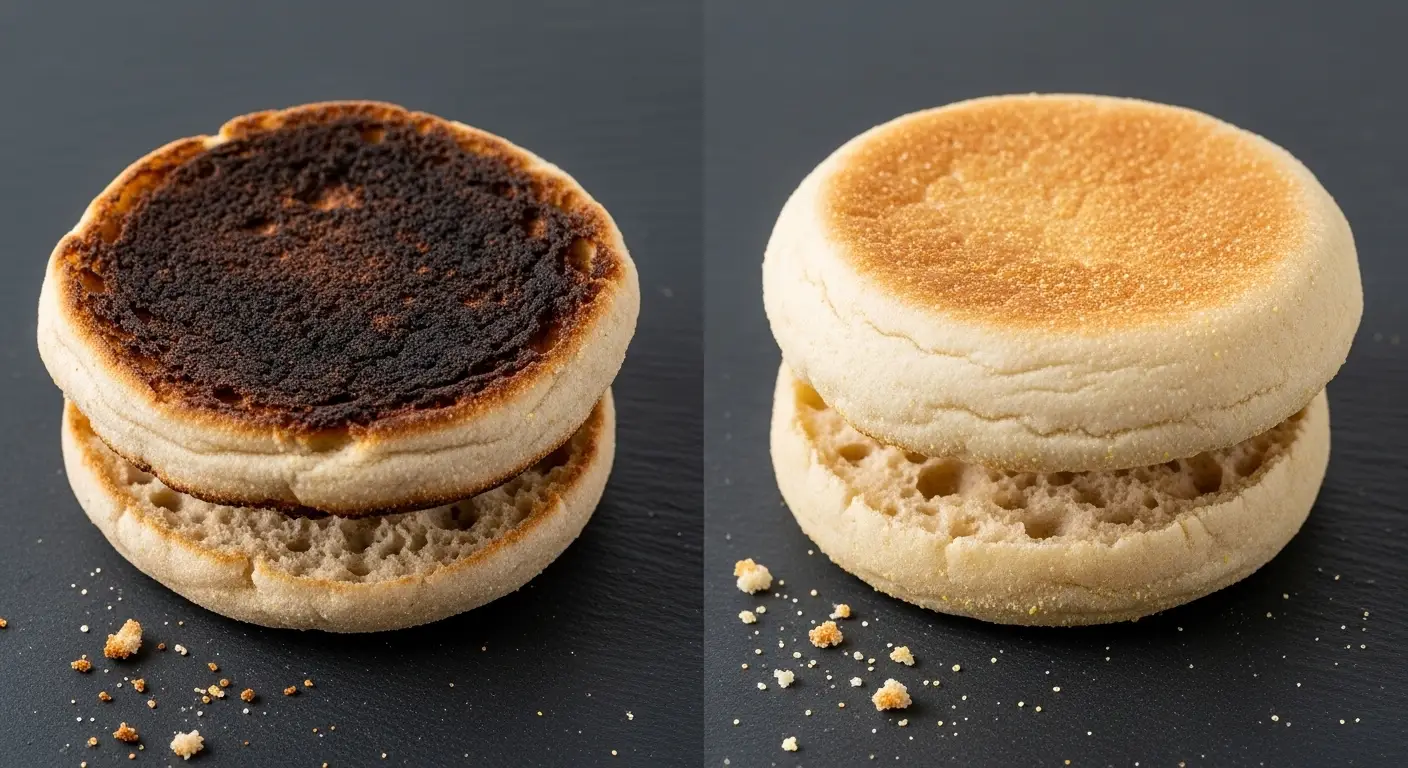
This is the part that surprises most people. You do not bake these in the oven. You cook them in a pan! I prefer using a cast iron skillet because it holds heat very well. Set your stove to low or medium-low heat. If the pan is too hot, the outside will burn before the inside is cooked. I learned this the hard way when I served my family muffins that were black on the outside and raw dough in the middle. It was gross!
Put the muffins in the dry pan. Do not use oil or butter yet. Cook them for about 5 to 7 minutes on each side. They should turn a beautiful golden brown. When you flip them, you will see them rise even more. This is called “oven spring,” even though we are using a stove. If you are worried they are not done inside, you can put them in a 350-degree oven for 5 minutes at the end. Use a meat thermometer to check; they should be 200 degrees inside.
Step 5: Cooling and Nooks

Patience is the hardest part of baking. You must let the muffins cool down before you eat them. If you cut into a hot muffin, the inside will turn gummy and sticky. The steam inside needs time to set the bread. I usually wait at least 30 minutes. It is hard when the whole house smells like toast, but it is worth the wait. Trust me on this one.
When they are cool, do not use a knife to cut them. Use a fork! Poke the fork all the way around the middle and pull it apart. This creates a rough surface with lots of “nooks and crannies.” These little holes are perfect for holding melted butter or jam. If you use a knife, the surface will be flat and smooth. You lose all that great texture that makes an english muffin special. FYI, this is the secret to a perfect breakfast.
Top Baking Tips
- Use a Fork: Always pull the muffins apart with a fork to keep the holes inside.
- Cornmeal is Key: It adds texture and prevents sticking without using extra oil.
- Low Heat: Keep the pan low so the middle cooks through perfectly.
How to Serve and Store Your Muffins
These muffins are very versatile. You can eat them plain with butter, or turn them into a big meal. I love making egg and cheese sandwiches with mine. The sourdough flavor goes really well with salty bacon or sausage. Since they are homemade, they do not have the chemicals found in store bread. This means they taste fresher, but they also dry out faster. You need to know how to keep them soft.
If you have leftovers, keep them in an airtight bag. They will stay fresh on the counter for about two days. If you want them to last longer, put them in the freezer. I usually slice them with a fork first, then freeze them. This way, I can take one out and put it right in the toaster. It is a great way to have a fast breakfast on busy mornings. IMO, frozen and then toasted muffins taste just as good as fresh ones.
The Best Toppings

What you put on your muffin is just as important as how you bake it. Butter is the classic choice. Because of the holes we made with the fork, the butter pools in little golden lakes. It is delicious. Honey is another great choice. The sweetness of the honey hits the sour notes of the bread just right. It is a match made in heaven.
If you want something savory, try avocado and a sprinkle of red pepper flakes. The creamy avocado tastes great against the crunchy toasted muffin. You can even use them as small pizza crusts! Put a little sauce and cheese on top and melt it under the broiler. My kids love doing this for lunch. It is a fun way to use up the last few muffins in the bag.
Common Mistakes to Avoid

Many people fail because their pan is too hot. If you see smoke, turn the heat down! Another mistake is using a starter that is too weak. If your starter does not double in size after a feeding, it will not lift the heavy dough. Make sure you see plenty of bubbles before you start mixing. This ensures your muffins are light and airy instead of dense.
Also, do not skip the cornmeal. I tried using flour on the pan once, and it just burned and smelled bad. Cornmeal has a higher heat limit and gives that sandy texture we all love. Lastly, do not rush the second rise after shaping. Those 60 minutes are vital for the muffins to get puffy. If you skip it, they will be very flat. Good bread takes time, but the result is so rewarding.
Fun Facts About Sourdough
Sourdough is actually very old. People have been making bread this way for thousands of years. Before we had packets of yeast from the store, everyone used a starter. It uses the natural yeast found in the air and on the flour. This is why sourdough from different cities tastes different. Sourdough from San Francisco might taste different than sourdough from New York! It is like a taste of the place where you live.
It is also better for your tummy. The long fermentation process breaks down some of the gluten. This makes it easier to digest for many people. While it is not gluten-free, some people who feel bloated after eating regular bread find they feel okay with sourdough. Plus, it has a lower glycemic index. This means it does not spike your blood sugar as fast as white bread does. It is a healthy and tasty choice for your family.
Frequently Asked Questions
Can I use sourdough discard instead of active starter?
Yes, but you may need to add a pinch of commercial yeast. Discard is not as strong as active starter and might not make the muffins rise enough on its own.
How do I know when they are finished cooking?
They should be golden brown on both sides. If you use a thermometer, the middle should reach 200 degrees. They should also feel light when you pick them up.
Why are my muffins so flat?
This usually happens if your starter was weak or you didn’t let them rise long enough after shaping. Make sure your dough doubles in size during the first rest.
Can I make these without a cast iron skillet?
Yes! Any heavy flat-bottom pan will work. Just make sure it spreads heat evenly so you don’t get hot spots that burn the bread.
Do I have to use cornmeal?
It is best for the classic texture. If you don’t have it, you can use semolina flour or just extra all-purpose flour, but be careful of burning.
Enjoy Your Homemade Breakfast
Making your own english muffins is a fun skill to have. It saves money and tastes amazing. Once you try these, you will never want the store-bought ones again. Just remember to be patient and use a fork to open them. Happy baking!