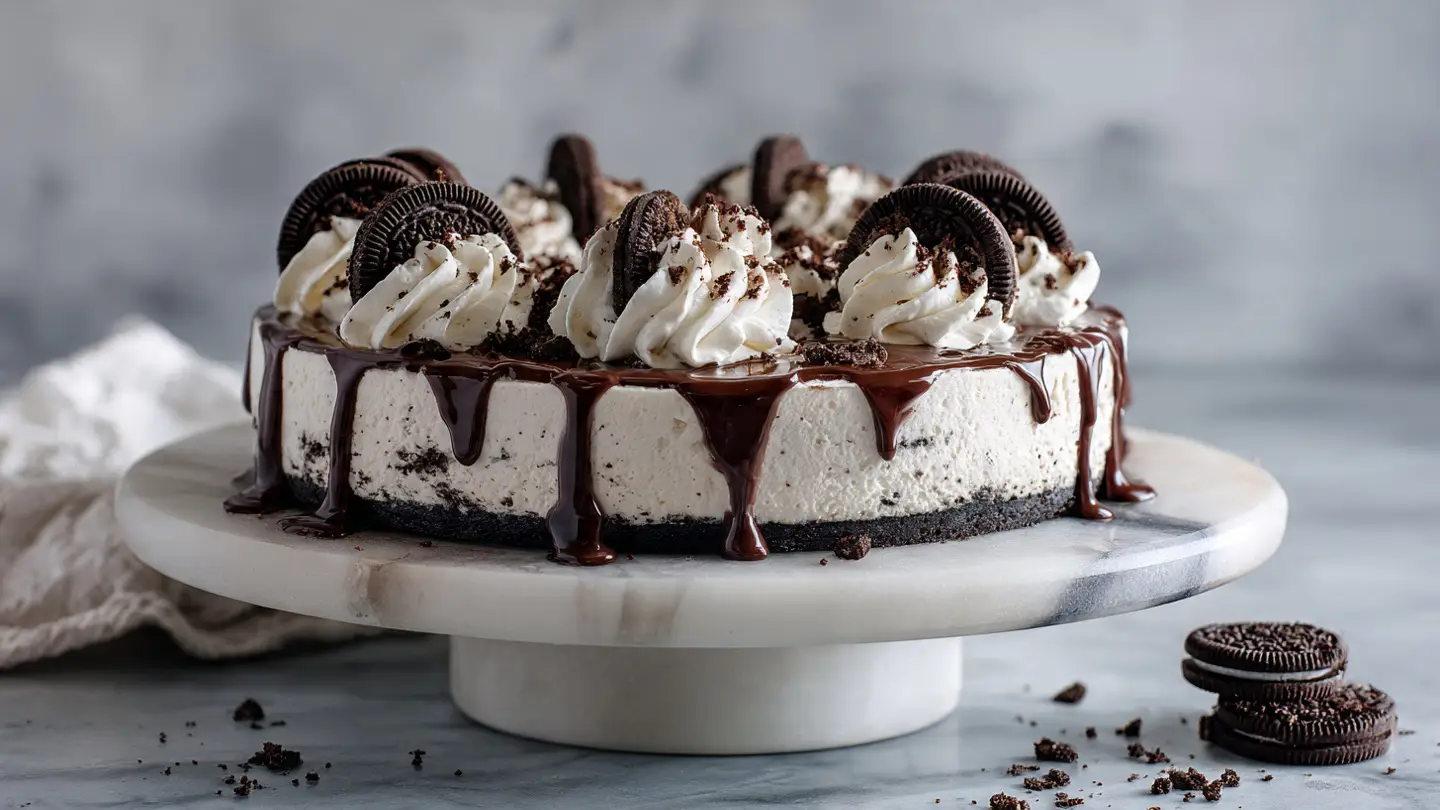
Decadent No-Bake Oreo Cheesecake with a Velvety Finish
Making a great dessert does not have to be hard. I love cookies and I love cake. Putting them together is the best idea ever. This No-Bake Oreo Cheesecake is thick, sweet, and full of chocolate bits. You do not even need to turn on your oven to make it. This is great for hot days or when you have a busy kitchen.
In this post, I will show you how to make a crunchy crust and a smooth filling. I use whole cookies to make sure every bite tastes like an Oreo. You will learn the secret to making it stand up tall without falling over. This is a treat that kids and grown-ups will both love. It looks fancy but it is very simple to put together.
Grab your mixing bowls and let us get started on this sweet treat!
Recipe Quick Info
- Prep Time: 30 minutes
- Cook Time: 0 minutes (plus 6 hours chilling)
- Servings: 12 slices
- Difficulty: Easy
Gathering Your Simple Ingredients
Before you start mixing, you need to have everything ready on your counter. Using cold ingredients for some parts and warm ingredients for others is very important. I find that when I get everything out first, I do not make mistakes. This recipe uses things you can find at any local grocery store. You do not need any special tools other than a mixer and a pan with a removable bottom.
The Cookies and Butter Base

The crust is the floor of your cheesecake. It needs to be strong so it can hold the heavy cream on top. I use a whole pack of chocolate sandwich cookies for this part. You do not need to take the white cream out of the middle. Just toss the whole cookies into a blender or a bag to crush them up. This makes the crust taste extra sweet and stay together better.
Melted butter acts like glue for the crumbs. I always use unsalted butter so the cake is not too salty. If you only have salted butter, that is fine too! It just adds a tiny bit of zing. Mix the crumbs and butter until they look like wet sand. If the mix is too dry, it will fall apart when you cut the cake later. I once forgot the butter and ended up with a pile of loose crumbs. It was still tasty but very messy to eat!
The Creamy Cheese Filling

The middle part of the cake needs to be very smooth. For this, you must use full-fat cream cheese. Low-fat cheese has too much water and will make your cake runny. It should be soft before you start. I usually take my cheese out of the fridge two hours before I cook. If it is cold, you will get tiny lumps in your cake that do not look good. Soft cheese mixes much faster and feels like silk.
You will also need some sugar and vanilla. The sugar makes it sweet and the vanilla makes it smell like a dream. Some people like to use lemon juice to make it tangy. I prefer to keep it simple so the cookie flavor stays the star of the show. We also add more crushed cookies into the white mix. This gives the inside a grey color with dark spots which looks very cool when you slice it.
Heavy Cream for Fluffiness

Since we are not baking this cake, we need something to make it light. Heavy whipping cream is the secret. You have to whip it until it gets thick like a cloud. Do not use the stuff from a spray can because it will melt. You want the liquid cream that comes in a carton. Make sure it is very cold when you start whipping it. Cold cream grows bigger and holds its shape longer than warm cream.
Gently folding the cream into the cheese is a big step. If you stir too hard, you will pop all the air bubbles. Then your cake will be flat and hard. Think of it like tucking a blanket around a baby. Be soft and slow. This part takes a few minutes, but it makes the cake feel like a marshmallow in your mouth. IMO, this is the most fun part of the whole process because it starts looking like a real cake.
Building the Perfect No-Bake Cake
Now that you have your parts, it is time to put them together. The way you layer the cake helps it stay strong. You want a thick crust and a tall filling. Most people use a 9-inch pan for this. A springform pan is best because the sides pop right off. If you use a regular pie dish, you will have a hard time getting the first slice out without breaking it.
Making the Crunchy Crust

Take your butter and cookie mix and dump it into the pan. Use the bottom of a flat glass to press it down hard. You want to push it into the corners too. I like to bring the crust about one inch up the sides of the pan. This creates a little wall that keeps the filling safe. If you just put it on the bottom, the cake might leak out a little bit if the pan is old.
Once it is flat and firm, put the pan in the freezer. Let it sit there for about ten minutes while you make the filling. Freezing the crust makes it turn into a solid brick. This prevents the wet filling from making the cookies soggy. A soggy crust is no fun for anyone! This step is a small trick that many people skip, but it makes a huge difference in how the cake feels when you bite it.
Mixing the Filling Layers

Beat your soft cream cheese and sugar until it looks like white paint. There should be no bumps at all. Once it is smooth, add your vanilla. Next, take your whipped cream and fold it in. I use a big rubber spoon for this. Move the spoon in a circle from the bottom to the top. Keep doing this until you do not see any white streaks of plain cream left.
Now, grab your extra crushed cookies. Stir them in last. Do not over-mix here or the whole cake will turn dark black. You want to see the white and black parts separate. Pour this thick mix onto your cold crust. Use a knife to make the top as flat as a table. You can also tap the pan on the counter to get rid of any air bubbles hiding inside. Air bubbles can make the cake crack later on.
Common Mistakes to Avoid
- Cold Cream Cheese: This causes lumps that never go away. Always use room temperature cheese.
- Too Much Butter: If the crust is greasy, it will be hard to chew. Stick to the recipe amounts.
- Rushing the Chill: If you cut it too soon, it will turn into a puddle on the plate.
- Using Low-Fat Cream: You need the fat to help the cake stay solid at room temperature.
The Waiting Game

This is the hardest part of the recipe. You have to wait! The cake needs to stay in the fridge for at least six hours. I usually leave mine in there overnight. The cold air makes the fat in the cream and cheese get hard. This is what holds the cake up. If you try to eat it after only two hours, it will be like eating thick soup. It will still taste good, but it won’t look like a cake.
Cover the pan with plastic wrap so it does not smell like other food in the fridge. Nobody wants a cheesecake that smells like leftover onions! Keep it on a flat shelf so it does not tilt. If it tilts, one side will be thicker than the other. I have made this mistake before and my cake looked like a slide. It was funny, but hard to decorate later. Just be patient and let the fridge do the work.
Adding the Final Decorations

Once the cake is firm, you can take it out of the pan. Run a warm knife around the edge to help it slide off. Now comes the fun part: making it look pretty. I like to put big swirls of whipped cream all around the top. You can also stick half-cookies into the cream. This tells everyone exactly what kind of cake it is before they even take a bite.
You can also drizzle some chocolate sauce over the top. If you want to be extra fancy, sprinkle some tiny cookie crumbs in the center. This makes the cake look like it came from a bakery. Remember to keep the cake cold until right before you serve it. It can sit out for about thirty minutes, but after that, it will start to get very soft. FYI, if you have leftovers, they stay good for about three days.
The Full Ingredient List
Make sure you have everything on this list before you start. It is better to check twice so you do not have to run to the store with flour on your face! Most of these items are cheap and easy to find. This recipe makes enough for a large family or a small party. You can easily double it if you have two pans and a lot of hungry friends.
What You Will Need

- 36 Oreo cookies (for the crust and the inside)
- 6 tablespoons of unsalted butter (melted)
- 24 ounces of full-fat cream cheese (3 blocks)
- 1 cup of white granulated sugar
- 1 teaspoon of pure vanilla extract
- 1.5 cups of cold heavy whipping cream
- 10 extra cookies for the top (optional)
- A pinch of salt to balance the sugar
Step-by-Step Cooking Guide

- Crush 24 cookies into fine crumbs using a blender or a rolling pin.
- Mix crumbs with melted butter and press into a 9-inch springform pan.
- Put the crust in the freezer for 10 minutes to set.
- In a big bowl, beat the soft cream cheese and sugar until smooth.
- Stir in the vanilla extract and salt.
- In a separate cold bowl, whip the heavy cream until stiff peaks form.
- Gently fold the whipped cream into the cheese mix using a spatula.
- Crush the remaining 12 cookies into chunks and fold them into the batter.
- Pour the filling over the crust and smooth the top.
- Fridge for 6 hours or overnight before serving.
Great Ways to Serve and Save
Serving this cake is the best part of the day. You should use a sharp knife that has been dipped in hot water. This helps the knife slide through the sticky cheese without making a mess. Wipe the knife after every single cut. This keeps the edges of each slice looking sharp and clean. This cake is very rich, so small slices are usually enough for most people.
Topping Ideas and Variations

You can change this recipe to make it your own. If you do not like chocolate cookies, you can use golden ones instead. This makes a vanilla version that tastes like cake batter. You can also add peanut butter to the cream cheese for a different flavor. I sometimes add a layer of caramel on top of the crust before I pour the filling. This makes it a surprise treat for anyone who eats it.
For a fruit twist, try putting fresh strawberries on top. The red color looks beautiful against the white and black cake. The sour fruit also helps cut through the heavy sugar. If you are making this for a birthday, you can add colorful sprinkles into the batter. It makes it look like a party in a pan! Just be careful not to add too much wet fruit inside the cake, or it will not set properly.
Storage and Freezing Tips

If you have any cake left over, you must keep it in the fridge. Put it in a box with a lid so it stays fresh. It will stay good for about three to four days. After that, the crust might start to get a little soft. If you want to keep it longer, you can actually freeze this cake! This is a great tip for people who like to plan ahead. It can stay in the freezer for up to a month.
To freeze it, wrap the whole cake (or just slices) in plastic wrap. Then wrap it again in foil. When you want to eat it, let it thaw in the fridge for a few hours. Do not use a microwave to thaw it or the cream will melt into a puddle. Frozen cheesecake actually tastes like a very fancy ice cream bar. I sometimes eat it straight from the freezer on hot summer days!
The Best Questions About No-Bake Cake
Why is my cheesecake still runny?
This usually happens if the cream cheese was too wet or if you did not whip the cream enough. Make sure to chill it for the full 6 hours to help it firm up.
Can I use a different kind of cookie?
Yes! Any crunchy sandwich cookie will work. Graham crackers or chocolate wafers are also good. Just make sure to use enough butter to hold the crumbs together.
Do I have to use a springform pan?
It is best for easy removal. If you do not have one, you can use a regular pie dish, but you will have to scoop the slices out instead of lifting them.
How do I get a clean slice?
Dip your knife in hot water and wipe it dry before every cut. This melts the fats just enough to slide through the cake without sticking.
Can I make this dairy-free?
You can use vegan cream cheese and coconut cream. However, it might be softer than the dairy version. It will still taste great if you keep it very cold!
A Sweet Ending to Your Meal
This Oreo cheesecake is a total winner for any occasion. It is easy to make and looks like you spent hours in the kitchen. Just remember to use full-fat ingredients and give it plenty of time to chill in the fridge. Your friends and family will be so happy when they see this on the table. Enjoy every creamy, chocolatey bite of your homemade dessert!