Sweet Sopapilla Cheesecake: A Tex-Mex Classic
I love food that brings people together. This Sweet Sopapilla Cheesecake is one of those dishes. It tastes like a mix of a crispy fried pastry and a smooth cheesecake. My friends always ask for the recipe when I bring it to a party. It is very easy to make even if you are not a pro in the kitchen. You do not need to spend all day baking to get a great result.
Today, I am going to show you how to make this treat from start to finish. You will learn what ingredients to buy and how to put them together. I will also share some mistakes I made so you can avoid them. By the end of this post, you will be ready to bake a dessert that tastes like it came from a fancy restaurant. Let us get started on this sweet treat!
Check out the steps below to make your own pan of goodness.
Recipe Quick Info
- Prep Time: 15 minutes
- Cook Time: 30 minutes
- Servings: 12 people
- Difficulty: Easy
What You Need to Get Ready
Before you start, make sure you have everything on your counter. It is no fun to start baking and find out you are missing sugar or butter. This recipe uses simple items you can find at any local grocery store. I like to use name-brand dough because it stays flaky and strong. If you use a cheap store brand, the dough might be too thin and rip easily.
The Shopping List

You will need a few basic things to make this recipe. First, grab two cans of refrigerated crescent roll dough. This acts as the top and bottom crust. Next, get two blocks of cream cheese. Make sure they are the 8-ounce size. You also need one cup of white sugar for the filling and half a cup for the topping. One teaspoon of vanilla extract adds a nice smell and taste to the cheese.
- 2 cans of crescent roll dough
- 2 blocks of cream cheese (softened)
- 1.5 cups of white sugar (divided)
- 1 teaspoon of vanilla extract
- 0.5 cups of melted butter
- 1 tablespoon of ground cinnamon
- Honey for drizzling on top
Make sure your cream cheese is soft before you start. I once tried to mix cold cream cheese and it stayed lumpy. It did not look good at all! If you forget to take it out of the fridge, you can put the closed foil packs in warm water for ten minutes. This helps a lot. FYI, using real butter instead of margarine makes a big difference in the flavor of the crust.
Kitchen Tools You Will Use

You do not need fancy gear for this. A 9×13 inch baking dish is the standard size for this recipe. A glass dish works best so you can see if the bottom is getting brown. You will also need a hand mixer or a stand mixer. Mixing the cream cheese by hand is very hard and usually leaves chunks. A rubber spatula is great for scraping the bowl so you don’t waste any filling.
I also suggest having a small bowl for your cinnamon sugar mix. A fork helps to mix the sugar and spice evenly. If you want to be extra clean, you can use parchment paper in your pan. This makes it easy to lift the whole cheesecake out later. However, a little cooking spray on the pan usually works just fine. Don’t overthink the tools; simple is better here.
How to Bake This Dessert
Now we get to the fun part. Putting this together feels like a puzzle. It is very satisfying to roll out the dough and see it fit the pan. Just follow these steps and your kitchen will smell like a dream in no time. Remember to preheat your oven to 350 degrees before you start anything else.
Preparing the Bottom Crust

Open one can of dough and unroll it. Press it into the bottom of your greased pan. You want to stretch it to the edges. Some cans have seams where you are supposed to tear them into triangles. Use your fingers to pinch those seams together. This creates a solid base for the cheese. If there are holes, the filling will leak under the crust and burn.
One trick I learned is to not press too hard. You want the dough to stay airy and light. If you mash it down too much, it becomes tough like a cracker. This part should only take a minute. If the dough gets too warm and sticky, put it in the fridge for five minutes to firm up. Working with cold dough is much easier than working with warm, gooey dough.
Mixing the Creamy Filling

- Put the soft cream cheese in a large bowl.
- Add one cup of white sugar.
- Pour in the vanilla extract.
- Beat on medium speed until it looks like clouds.
The filling should be very smooth. If you see tiny white dots, keep mixing. Those dots are bits of cheese that didn’t blend. Once it is ready, spread it over your bottom crust. Use your spatula to make it level. Make sure to leave a tiny bit of space at the very edges so the top crust can seal with the bottom crust later. This keeps the cheese trapped inside where it belongs.
IMO, the filling is the best part. It tastes like a sweet cloud. Some people like to add a little lemon juice here to make it tangy. I prefer the classic sweet vanilla taste myself. This is the stage where you can really see the dessert coming together. It looks simple, but the flavors are going to be very rich once they bake together.
Adding the Top Layer

Open your second can of dough. This part can be tricky. Try to unroll it on a piece of wax paper first. Then, flip it over onto the cream cheese layer. If you try to unroll it directly on the cheese, it might sink or get stuck. Once it is on top, pinch the seams again just like you did for the bottom. This makes it look like a giant stuffed pastry.
If the dough doesn’t cover the whole top, don’t worry. You can pull and stretch it a little bit. It will expand as it bakes. Just try to get it as close to the edges as you can. A small gap here and there won’t ruin the dish. The sugar topping will cover up most of the small mistakes anyway. Baking is about having fun, not being a robot!
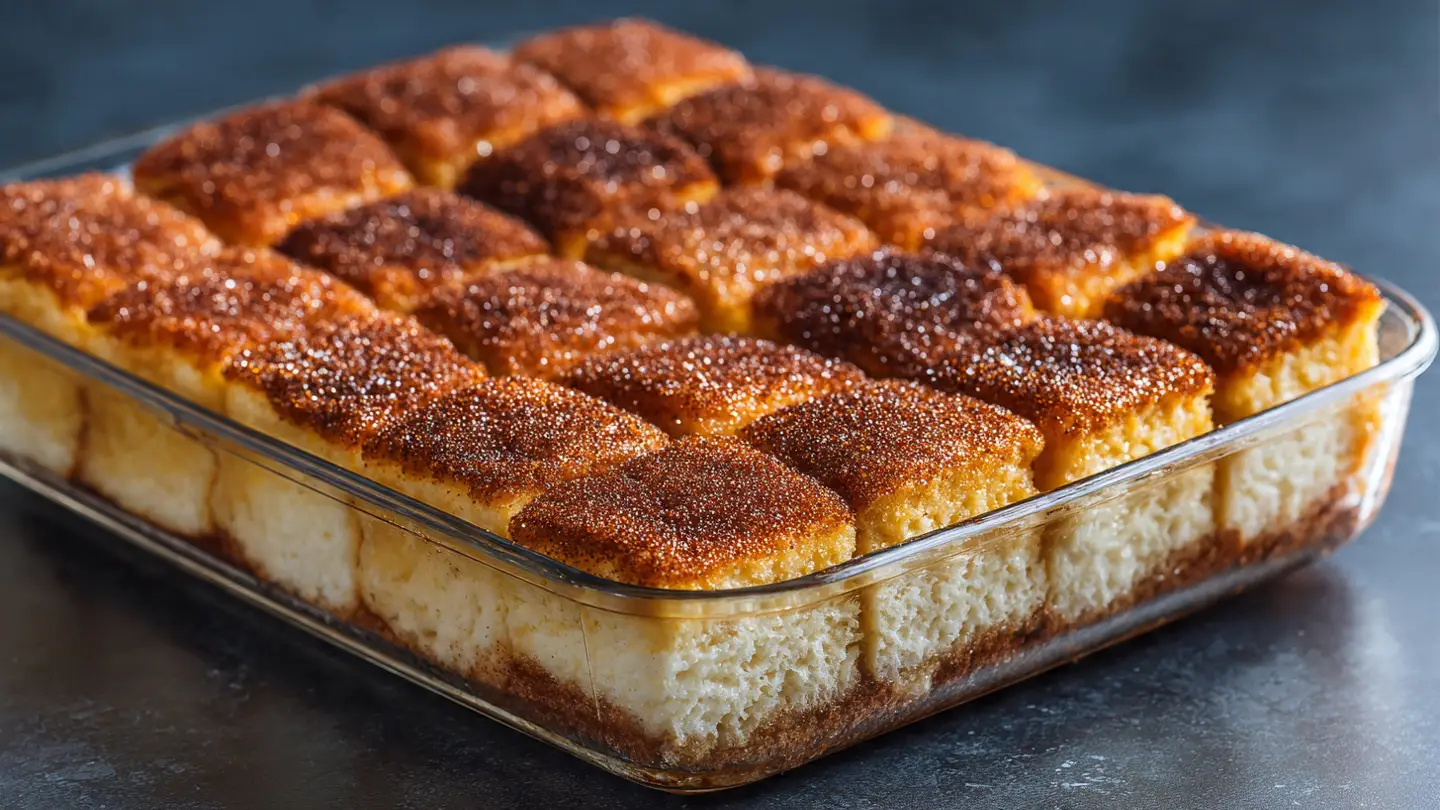
The Topping and Baking

Melt your butter in the microwave. Use a brush or a spoon to spread it all over the top dough. Be generous! The butter is what makes the top crispy and golden. In a small bowl, mix the remaining half cup of sugar with the cinnamon. Sprinkle this mix evenly over the butter. It should look like a sandy beach on top of your cheesecake.
Put the pan in the oven for about 30 minutes. You are looking for a deep golden brown color. The sugar will bubble and turn into a sweet crust. If you take it out too early, the middle dough will be raw. If you leave it too long, the sugar might burn and taste bitter. I always set a timer for 25 minutes and then check it every few minutes after that. Every oven is a little bit different.
Pro Baking Tip
- Don’t Cut It Hot: If you cut the cheesecake while it is hot, the filling will run out like water. You must let it cool for at least one hour on the counter. For the best squares, put it in the fridge for two hours. It needs time to set up and become firm.
Making It Even Better
Even though the recipe is great on its own, you can change things up. I like to experiment with different toppings and flavors. This is a very flexible recipe. You can make it fancy for a wedding shower or keep it simple for a Tuesday night treat. Here are some ideas to help you make this dish your own.
Variations and Ideas

The traditional way to serve this is with a big drizzle of honey. This makes it taste like a real sopapilla from a Mexican restaurant. You can also try adding some fruit. Apple pie filling spread over the cream cheese before adding the top crust is a huge hit. Some people even use chocolate chips in the middle. The cinnamon and chocolate go very well together.
If you want a crunchier top, you can add crushed pecans to the cinnamon sugar mix. This adds a nice nutty flavor. For a lower calorie version, you can use light cream cheese. However, keep in mind that light cream cheese is more watery. It might make the bottom crust a bit soggy. I usually stick to the full-fat stuff because the texture is much better for a party dessert.
Serving and Storage

When you are ready to serve, cut the cheesecake into small squares. It is very rich, so people usually only want a small piece at first. I like to serve it cold or at room temperature. If you have leftovers, you must keep them in the fridge. Because it has cream cheese, it cannot sit out on the counter for more than two hours. It will stay fresh in the fridge for about three to four days.
You can also freeze this dessert. Wrap the squares tightly in plastic wrap and then put them in a freezer bag. They will stay good for about a month. To eat them, just let them thaw in the fridge overnight. The crust won’t be as crispy as it was on day one, but it still tastes amazing. This makes it a great recipe to make ahead of time if you are busy.
Your Common Questions
Can I use different dough for the crust?
You can use puff pastry if you want a lighter crust. It will be much more flaky but less chewy than the crescent rolls. Pizza dough is too heavy, so I do not suggest using that.
Why did my bottom crust come out soggy?
This usually happens if the cream cheese filling is too wet or if the oven was not hot enough. Make sure to preheat. Also, do not use low-fat cream cheese as it has more water.
Do I have to use white sugar for the topping?
Brown sugar works too! It gives the top a deeper, caramel-like flavor. It will be a bit softer than the white sugar crust, but it is very delicious.
Can I make this a day before my party?
Yes! It actually tastes better the next day because the flavors have time to blend. Just keep it covered in the fridge so it doesn’t pick up other smells from your food.
What if I don’t have a hand mixer?
You can use a whisk and some muscle! Just make sure the cream cheese is very soft. Whisk it hard until no lumps remain. It will take about five minutes of fast stirring.
Time to Start Baking
This Sweet Sopapilla Cheesecake is a winner every single time. It is the perfect mix of creamy, crunchy, and sweet. I hope you enjoy making it as much as I do. Grab your apron and go have some fun in the kitchen today!