5 Minute Microwave Apple Crisp with a Crunchy Oat Topping
Sometimes you want a warm dessert but you do not want to wait an hour for the oven. I know that feeling well. One night I was craving apple pie so badly, but it was late and I was tired. I decided to try making something in a mug using my microwave. It turned out so good that I have made it every week since then.
This recipe is perfect for when you are alone or just want a quick treat. You only need one apple and a few things from your pantry. In just five minutes, you will have a bubbly, sweet, and crunchy dessert that smells like a dream. It is basically magic in a bowl.
Take a look at how simple this is to pull together!
How to Choose the Best Apples and Tools
Not every apple is the same when you cook it. Some stay firm and some turn into mush. For this recipe, you want an apple that can handle the heat. I usually go for a green apple because it is tart and stays a bit crunchy. If you like things very sweet, a red apple works too, but it might get softer faster. Choosing the right bowl is also very important so you do not make a mess.
The Best Apples for Microwaving

I have tried many types of apples for this quick snack. Granny Smith apples are my favorite because the sour taste goes great with the sweet sugar. They also hold their shape well when they get hot. If you use a soft apple like a McIntosh, it might turn into applesauce. That still tastes okay, but it is not quite a crisp anymore. Honeycrisp is another great choice if you want a balance of sweet and tart.
Make sure you peel the apple if you do not like the skin. I usually leave the skin on because I am lazy and it has good vitamins. Just make sure to wash the fruit really well first. Cut the pieces into small cubes so they cook fast. If the pieces are too big, the middle will still be hard while the outside is mushy. Keeping them about the size of a dice is perfect for the 5-minute timer. IMO, smaller pieces always soak up the cinnamon better anyway.
Picking the Right Bowl

You need a bowl that can go in the microwave safely. Check the bottom for a label that says microwave safe. Glass or ceramic bowls are the best. Do not use plastic because it can get too hot and melt or smell weird. I learned this the hard way when I ruined a plastic bowl and had to throw my dessert away. It was a sad night for my tummy.
The bowl should be a bit bigger than you think you need. When the apple juice starts to boil, it bubbles up high. If your bowl is too small, the sticky juice will spill over the sides. Cleaning burnt sugar off the microwave floor is not fun at all. A deep cereal bowl or a large mug is usually the best choice for this recipe. It keeps everything inside where it belongs.
Recipe Quick Info
- Prep Time: 3 minutes
- Cook Time: 2 minutes
- Servings: 1 person
- Difficulty: Very Easy
Gathering Your Ingredients
You probably have almost everything you need in your kitchen right now. This is a very cheap dessert to make. You do not need fancy flours or strange oils. Just simple things like oats, butter, and sugar. I love that I can make this without going to the store. It is the best way to use up that last apple sitting in the fruit bowl.
The Sweet Apple Filling

For the bottom part of the crisp, you need one large apple. You will also need a spoonful of brown sugar. Brown sugar is better than white sugar here because it has molasses. That makes a yummy syrup that tastes like caramel. If you only have white sugar, that is fine, but add a tiny bit more cinnamon to help the flavor. Speaking of cinnamon, do not be shy with it.
I also add a tiny splash of water or lemon juice. This helps the apples steam and get soft quickly. A pinch of flour mixed with the apples is a secret trick. It thickens the juices so you get a thick sauce instead of a watery mess. Most people skip the flour in the filling, but it really makes a big difference in how it feels in your mouth. Just 180 seconds in the heat and it turns into a thick jam.
The Crunchy Oat Topping

The top part is what makes it a crisp! You need rolled oats for the best crunch. Instant oats work too, but they can get a little soft. You also need cold butter. I cut the butter into tiny pieces and mix it with the oats, a little flour, and more brown sugar. It should look like wet sand or small crumbs. This is the part that gets toasted and delicious in the microwave.
If you want to be extra healthy, you can use coconut oil instead of butter. It will taste a bit like coconut, but it still gets crunchy. Some people like to add chopped nuts like pecans or walnuts to the mix. I think nuts add a great texture, but they are not required. FYI, if you have a gluten allergy, just make sure your oats say gluten-free on the bag. It is a very easy recipe to change for different diets.
Step-by-Step Instructions
Making this is faster than watching a commercial break on TV. You just have to follow these simple steps. I will guide you through the whole process so nothing goes wrong. Even if you have never cooked anything before, you can do this. It is basically just stirring and pressing buttons on the microwave.
Preparing the Apple Base

- Wash and chop your apple into small bite-sized pieces.
- Put the pieces into your microwave-safe bowl.
- Add one teaspoon of sugar, half a teaspoon of cinnamon, and a tiny bit of flour.
- Stir it all up until every piece of apple looks brown and coated.
Make sure there are no dry spots of flour left. If you see white powder, keep stirring. The moisture from the apple will eventually wet the flour. If your apple is very dry, add one teaspoon of water. This creates the steam that cooks the fruit from the inside out. I once forgot the water with a very old apple and it stayed a bit tough. A little liquid goes a long way in making it tender.
Mixing and Adding the Topping

- In a separate tiny bowl, mix two tablespoons of oats with one tablespoon of flour and one tablespoon of brown sugar.
- Add one tablespoon of cold butter and mash it in with a fork until it looks like crumbs.
- Sprinkle this mixture all over the top of your apples in the bowl.
- Do not stir the topping into the apples; keep it on top so it stays crisp!
It is tempting to just dump everything in one bowl, but keeping the layers separate is the key. The topping needs to sit on top of the steam to get that specific texture. If you mix it in, you just get apple oatmeal. That is good for breakfast, but we are making dessert here! Press the crumbs down just a little bit with the back of your spoon so they stick together. This helps create bigger crunchy bits.
Cooking to Perfection

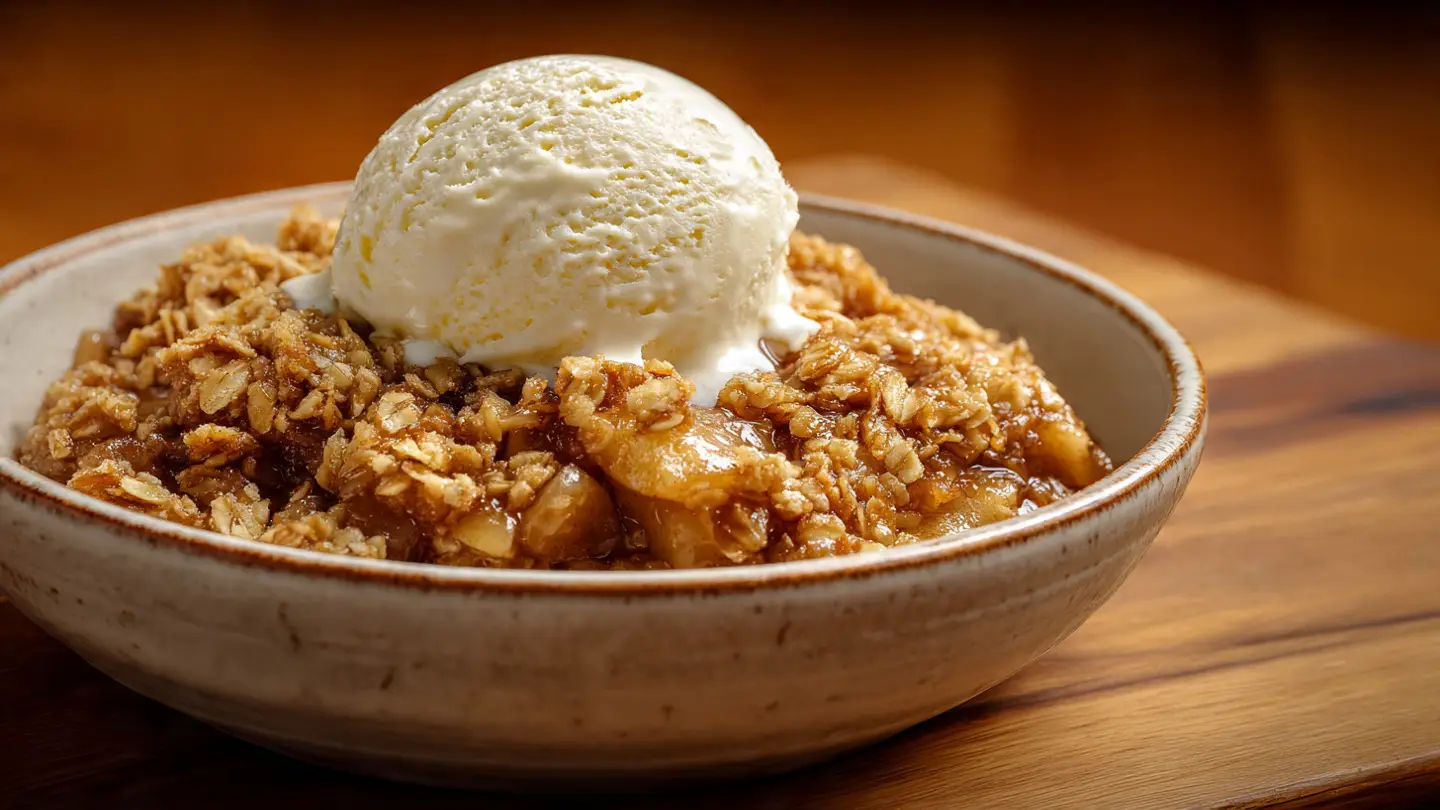
Put your bowl in the microwave and cook it on high for about two minutes. Every microwave is different, so yours might need a little more or less time. I start with 90 seconds and then check it. You want to see the juices bubbling around the edges. If the apples do not feel soft when you poke them with a fork, give them another 30 seconds. Be very careful when you take the bowl out because it will be extremely hot!
Let the bowl sit on the counter for at least one minute before you eat it. This is the hardest part because it smells so good. Waiting lets the sauce thicken up and the topping firm up. If you eat it right away, it might be a bit runny and you will burn your tongue. Trust me, I have burned my tongue many times because I was too impatient. Good things come to those who wait sixty seconds!
Top Pro Tips
- Butter Temperature: Use cold butter for the topping to get better crumbs. Melted butter makes it oily.
- Salt: Add a tiny pinch of salt to the oats. It makes the sugar taste even better!
- Avoid Mush: Don’t overcook or the apples will lose all their texture.
Serving and Enjoying Your Treat
Now comes the fun part! You have a warm, bubbly bowl of apple goodness. You can eat it just like it is, but there are ways to make it feel like a fancy restaurant dessert. I like to think of this as the “choose your own adventure” part of the recipe. You can keep it simple or go all out with toppings.
The Best Toppings to Add

A big scoop of vanilla ice cream is the classic choice. The way the cold ice cream melts into the hot cinnamon apples is truly amazing. If you do not have ice cream, a dollop of whipped cream is also great. Even a splash of cold milk or a spoonful of Greek yogurt can work. The yogurt adds a nice tang that cuts through the sweet sugar. My mom used to put a slice of cheddar cheese on her apple pie, which sounds weird, but some people love it!
You can also drizzle some caramel sauce over the top if you have some in the fridge. A few extra sprinkles of cinnamon or a dusting of powdered sugar makes it look beautiful. If you are feeling fancy, add a few fresh berries on the side. This dessert is very forgiving. It wants to be friends with whatever toppings you have. Don’t be afraid to try new things and see what you like best.
Storage and Reheating

Since this is a single serving, you probably won’t have leftovers. But if you do, you can put them in the fridge. Cover the bowl with some plastic wrap or put it in a container with a lid. It will stay good for about two days. The topping will get soft in the fridge because of the moisture from the apples. That is just how physics works, unfortunately. It won’t be as crunchy the second time around.
To reheat it, just pop it back in the microwave for 30 seconds. It will still taste great even if it is a little soft. You could also put it under a broiler in the oven for a minute to try and crisp the top back up, but that takes more work. Usually, I just eat the leftovers cold for breakfast. It is basically just fruit and oats, so it counts as a healthy start to the day, right? At least that is what I tell myself!
Fun Questions About Apple Crisp
Can I use different fruit like peaches?
Yes! Peaches or pears work great. Just make sure to peel them and cut them into small pieces like the apples.
How do I make the topping extra crunchy?
Add more oats and less flour. You can also add chopped nuts like pecans for a bigger crunch sound.
Is this recipe vegan?
It can be! Just use vegan butter or coconut oil instead of regular butter. The rest is already vegan.
My apples are still hard, what happened?
They might be cut too big. Cook them for another 30-60 seconds or cut them smaller next time.
Start Cooking Your Fast Dessert
I hope you love this quick apple crisp as much as I do. It is the perfect way to satisfy a sweet tooth without making a big mess in the kitchen. Just remember to use a big bowl and let it cool for a minute. You are now ready to make a delicious snack in no time! Enjoy your warm, crunchy treat.