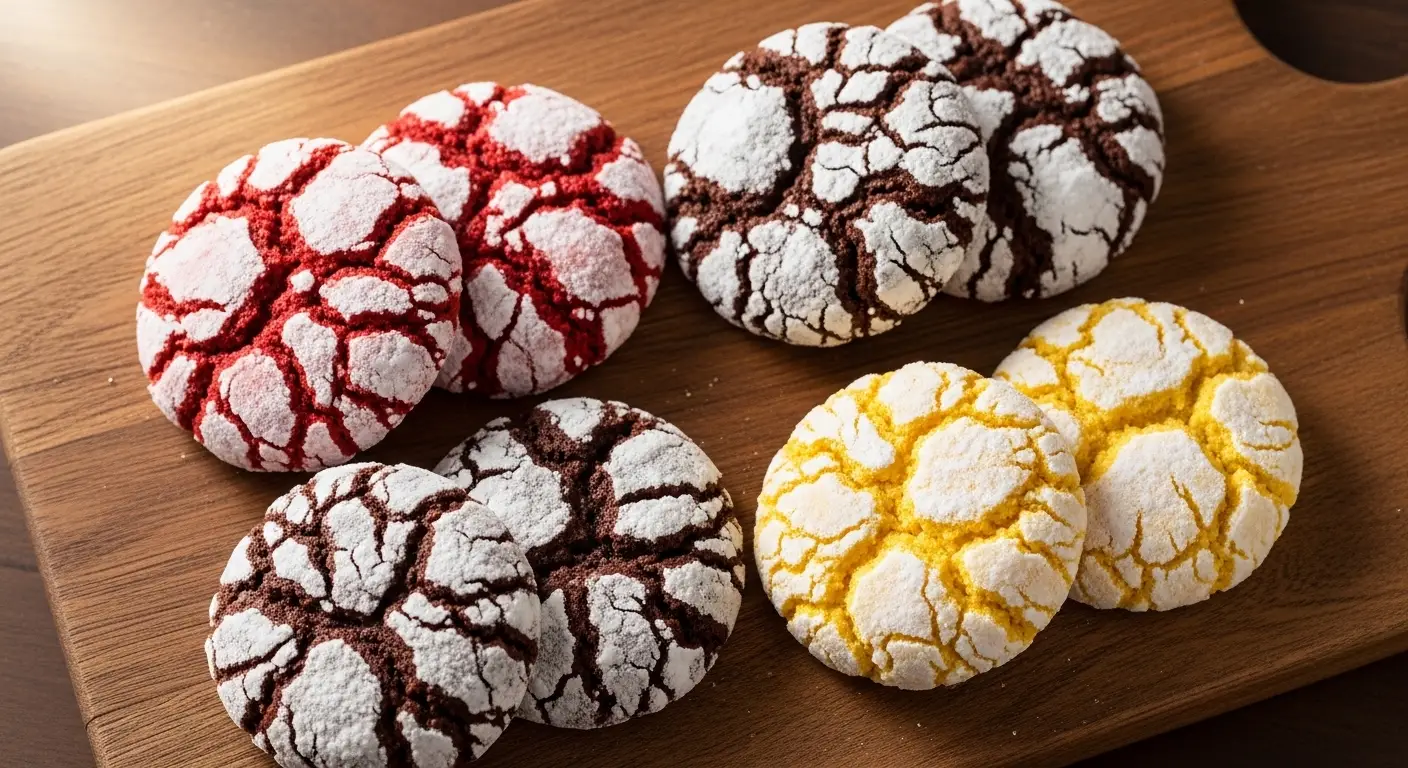
Festive Red Velvet Crinkle Cookies
Are you looking for a cookie that looks like a gift? These red velvet crinkle cookies are exactly what you need. They are bright red on the inside and covered in white sugar on the outside. When they bake, the sugar pulls apart to show the deep red color. They look like little snow-covered mountains and taste like a mix of chocolate and cake. I love making these because they stand out on any plate. Even if you are not a pro in the kitchen, you can make these look perfect every single time.
In this guide, I will show you how to get that perfect crackle look. You will learn the best way to mix the dough so it stays soft and chewy. We will also talk about how to keep the white sugar from melting into the cookie. This recipe is great for kids to help with because rolling the dough in sugar is the best part. By the end of this post, you will have a new favorite treat to share with your friends and family.
Ready to start baking some holiday magic? Let’s get our aprons on and head to the kitchen.
Recipe Quick Info
- Prep Time: 20 minutes (plus chilling)
- Cook Time: 10 minutes
- Servings: 24 cookies
- Difficulty: Easy
The Magic of Red Velvet Crinkle Cookies
Red velvet is more than just a color. It has a special taste that is a little bit tangy and a little bit chocolatey. These cookies are special because they stay thick and soft. Many cookies go flat in the oven, but these hold their shape. The contrast between the dark red dough and the bright white sugar makes them look very fancy. People will think you bought them at a high-end bakery, but you actually made them in your own home.
I remember the first time I tried to make these. I was so excited to see the cracks form. I sat in front of the oven door and watched through the glass. When the dough started to spread and the white sugar broke apart, it felt like a science experiment. They are fun to make and even better to eat. They work well for school parties, office swaps, or just a cozy night by the fire with a glass of milk.
What You Need from the Store

To make these cookies, you need simple things you might already have. You will need all-purpose flour for the base. Cocoa powder gives it that hint of chocolate flavor. Do not use too much cocoa, or the red color will look muddy. You also need baking powder to help them puff up and salt to make the flavors pop. For the wet parts, you need butter, sugar, eggs, and vanilla. The most important part is the red food coloring. I like to use gel coloring because it is very strong and bright.
- 2 cups all-purpose flour
- 1/4 cup unsweetened cocoa powder
- 2 teaspoons baking powder
- 1/4 teaspoon salt
- 3/4 cup granulated sugar
- 1/4 cup softened butter
- 2 large eggs
- 1 teaspoon vanilla extract
- 1 tablespoon red gel food coloring
- 1/2 cup powdered sugar (for rolling)
Make sure your butter is soft but not melted. If the butter is too hot, the cookies will spread too much. I also suggest using fresh baking powder. If your baking powder is old, the cookies will stay flat and won’t get those pretty cracks we want. Check the date on the box before you start.
Getting the Dough Just Right

Mixing the dough is easy, but you have to follow the order. First, whisk your dry things like flour and cocoa in a small bowl. In a big bowl, beat the sugar and butter until they look fluffy. Add the eggs one at a time. This helps the dough stay smooth. Then, stir in the vanilla and the red food coloring. Be careful with the red dye! It can stain your counters or your clothes. I once got red dye on my favorite white shirt and it never came out. Learn from me and wear an apron.
Once the wet stuff is mixed, slowly add the dry stuff. Do not overmix the dough. If you mix it too much, the cookies will be tough like bread instead of soft like cake. The dough will be very sticky, and that is normal. Because it is sticky, you must let it rest in the fridge. This is a step you cannot skip. Cold dough is easier to roll and keeps its shape better in the oven. IMO, chilling the dough is the secret to a perfect crinkle cookie.
The Importance of Chilling Time

You need to chill this dough for at least two hours. If you are in a rush, you might want to skip this, but please don’t! Cold dough ensures the cookies don’t turn into flat pancakes. While the dough sits in the fridge, the flour soaks up the liquid. This makes the flavor better and the texture tougher so you can handle it. I usually make the dough the night before. That way, it is ready to go the next morning when I want to bake.
When you take the dough out, it should feel firm. If it still feels too soft to roll into a ball, put it back in for another thirty minutes. If the dough gets warm while you are working, the powdered sugar will melt right into it. We want that sugar to stay white and dry on top. Keeping everything cold is the best way to make sure your cookies look like the pictures you see online.
How to Roll and Coat the Cookies

Now comes the fun part. Scoop about one tablespoon of dough and roll it into a ball between your hands. Try to make all the balls the same size so they bake evenly. Once you have a ball, drop it into a bowl of powdered sugar. Roll it around until it is completely white. You should not see any red peeking through yet. A thick layer of sugar is what creates the best crinkles.
One tip most blogs skip is rolling the ball in granulated sugar first, then the powdered sugar. This creates a barrier. It stops the moisture in the dough from soaking into the powdered sugar. This keeps the white parts looking very bright. If you find your sugar is disappearing after baking, try this trick next time. It makes a big difference in how they look on the plate.
Baking to Perfection

Heat your oven to 350°F. Line a big pan with parchment paper or a silicone mat. Place your sugar-covered balls on the pan. Give them plenty of space because they will spread out. I usually put about 12 cookies on one large sheet. Bake them for 10 to 12 minutes. You will know they are done when the edges look set but the middle still looks a little soft. Do not overbake them! They will firm up as they cool down on the pan.
Watching them through the oven window is so satisfying. You will see the red cracks start to appear around the eight-minute mark. If you bake them too long, the red color might turn a bit brown. We want them to stay vibrant. Let them sit on the hot pan for five minutes after you take them out. This helps the bottom of the cookie stay together. Then, move them to a wire rack to cool all the way.
Pro Baking Tips
- Don’t Overbake: Take them out when the centers look slightly underdone.
- Double Coat: Use a lot of powdered sugar for a bright white look.
- Room Temp Eggs: This helps the dough mix better without lumps.
Serving and Presentation Ideas

These cookies look amazing just as they are. However, you can make them even more festive. Place them on a white plate to make the red color pop. You can also add some small green sprinkles or white chocolate chips if you want extra crunch. I think they look best when stacked in a neat pile. Since they are red and white, they fit perfectly with Christmas or Valentine’s Day themes. They are a great gift when put in a clear jar with a pretty ribbon.
Serving them with cold milk is a classic choice. The chocolate flavor is light, so it doesn’t overwhelm you. Some people like to make sandwich cookies out of them. You can put a scoop of cream cheese frosting between two cookies. This tastes just like a red velvet cake! If you do this, make sure the cookies are completely cold first. FYI, these cookies are also great with a hot cup of coffee in the morning. Who says you can’t have cookies for breakfast?
Storing Your Treats

If you have leftovers, you need to store them correctly. Put them in a container that shuts tight. They will stay soft for about 3 to 5 days at room temperature. If you leave them out on a plate, they will get hard and crunchy. I like my cookies soft, so I always hide them in a jar. You can also freeze these cookies! They freeze very well for up to two months. Just let them thaw on the counter for an hour before you eat them.
One thing to know is that the powdered sugar might get a little damp in the container over time. They will still taste great, but they might not look as sharp. If you are making these for a party, it is best to bake them the same day or the day before. This ensures they look their absolute best when your guests see them. If you follow these steps, your cookies will be the star of the show.
Common Mistakes to Avoid
- Melting Sugar: Rolling dough while it is too warm makes sugar disappear.
- Too Much Cocoa: Using half a cup instead of a quarter cup will hide the red color.
- Flat Cookies: Skipping the fridge time will cause the dough to spread too thin.
Variations to Try Later

Once you master the red velvet version, you can try other colors. You can use the same base recipe but swap the red for green for St. Patrick’s Day. Or, you can leave out the food coloring and add more cocoa for a dark chocolate crinkle cookie. Some people like to add a peppermint extract instead of vanilla. This gives it a candy cane flavor that is very popular in December. You can even press a chocolate kiss candy into the center right after they come out of the oven.
Another idea is to add white chocolate chips inside the dough. This adds a nice creamy texture to every bite. If you are dairy-free, you can use vegan butter and a flax egg. I have tried this and it works okay, but the cookies might be a little flatter. Always remember that baking is about having fun and trying new things. Don’t be afraid to change a little bit of the recipe once you know how the dough feels. This is how you become a better baker!
Common Questions About Crinkle Cookies
Why didn’t my cookies crinkle?
Your dough might have been too warm or your baking powder was old. Make sure to chill the dough well so it expands quickly in the oven to create those cracks.
Can I use liquid food coloring?
You can, but you will need a lot of it. Gel coloring is better because it doesn’t add extra liquid to the dough, which keeps the cookies thick.
How do I keep the sugar white?
Roll the dough balls in granulated sugar before rolling them in powdered sugar. This creates a dry layer that prevents the powdered sugar from melting.
Can I make the dough in advance?
Yes! You can keep the dough in the fridge for up to three days. Just make sure it is wrapped tightly so it does not dry out.
Why are my cookies brown instead of red?
You might have used too much cocoa powder or baked them for too long. Stick to 1/4 cup of cocoa and check them at the 10-minute mark.
Enjoy Your Festive Treats
These red velvet crinkle cookies are the perfect blend of beauty and taste. They are simple to make but look very professional. Just remember to chill your dough and use plenty of sugar. Now go share these with someone you love!