No-Bake Chocolate Icebox Cake with Wafer Layers
I love desserts that feel like a magic trick. You take a few simple things from the store, stack them up, and wait. The next day, you have a fancy cake that looks like you spent hours in the kitchen. This chocolate icebox cake is exactly that. It is cold, creamy, and full of soft chocolate wafers that turn into a cake-like texture overnight. If you want a treat that does not require turning on the oven, you are in the right place.
My favorite part about this recipe is how forgiving it is for beginners. You do not need to be a pro baker to make this look great. We are going to use thin chocolate cookies and a lot of whipped cream to build a tower of flavor. By the time it sits in the fridge, the cookies soak up the moisture from the cream. It becomes soft enough to slice just like a real sponge cake. It is the perfect solution for hot summer days or busy holidays when the oven is already full.
Ready to learn how to build this easy masterpiece?
Would you like to see how simple the ingredient list is?
Everything You Need for This Cake
Before we start building, we need to gather our tools and food. This cake only needs a handful of items. Most of these are likely in your pantry or the dairy aisle of your local shop. Because there are so few ingredients, I always try to use the best quality I can find. Since we aren’t baking it, you will really taste the chocolate and the cream.
The Short List of Ingredients

To make this cake, you will need two packs of thin chocolate wafer cookies. These are the dark, crisp ones that usually come in a yellow or brown box. You also need a large carton of heavy whipping cream. This must be very cold so it whips up thick and fluffy. To sweeten the cream, grab some powdered sugar. I prefer powdered sugar over regular sugar because it dissolves faster and keeps the cream stable. Finally, a splash of vanilla extract adds that classic bakery smell and taste.
If you cannot find the specific chocolate wafers, do not worry. You can use chocolate graham crackers or even thin Oreo-style cookies with the filling removed. The goal is to have a thin, crunchy cookie that can absorb liquid. I once tried using thick chewy cookies, but they stayed too hard. Stick to the thin, crispy ones for the best results. You will also want a little extra cocoa powder or chocolate shavings for the top to make it look pretty.
Helpful Kitchen Tools

You do not need a lot of gear for this. A large mixing bowl is a must for whipping the cream. I highly suggest using an electric hand mixer or a stand mixer. Doing it by hand with a whisk is a huge workout and takes a long time! You also need a sturdy rubber spatula to fold everything together without losing the air in the cream. For the base, a long rectangular platter or a springform pan works best.
I usually use a simple flat plate. If you want a round cake, a springform pan with a removable bottom is a great choice. It helps the cake keep its shape while it sets. Just remember that the cream can be messy, so having some plastic wrap nearby is a smart move. I like to cover the whole thing tightly before it goes into the fridge so it doesn’t pick up any weird smells from the leftovers.
Recipe Quick Info
- Prep Time: 20 minutes
- Cook Time: 0 minutes (No-Bake)
- Servings: 10 people
- Difficulty: Very Easy
Building the Perfect Chocolate Layers
Now comes the fun part. Making an icebox cake is like building a house out of cookies and clouds. You have to be patient, but the process is very relaxing. The main goal is to make sure every cookie is touching the whipped cream. If a cookie stays dry, it will stay crunchy, and we want it to be soft and cake-like. This is where the magic happens over several hours in the cold.
How to Make the Whipped Cream

Start by pouring your cold heavy cream into the bowl. Start your mixer on a low speed so you do not splash cream all over your shirt. As it gets bubbles, turn up the speed. Once it looks like soft clouds, add your powdered sugar and vanilla. Keep mixing until the cream stands up in stiff peaks. This means when you lift the mixer, the cream stays pointing up and does not flop over. Be careful not to mix too long, or you might accidentally make butter!
IMO, the best whipped cream is just slightly sweet. I usually add about half a cup of sugar for every two cups of cream. If you like it sweeter, feel free to add more. One tip I learned the hard way is to chill your bowl and your beaters in the freezer for ten minutes before you start. This makes the cream whip up much faster and stay stable longer. It is a small step that makes a big difference in the final texture of your cake.
Stacking the Wafer Cookies

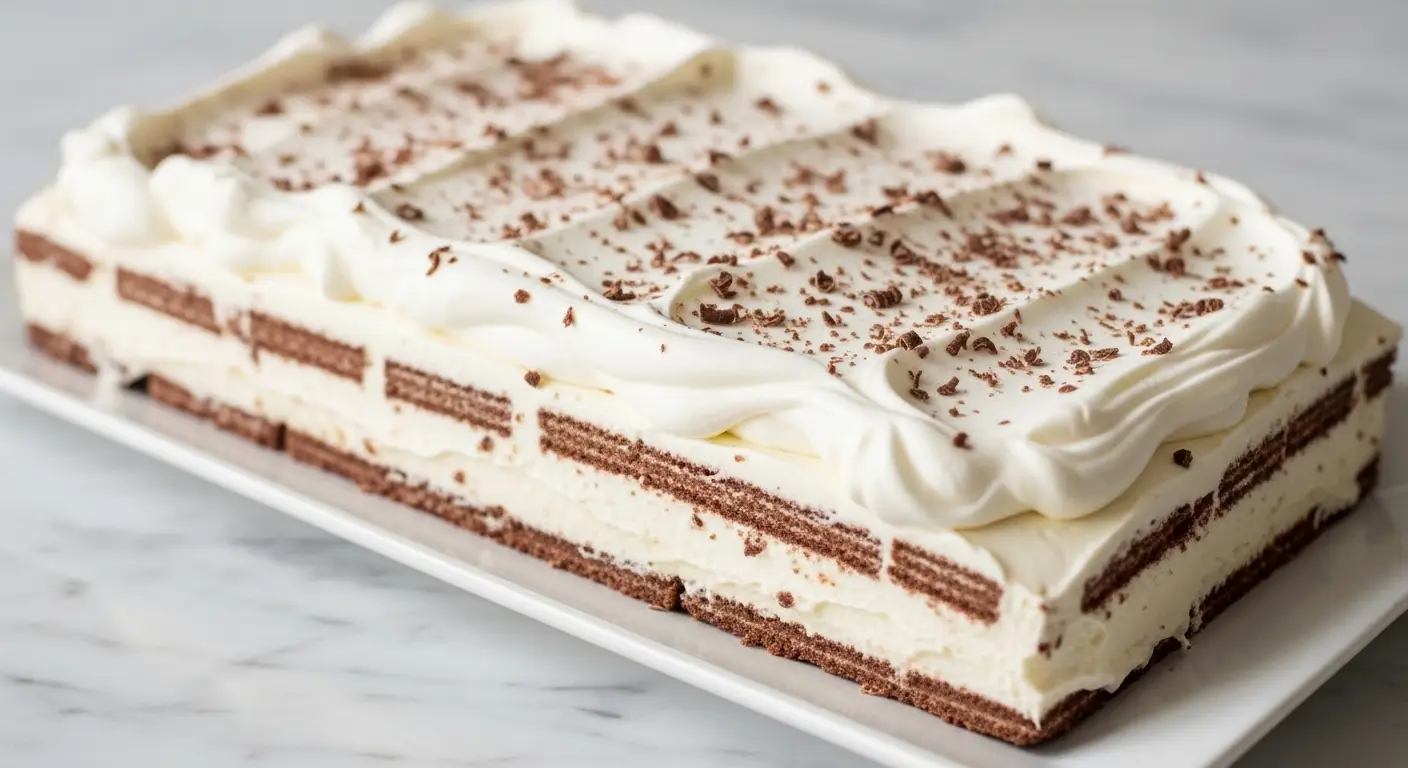
There are two ways to build this. You can make a tall tower on a plate, or you can layer it flat in a pan. To make the classic log shape, spread a little cream on a cookie, then press another cookie against it. Keep doing this until you have a stack of about five cookies. Stand that stack up on your plate. Keep adding stacks until you have a long line. Then, cover the whole outside of the log with the rest of the whipped cream until you can’t see the cookies anymore.
If you use a pan, start with a layer of cream on the bottom. Lay the cookies flat in a single layer. Spread more cream on top, then another layer of cookies. Repeat this until you run out of stuff. I prefer the log method because when you slice it at an angle, you see beautiful diagonal stripes. It looks much fancier than it actually is. Just make sure you have enough cream left at the end to hide all the edges. A smooth coat of white cream makes the finished cake look like a snowy mountain.
The Importance of Chilling Time

This is the hardest part: waiting. You cannot eat this cake right away. If you try, the cookies will be hard and the cream will just slide off. The cake needs at least four hours in the fridge, but overnight is much better. During this time, the cookies pull moisture from the cream. They soften up and blend with the cream to create a single, unified texture. It is a slow process that cannot be rushed with a freezer.
FYI, putting it in the freezer will just make it a frozen treat. While that is also tasty, it is not a true icebox cake. You want it to stay in the main part of the fridge. I usually make mine the night before a party. By the next afternoon, it is perfectly soft and easy to cut. If you are worried about the cream drying out, just drape some plastic wrap loosely over it. Just be careful not to squish your beautiful cream decorations!
Pro Tips for Success
- Temperature: Use very cold cream for the best volume.
- Cookie Choice: Thin wafers work better than thick ones.
- Slicing: Cut at an angle to see the pretty stripes.
- Garnish: Add toppings right before serving to keep them fresh.
Customizing Your Icebox Cake
Once you know the basics, you can change this recipe a lot. You are not stuck with just chocolate and vanilla. Since this is a no-bake cake, it is very easy to experiment with different flavors. You can change the cookies, the cream, or the toppings to fit any mood or season. It is a great way to use up things you have in your cupboard.
Flavor Variations to Try

You can mix things into your whipped cream to change the flavor. Try adding a tablespoon of instant coffee powder for a mocha cake. Or, mix in some peanut butter for a chocolate-peanut butter dream. If you like fruit, you can put thin slices of strawberries or bananas between the cookie layers. The fruit adds a fresh pop of color and a nice tart flavor that cuts through the rich cream. I once tried adding crushed peppermint candies for a winter version, and it was a huge hit.
Another idea is to change the cookies entirely. Lemon wafers with blueberry-flavored cream would be amazing for spring. Ginger snaps with pumpkin spice cream work great for fall. The only rule is that the cookie must be thin enough to get soft. This cake is like a blank canvas. You can make it your own every single time you make it. I love trying new combos to see what my family likes best.
Topping and Decorating Ideas

A plain white cake looks nice, but toppings make it look professional. I like to shave a bar of dark chocolate over the top using a vegetable peeler. It creates beautiful curls. You can also sift a little cocoa powder over it for a matte look. If you want some crunch, crushed nuts like pecans or walnuts work well. Sprinkles are always a favorite if you are making this for a kid’s birthday party.
One mistake I made once was adding fresh berries too early. They leaked juice and made red streaks all over the white cream. Now, I always wait until right before I serve the cake to add fresh fruit. It keeps the cake looking clean and bright. If you want to get really fancy, you can use a piping bag to make little swirls of cream along the top. It looks like it came from a high-end bakery, but we know it only took a few minutes of work!
Serving and Storage Tips

When you are ready to serve, use a sharp knife. I find that dipping the knife in warm water and wiping it dry between cuts helps get those clean, sharp lines. If you built the cake in a log, slice it at a 45-degree angle. This shows off the most layers and looks very impressive on the plate. Any leftovers should go straight back into the fridge. This cake is mostly cream, so it cannot sit out on a warm table for too long.
This cake actually stays good for about two or three days. In fact, some people think it tastes even better on the second day. However, after the third day, the cookies might get a bit too mushy. If you have a lot left over, you can actually freeze individual slices. They taste like a fancy ice cream sandwich when they are frozen! Just wrap them tightly so they do not get freezer burn. It is a great way to save a treat for later.
Your Common Questions Answered
Can I use low-fat cream?
No, you need heavy whipping cream. Low-fat milk or cream will not get thick enough to hold the cookies together. It will just stay liquid.
What if my cream doesn’t whip?
Make sure the cream and the bowl are very cold. If it is too warm, it will not trap air. Try putting the bowl in the freezer for a few minutes.
Can I make this dairy-free?
Yes! You can use a heavy coconut cream or a plant-based whipping cream. Just make sure it is a kind that says it can be whipped into stiff peaks.
How long does it last?
It is best within 48 hours. After that, the cookies get very soft. It is still safe to eat, but the texture changes a bit.
Do I have to use chocolate wafers?
You can use any thin, crisp cookie. Graham crackers, ginger snaps, or vanilla wafers all work great. Just make sure they are not too thick.
Time to Enjoy Your Easy Cake
This no-bake chocolate icebox cake is a total winner for any day. It is simple, cheap to make, and tastes like a dream. Now that you know the secrets of the whipped cream and the waiting game, you can make this whenever you need a quick win. I hope you love every creamy, chocolatey bite as much as I do!