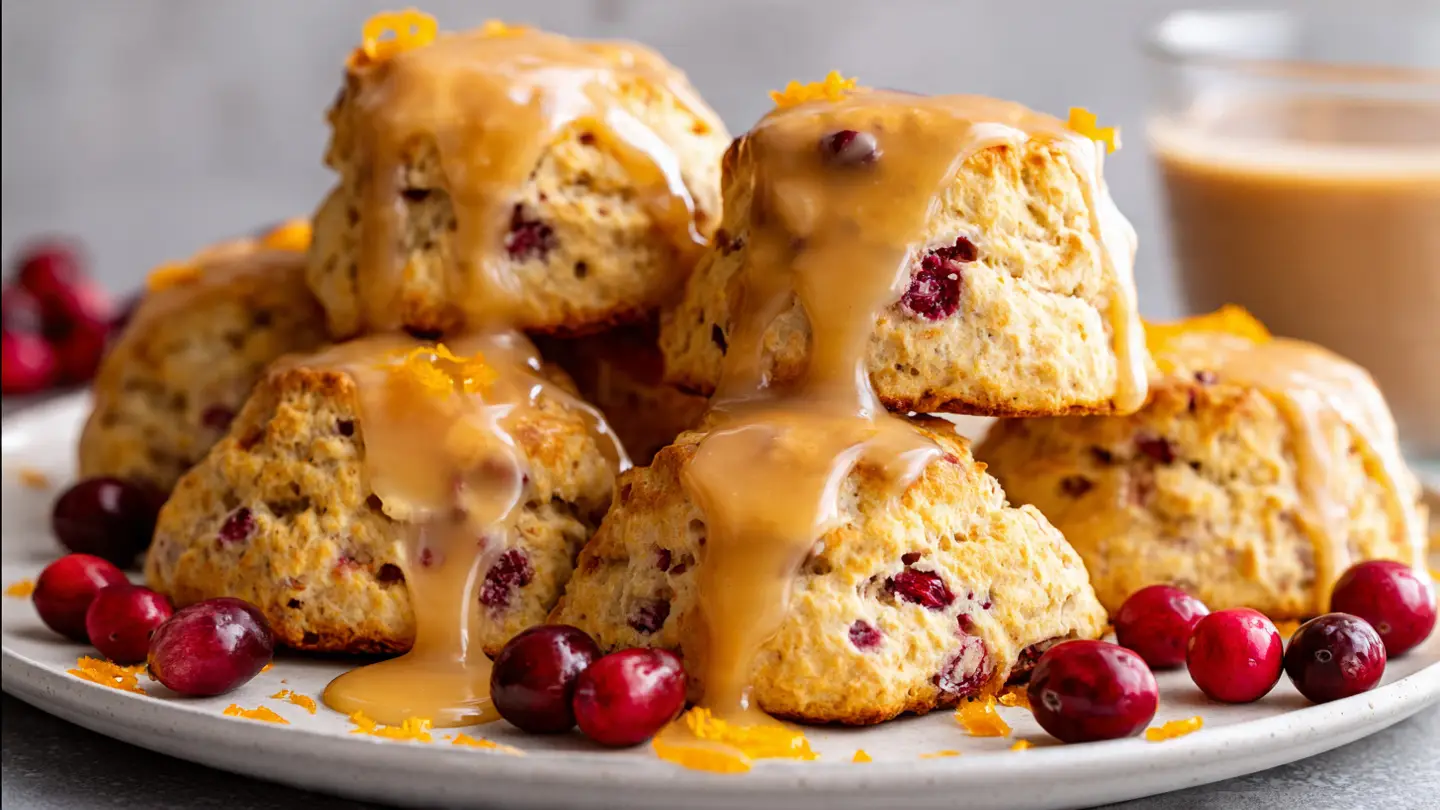
Best Ever Zesty Orange Glazed Cranberry Scones for Brunch
I love a slow morning with a warm pastry and a hot cup of coffee. There is something so special about the smell of butter and citrus filling the kitchen while the sun comes up. Scones used to scare me because I thought they were too hard to make. I always worried they would turn out like dry, heavy rocks that no one would want to eat. But after years of trying, I found the secret to a light and soft scone that melts in your mouth.
In this post, I will teach you how to make my favorite zesty orange glazed cranberry scones. These are not those dry scones you find at the store. These are moist, flaky, and full of bright fruit flavor. You will learn the right way to handle dough so it stays soft and how to get that perfect golden crust. Whether you are a pro baker or this is your first time using flour, you can do this. Let us get into the kitchen and start baking something delicious.
Check out the full list of tools and food you need below to get started.
Everything You Need to Make These Treats
Before we start mixing, we need to talk about what goes into a great scone. Most of these things are likely in your pantry right now. I like to use fresh ingredients because they make the orange flavor pop. Scones are simple, so the quality of your butter and fruit really matters. If you use good stuff, your scones will taste like they came from a fancy bakery. I learned that using cold ingredients is the most important part of this whole process.
The Ingredients You Will Need

Gather these items before you start. Having everything ready makes the work go much faster and keeps you from making mistakes. You will need 3 cups of all-purpose flour to give the scones their shape. Make sure you do not pack the flour into your measuring cup. Use a spoon to fill the cup and level it off with a knife. You also need 1/2 cup of white sugar for just the right amount of sweetness. For the lift, use 1 tablespoon of baking powder. Do not forget a 1/2 teaspoon of salt to make all the other flavors stand out.
- 3 cups all-purpose flour
- 1/2 cup granulated sugar
- 1 tablespoon baking powder
- 1/2 teaspoon salt
- 1/2 cup cold unsalted butter (1 stick)
- 1 cup fresh or frozen cranberries
- 1 tablespoon orange zest
- 1 cup heavy cream (plus more for brushing)
- 1 large egg
- 1 teaspoon vanilla extract
For the glaze, you just need 1 cup of powdered sugar and 2 tablespoons of fresh orange juice. I also like to add a little extra zest on top because it looks pretty. If you do not have fresh cranberries, frozen ones work just fine. Just do not thaw them out before you put them in the dough or they will turn the whole thing pink! This recipe is very forgiving, so do not worry if you are missing one small thing.
Why Cold Butter Matters

The biggest secret to a flaky scone is cold butter. I mean really cold butter. When the cold butter hits the hot oven, it creates steam. That steam pushes the dough up and makes those little layers we all love. If your butter gets warm while you are working, the scones will be flat and greasy. I like to cut my butter into small cubes and then put them back in the fridge for ten minutes before I start mixing. It makes a huge difference in how the bread feels when you bite into it.
If you have warm hands, try using a pastry blender or two forks to mix the butter into the flour. This keeps the heat from your fingers away from the dough. Some people even grate frozen butter using a cheese grater. That is a great trick if you want very small, even pieces of fat. IMO, the grater method is the easiest way for beginners to get it right. Just be careful not to overwork the dough once the butter is in there.
How to Prepare Your Kitchen

Start by turning your oven on to 400 degrees. A hot oven is a must. If the oven is not hot enough, the scones will spread out instead of rising up. I always check my oven temp with a separate thermometer to be sure it is right. Next, line a big baking sheet with parchment paper. This stops the sugar in the glaze and the berries from sticking to the pan. It also makes cleaning up a lot easier later on, which is a win in my book.
I also like to clear a big space on my counter. You will need room to pat the dough out and cut it into shapes. Make sure your counter is clean and dry. I usually sprinkle a little bit of flour on the surface so the dough does not stick. Having a clear workspace helps me stay calm while I bake. If the kitchen is a mess, I tend to get overwhelmed and skip steps. Take a minute to tidy up before you dive in.
Recipe Quick Info
- Prep Time: 20 minutes
- Cook Time: 18-22 minutes
- Servings: 8 large scones
- Difficulty: Easy to Medium
The Step-by-Step Guide to Success
Now we are ready for the fun part. Making the dough is like a science project, but you get to eat the results. I will walk you through every step so you don’t get lost. Remember, the goal is to be fast and gentle. The less you touch the dough, the better it will be. I once spent twenty minutes kneading my scone dough because I thought it needed to be smooth like bread. That was a big mistake! Those scones were so hard I could have used them as paperweights. Keep it messy and keep it quick.
Mixing the Dry and Wet Ingredients

- Whisk the flour, sugar, baking powder, and salt in a large bowl. Add the orange zest and toss it so the orange smells fill the air.
- Add the cold butter cubes. Use a pastry cutter or your fingers to smash the butter into the flour. You want it to look like coarse crumbs with some pea-sized chunks left.
- In a small jar, whisk the heavy cream, egg, and vanilla. Pour this into the flour mixture slowly.
- Fold in the cranberries. Stir everything with a fork just until the flour is mostly wet. It will look shaggy and messy, and that is okay!
When you add the wet ingredients, try not to pour them all in one spot. Move the jar around the bowl. This helps the flour soak up the liquid evenly. If you see a few dry spots at the bottom of the bowl, do not panic. Once you put the dough on the counter, those dry bits will get pushed into the moist parts. I find that a fork works better than a spoon for this part. A fork lets the air stay in the dough while a spoon can mash it down too much.
Shaping and Cutting Your Scones

Turn the messy dough onto your floured counter. Gently pat it into a circle about one inch thick. I use my hands for this instead of a rolling pin. A rolling pin is too heavy and can squash the air out of your scones. If the dough is sticking to your hands, just add a tiny bit more flour. Once you have a nice circle, use a sharp knife to cut it into 8 wedges, like a pizza. This is the classic scone shape that looks so pretty on a brunch plate.
Separating the wedges can be tricky. I use a metal spatula to lift them and move them to the baking sheet. Space them about two inches apart so the heat can get all the way around them. If you want even fluffier scones, you can put the whole tray in the freezer for ten minutes before baking. This chills the butter one last time. This little trick is what the pros do to get that massive rise in the oven. FYI, this is the part where most people overwork the dough, so stay light with your touch.
Baking to Golden Perfection

Slide your tray into the middle of the oven. Bake them for 18 to 22 minutes. You are looking for a light golden brown color on the tops and edges. I usually start checking them at the 15-minute mark because every oven is a little different. While they bake, the house will start to smell like a dream. The cranberries will burst a little and release their tart juice, which balances the sweet dough perfectly. It is hard to wait, but do not take them out too early or the middle will be doughy.
Once they are done, let them cool on the pan for about five minutes. Then move them to a wire rack. If you leave them on the hot pan for too long, the bottoms might get too dark. Also, cooling them on a rack stops the bottoms from getting soggy. I know it is tempting to eat one right away, but we still have to add the orange glaze! The glaze needs the scone to be slightly warm, but not hot, or it will just run right off onto the counter.
Whisking the Zesty Orange Glaze

Making the glaze is the easiest part. Put your powdered sugar in a small bowl and add the orange juice. Whisk it until it is smooth. If it is too thick, add a tiny drop more juice. If it is too thin, add a spoonful of sugar. You want it to be thick enough to stay on the scone but thin enough to drizzle. I love using fresh juice because it has a much better flavor than the stuff from a carton. Plus, you already have the oranges from the zest!
Drizzle the glaze over the warm scones using a spoon. I like to do a zig-zag pattern to make them look fancy. If you have extra orange zest, sprinkle it on top while the glaze is still wet. It adds a beautiful pop of color and an extra hit of citrus. This glaze is what takes these from “good” to “the best ever.” It adds a punch of sugar that cuts through the tartness of the cranberries. It is truly the star of the show.
Pro Baking Tips
- Don’t Overmix: Stop stirring as soon as the flour disappears to keep scones tender.
- Use Heavy Cream: Milk is too thin; the fat in heavy cream makes the best texture.
- Check Freshness: Make sure your baking powder isn’t old or your scones won’t rise.
Serving and Storing Your Scones
Now that your kitchen smells amazing and your scones are glazed, it is time to enjoy them. Scones are best when they are fresh. There is nothing like a scone that is still a little bit warm from the oven. But if you have leftovers, do not worry. You can keep them for later. Just remember that the glaze might get a little soft if you store them in a closed container. I usually eat two right away because I simply cannot help myself.
Perfect Brunch Pairings

These scones are the perfect main event for a brunch. I love serving them with a side of salty bacon or scrambled eggs to balance the sweetness. If you want to go all out, serve them with some clotted cream or extra orange marmalade. They also go great with a big fruit salad. For drinks, coffee is the classic choice, but a bright herbal tea or a glass of cold orange juice works just as well. They are very versatile and fit in at a fancy party or a quiet Sunday morning.
If you are hosting a big group, you can make the scones smaller. Instead of 8 large wedges, you can cut the dough into 12 or 16 smaller pieces. Just remember to lower the bake time by a few minutes. Tiny scones are great for a tea party because people can grab one and keep talking. These are always the first things to disappear at any brunch I host. Everyone asks for the recipe, and they are always surprised by how simple the ingredients are.
How to Store and Reheat

If you have any scones left over, put them in an airtight container. They will stay fresh at room temperature for about two days. If you want them to last longer, you can put them in the fridge for up to a week. To make them taste fresh again, pop them in a toaster oven for a few minutes. This crisps up the outside while keeping the inside soft. Just be careful not to melt all the glaze off! I sometimes skip the glaze on half the batch if I know I am going to freeze them for later.
You can also freeze unbaked scone wedges. Just cut them into shapes and put them on a tray in the freezer. Once they are frozen solid, toss them into a bag. When you want a fresh scone, just bake them straight from the freezer! You might need to add 2 or 3 minutes to the bake time, but they will taste just as good as a fresh batch. This is my favorite way to have a “fancy” breakfast on a busy Tuesday morning. It feels like a treat without all the work of mixing a new bowl of dough.
Your Scone Questions Answered
Can I use dried cranberries instead of fresh ones?
Yes, you can! Use the same amount. Dried berries are sweeter and less tart. They won’t burst in the oven like fresh ones, but they still taste great.
Why did my scones turn out flat and hard?
This usually happens if the butter was too warm or you mixed the dough too much. Make sure your butter is ice-cold and stop mixing as soon as the flour is wet.
Can I make these scones vegan?
You can use cold vegan butter and coconut cream instead of heavy cream. Use a “flax egg” or just skip the egg and add a little more cream to the dough.
What can I use if I don’t have heavy cream?
Whole milk works but the scones will be less rich. You can also mix 1/4 cup melted butter into 3/4 cup milk to make a DIY heavy cream substitute.
How do I get a really high rise on my scones?
Keep the dough thick when you pat it out. If the circle is thin, the scones will be thin. Also, make sure your baking powder is fresh and not expired.
Time to Enjoy Your Scones
I hope you have a blast making these zesty orange cranberry scones. They are truly a treat for the senses with their bright colors and sweet smells. Remember to keep that butter cold and your hands light. Once you master this simple dough, you can try adding other fruits like blueberries or even chocolate chips. Baking should be fun and relaxing, so don’t sweat the small stuff. Now, go grab a plate and enjoy the best brunch ever!