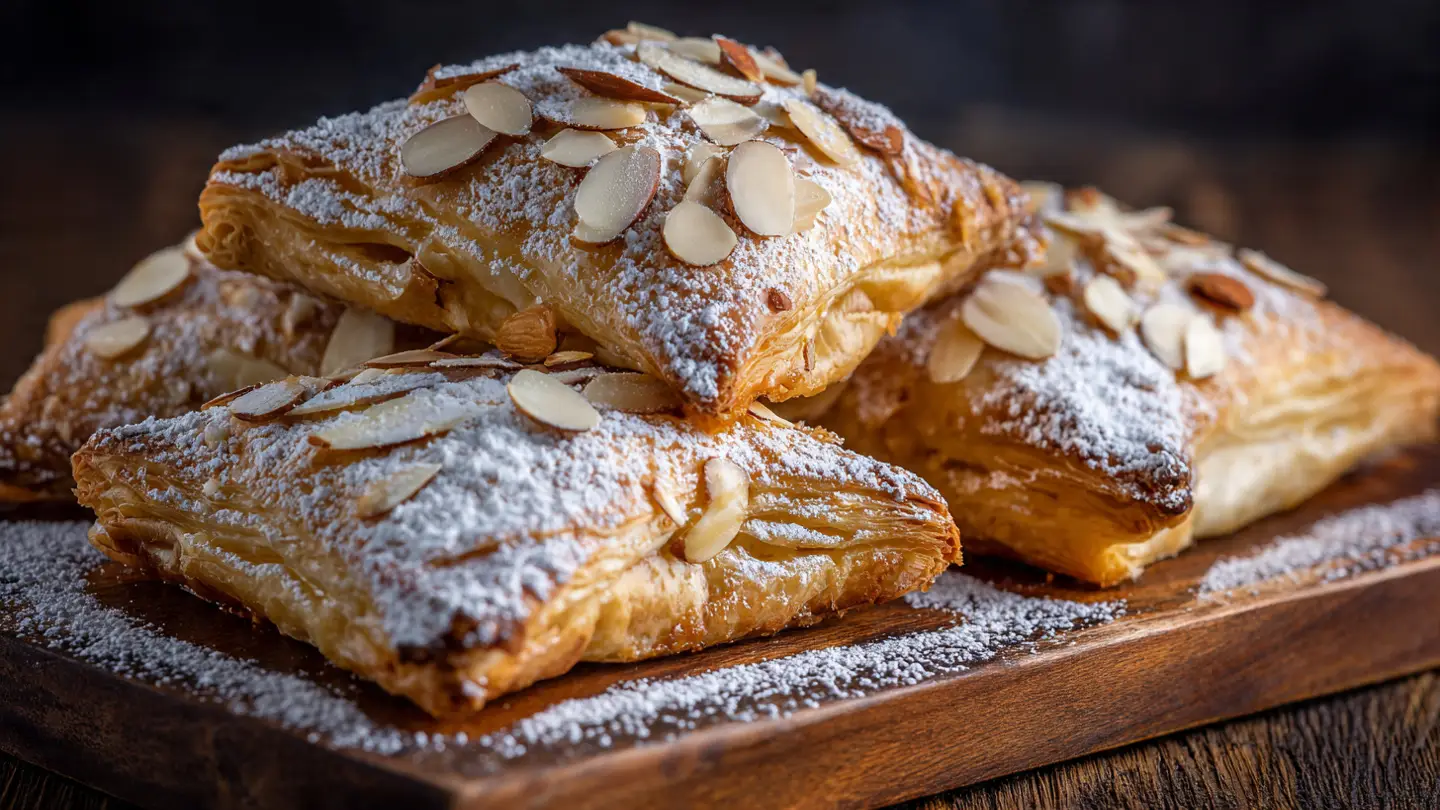
Classic Bear Claws with Almond Filling
Making pastries at home always felt like a scary task to me. I used to look at those beautiful, flaky layers in bakery windows and think I could never do that. But then I tried making these classic Bear Claws and everything changed. These treats are sweet, crunchy, and taste just like a hug from your favorite baker. You are going to learn how to make a simple dough and a yummy almond filling that everyone will love.
You do not need to be a pro to make these. I will show you how to get those cute little ‘toes’ on the pastry and how to make sure they bake up nice and golden. It takes a bit of time because the dough needs to rest, but the smell in your kitchen will be totally worth it. Let’s get started on this baking adventure together.
Check out the steps below to make your own batch of homemade goodness!
What Makes a Great Bear Claw
A Bear Claw is more than just a piece of bread. It is a special kind of pastry called a Danish. It has lots of layers of butter and dough. When it bakes, the water in the butter turns to steam. This makes the layers puff up and get crispy. The middle is filled with a sweet almond paste that stays soft and moist. It is the perfect mix of textures in every single bite.
I remember the first time I tried to make these. I was so excited that I forgot to chill my dough. My butter melted all over the pan and the pastries were flat. I learned that being patient is the most important part of baking with yeast and butter. If you follow my tips about keeping things cold, your Bear Claws will look like they came from a fancy shop in the city. IMO, these are way better than the ones you buy at the grocery store.
The Ingredients You Need

To start, you need basic things from your pantry. For the dough, gather all-purpose flour, sugar, salt, and yeast. You also need milk and eggs to make the dough rich. The most important thing is unsalted butter. Make sure your butter is very cold. If it gets warm, it will mix into the flour too much and you will lose those flaky layers we want so badly.
For the filling, you need almond paste. This is not the same as almond butter! Almond paste comes in a tube or a can and is thick and sweet. You will mix it with a little bit of sugar and egg white to make it easy to spread. For the top, you need sliced almonds and a little extra sugar. These add a nice crunch when you take a bite. FYI, you can find almond paste in the baking aisle near the nuts.
How to Prepare the Dough

First, mix your warm milk with a little sugar and the yeast. Let it sit for a few minutes until it looks bubbly. This means the yeast is alive and ready to work! In a big bowl, mix your flour and salt. Then, cut your cold butter into small cubes. Toss the butter in the flour. Use your fingers to smash the butter bits until they look like flat shingles. This is a great trick I learned to get huge flakes later on.
Add the yeast mix and eggs to the flour. Stir it until it just comes together into a shaggy ball. Do not overmix it! If you stir too much, the bread will be tough like a bagel instead of soft like a cloud. Wrap the dough in plastic and put it in the fridge for at least two hours. Overnight is even better. This gives the flour time to soak up the liquid and keeps the butter nice and cold for the next steps.
Making the Almond Filling

While your dough is resting, you can make the sweet center. Take your almond paste and break it into small pieces in a bowl. Add some powdered sugar and a single egg white. Use a fork or a hand mixer to blend it until it is smooth and creamy. It should be easy to spread but not runny. If it feels too thick, you can add a tiny splash of milk to help it move.
I like to add a tiny drop of almond extract to mine. It makes the flavor really pop. Some people like to add a bit of cinnamon too. If you are not a fan of almond, you could actually use thick jam or even chocolate chips. But today, we are sticking to the classic style. Put the filling aside until you are ready to assemble your pastries. This filling is very sweet, so a little goes a long way in each claw.
Folding and Rolling the Pastry

This part is called laminating. It sounds fancy, but it just means folding. Take your cold dough out and roll it into a big rectangle on a floured surface. Fold it into thirds like you are folding a letter to put in an envelope. Turn the dough and roll it out again. Do this three times. This creates hundreds of tiny layers of butter and dough that will puff up in the oven.
If the dough feels soft or sticky at any point, stop what you are doing. Put it back in the fridge for 20 minutes. My big mistake when I started was trying to rush this part on a hot day. The butter melted, and I ended up with a greasy mess. Keeping the dough cold is the secret to success. Once you finish your folds, let the dough rest one last time before we cut out the shapes.
Recipe Quick Info
- Prep Time: 40 minutes (plus chilling)
- Cook Time: 15-20 minutes
- Servings: 12 Bear Claws
- Difficulty: Medium
Cutting and Shaping the Claws

Now for the fun part! Roll your dough out into a long, wide strip. Cut the strip into smaller rectangles about four inches wide. Place a spoonful of almond filling in the center of each piece. Fold the dough over the filling and press the edges down to seal them. Now, you should have a long rectangle with a bump in the middle. This is the base of your pastry.
Take a sharp knife or a pizza cutter. Make four deep cuts along the sealed edge, but do not cut all the way through to the filling side. These cuts make the ‘fingers’ or ‘toes’ of the bear claw. Gently curve the pastry so the toes spread out and open up. It should look like a little paw! Place them on a baking sheet with parchment paper. Give them plenty of space because they will grow a lot while they bake.
The Final Bake and Toppings

Before they go in the oven, brush the tops with a beaten egg. This is called an egg wash. It makes the pastries shiny and dark golden brown. Sprinkle your sliced almonds over the top. Press them down just a little bit so they stick to the egg. Let the pastries sit on the counter for about 30 minutes to puff up one last time. This is called proofing.
Bake them at 400 degrees for about 15 to 20 minutes. You want them to be very brown, not pale. A dark crust means more flavor and a better crunch. When they come out, let them cool for a few minutes. You can dust them with powdered sugar or even a little glaze made of sugar and water. They are best eaten while they are still a little bit warm from the oven.
Tips for Perfect Results

One tip most people skip is using a heavy baking sheet. Thin pans can burn the bottom of your pastries before the middle is cooked. If you only have thin pans, use two of them stacked on top of each other. This protects the bottom of your Bear Claws. Also, make sure your oven is fully heated before you put the tray in. A hot oven gives the dough the ‘kick’ it needs to rise quickly.
If your filling leaks out, do not worry. It happens to everyone sometimes! Usually, it means the edges were not pressed down hard enough. You can use a fork to crimp the edges like a pie crust if you want to be extra safe. This recipe might not work well if you use a liquid sweetener like honey in the dough, as it can make things too sticky. Stick to granulated sugar for the best texture in the bread.
Pro Baking Tips
- Cold is Key: Always keep your dough cold to ensure the butter doesn’t melt.
- Sharp Tools: Use a very sharp knife to cut the toes so you don’t squish the dough.
- Fresh Yeast: Check the date on your yeast. If it doesn’t bubble in the milk, start over with fresh yeast.
Serving and Storage Ideas

These are amazing with a cup of coffee or a cold glass of milk. They are perfect for a special breakfast or a weekend treat. If you have leftovers, you can keep them in an airtight container for about two days. They will lose some of their crunch, but they still taste great. To make them crispy again, just pop them in a toaster oven for a minute or two.
You can also freeze the shaped, unbaked Bear Claws. Just put the tray in the freezer until they are hard, then move them to a bag. When you want a fresh treat, take one out and let it thaw and rise for a few hours before baking. It is like having a private bakery in your own freezer! This is my favorite way to make sure I always have a treat ready for guests. Just remember to add the egg wash and almonds right before you bake them.
Your Questions Answered
Can I use store-bought puff pastry instead?
Yes! You can use puff pastry to save time. It will be thinner and crispier, but it still tastes great with the almond filling. Just follow the package bake times.
What if I do not have almond paste?
You can make a quick version by mixing almond flour, sugar, and a little egg white. It is not exactly the same, but it works in a pinch for that nutty flavor.
How do I know when the yeast is ready?
The milk should look foamy and have a strong smell like bread. If it stays flat and clear after five minutes, your yeast might be old. You should get new yeast.
Why did my pastries turn out flat?
This usually happens if the butter got too warm while you were rolling the dough. Try to work quickly and keep the dough in the fridge whenever you take a break.
Can I use different nuts on top?
Sure! Sliced pecans or walnuts are delicious too. You can even use coarse sugar if you want a nut-free topping, but the almond filling still has nuts inside.
Enjoy Your Homemade Treats
You did it! Making Bear Claws is a big win for any home baker. You now know how to fold dough, make a sweet almond filling, and bake everything to a golden brown. These pastries are a labor of love that taste better than anything from a box. Share them with your friends or keep them all for yourself. Happy baking!