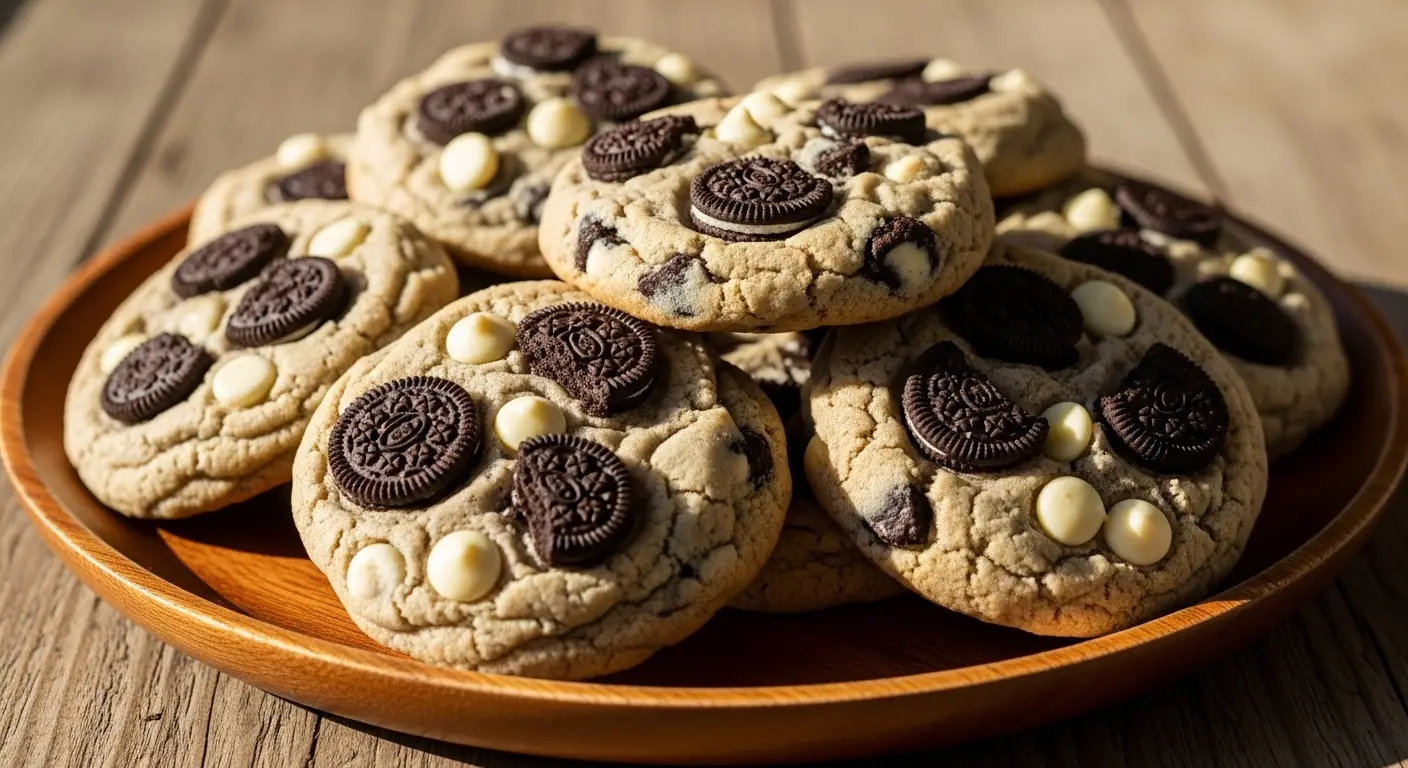
Cookies and Cream Cookie Recipe
I love cookies that taste like other cookies. It sounds funny, but it is true. Cookies and cream is one of my favorite flavors in the whole world. Most people think of ice cream when they hear those words. But I think about a soft, buttery cookie filled with crunchy chocolate sandwich pieces. This recipe gives you exactly that. You will learn how to make a cookie that stays soft for days and has huge chunks of chocolate inside.
Making these treats is very simple. You do not need any fancy tools or rare items. Most of the stuff is likely in your kitchen right now. I will show you how to mix the dough so it does not get too tough. We will also talk about the best way to crush the chocolate cookies so they look pretty. By the end of this page, you will be ready to bake a batch that your friends will beg you to share.
Are you ready to make your kitchen smell like a bakery?
Everything You Need to Start Baking
Before we turn on the oven, we need to gather our tools and food. Using the right ingredients makes a big difference. I always tell my friends to use room temperature butter. If the butter is too cold, the sugar will not mix in well. If it is melted, the cookies will turn into flat puddles. It took me a long time to learn that lesson! I once melted the butter because I was in a rush, and my cookies looked like thin pancakes. They still tasted good, but they were not pretty.
The Ingredient List

To make these delicious treats, you will need a few basic things from your pantry. I like to use name-brand chocolate sandwich cookies because they stay crunchy inside the dough. You can use the store brand too, but sometimes they get a bit soft. This recipe makes about 24 large cookies, which is plenty for a party or a long week of snacks. IMO, a cookie is not a cookie unless it has a lot of mix-ins.
- 1 cup of unsalted butter (make sure it is soft!)
- 3/4 cup of white sugar
- 3/4 cup of light brown sugar (pack it down in the cup)
- 2 large eggs
- 2 teaspoons of vanilla extract
- 3 cups of all-purpose flour
- 1 teaspoon of baking soda
- 1/2 teaspoon of salt
- 2 cups of crushed chocolate sandwich cookies (like Oreos)
- 1 cup of white chocolate chips (optional but very good)
How to Crush Your Cookies

This part is actually fun. You do not want to turn the cookies into dust. If you use a blender, you will get black flour, and your cookies will look gray. That is not what we want! We want big, chunky pieces that people can see. I usually put the cookies in a big plastic bag and hit them gently with a rolling pin. Or, you can just break them with your hands. It is a great way to let out some energy after a long day.
Try to keep the pieces about the size of a pea or a dime. Some small crumbs are okay because they turn the dough a nice speckled color. But the big chunks are the stars of the show. I learned this the hard way when I over-crushed my cookies once. The dough turned dark gray and looked a bit muddy. It still tasted fine, but it did not have that classic cookies and cream look. Keep those chunks big!
Recipe Quick Info
- Prep Time: 15 minutes
- Cook Time: 10 minutes
- Servings: 24 cookies
- Difficulty: Easy
Steps to Make the Perfect Dough
Now that we have everything ready, it is time to mix. Mixing dough is like a science project. You have to do things in a certain order. If you throw everything in the bowl at once, the texture will be strange. We start with the fats and sugars. This creates a creamy base that holds air. That air is what makes the cookies light and fluffy instead of hard like a rock.
Creaming the Butter and Sugar

First, put your soft butter, white sugar, and brown sugar into a big bowl. Use a hand mixer or a stand mixer to beat them together. You want to do this for about two or three minutes. The mixture should turn a pale yellow color and look very fluffy. This is a step many people skip because they are in a hurry. Please do not skip it! This is the secret to a professional cookie texture.
After the butter and sugar are happy together, add the eggs one at a time. Mix after each egg until you can’t see the yellow anymore. Then, pour in the vanilla. Vanilla is like salt for sweets; it makes all the other flavors taste better. Even though we are making chocolate cookies, the vanilla helps the cream flavor stand out. It smells amazing at this point, but try not to eat the dough yet!
Adding the Dry Ingredients

In a separate small bowl, whisk your flour, baking soda, and salt. This ensures the baking soda is spread out. If you don’t do this, one cookie might rise a lot while another stays flat. Nobody wants a salty surprise in one bite either! Once they are mixed, slowly add the flour mixture to your wet butter mixture. Turn your mixer to a low speed so flour doesn’t fly all over your face.
Stop mixing the moment you stop seeing white streaks of flour. Over-mixing the dough makes the gluten get tough. If you mix too much, your cookies will be chewy like bread instead of soft like cake. FYI, if you are doing this by hand, it is a good workout for your arms. Just keep an eye on that dough and be gentle with it. We want it just combined and no more.
Folding in the Cookie Chunks

Now comes the best part. Put away your electric mixer. Grab a big spoon or a rubber spatula. Dump all those crushed cookies and white chocolate chips into the bowl. Use a folding motion to mix them in. This means you scrape the bottom, lift the dough, and fold it over the top. Do this until the chunks are spread out evenly. Using a spoon instead of a mixer keeps the cookie pieces from breaking into tiny dust particles.
I like to add white chocolate chips because they look like the cream filling from the sandwich cookies. It adds an extra layer of sweetness. If you don’t like white chocolate, you can leave them out or use milk chocolate chips instead. The dough will look very thick and heavy now. That is exactly what you want. If the dough feels too sticky, you can put it in the fridge for ten minutes to firm up.
Pro Baking Tips
- Use a Scoop: Use a metal ice cream scoop to make every cookie the same size so they bake evenly.
- Don’t Overbake: Take them out when the edges are light brown but the middle still looks soft.
- Cooling: Let them sit on the hot pan for 5 minutes after baking to finish setting up.
Baking and Serving Your Creation
Your oven should be preheated to 350 degrees Fahrenheit. If your oven is not hot enough, the cookies will spread out too much. If it is too hot, the bottoms will burn before the middle is done. I always use a piece of parchment paper on my baking sheets. This stops the cookies from sticking and makes cleaning up very easy. You can also use a silicone mat if you have one.
Scooping and Spacing

Take a big spoonful of dough and roll it into a ball about the size of a golf ball. Place them on your baking sheet. Make sure to leave about two inches of space between each one. Cookies like their personal space! If you put them too close, they will grow into each other and form one giant square cookie. While that sounds fun, it is hard to serve to guests.
If you want them to look like they came from a fancy shop, press a few extra cookie chunks into the top of each ball before baking. This makes sure people know exactly what flavor they are getting. It also makes the top look bumpy and delicious. I usually do this for my “photo cookies” to make them look extra special. It is a simple trick that makes a big difference in how they look.
The Waiting Game

Put the tray in the oven and set a timer for 9 to 11 minutes. Every oven is a little bit different, so watch them closely the first time. You are looking for edges that are just starting to turn a golden brown. The center might still look a little bit wet or under-baked. That is okay! The cookies will keep cooking on the hot pan after you take them out. This is how you get that soft, melt-in-your-mouth texture.
Pull them out of the oven and let them rest on the pan for at least five minutes. If you try to move them too soon, they might fall apart because they are still very soft. Once they firm up, move them to a wire rack to cool completely. Or, if you are like me, eat one while it is still warm and the chocolate is melty. Just be careful not to burn your tongue!
Serving Suggestions

These cookies are great on their own, but they are even better with a glass of cold milk. You can also use them to make an epic ice cream sandwich. Just put a scoop of vanilla or cookies and cream ice cream between two cookies and press them together. It is a messy treat, but it is so worth it. They also make a great gift if you put them in a cute tin with a ribbon.
If you have leftovers, keep them in an airtight container. They stay soft for about three to four days. If they start to get a little hard, you can put a slice of white bread in the container with them. The cookies will soak up the moisture from the bread and become soft again. It sounds like magic, but it works! These are also great for school lunches or as a late-night snack when you want something sweet.
Fun Questions About This Recipe
Can I use different types of cookies?
Yes! You can use mint chocolate cookies, peanut butter ones, or even golden sandwich cookies. Any crunchy cookie works well in this dough.
Why are my cookies flat?
Your butter might have been too soft or melted. Try chilling the dough in the fridge for 30 minutes before baking to help them stay thick.
Can I freeze the dough?
Absolutely. Roll the dough into balls and freeze them on a tray. Once hard, put them in a bag. Bake them straight from the freezer for an extra minute.
Do I have to use white chocolate chips?
No, you do not. I like them because they add to the cream flavor, but the cookies are still great with just the crushed sandwich pieces.
How do I get perfectly round cookies?
Right when they come out of the oven, use a large circular glass or cookie cutter to gently swirl around the cookie. This pushes the edges into a perfect circle.
Happy Baking Everyone
I hope you have a blast making these cookies and cream treats. They are a huge hit in my house, and I bet they will be in yours too. Remember to keep those cookie chunks big and do not over-mix your flour. Once you master this simple recipe, you can try adding different things like nuts or sprinkles. Baking is all about having fun and sharing something sweet with the people you love. Enjoy every bite!