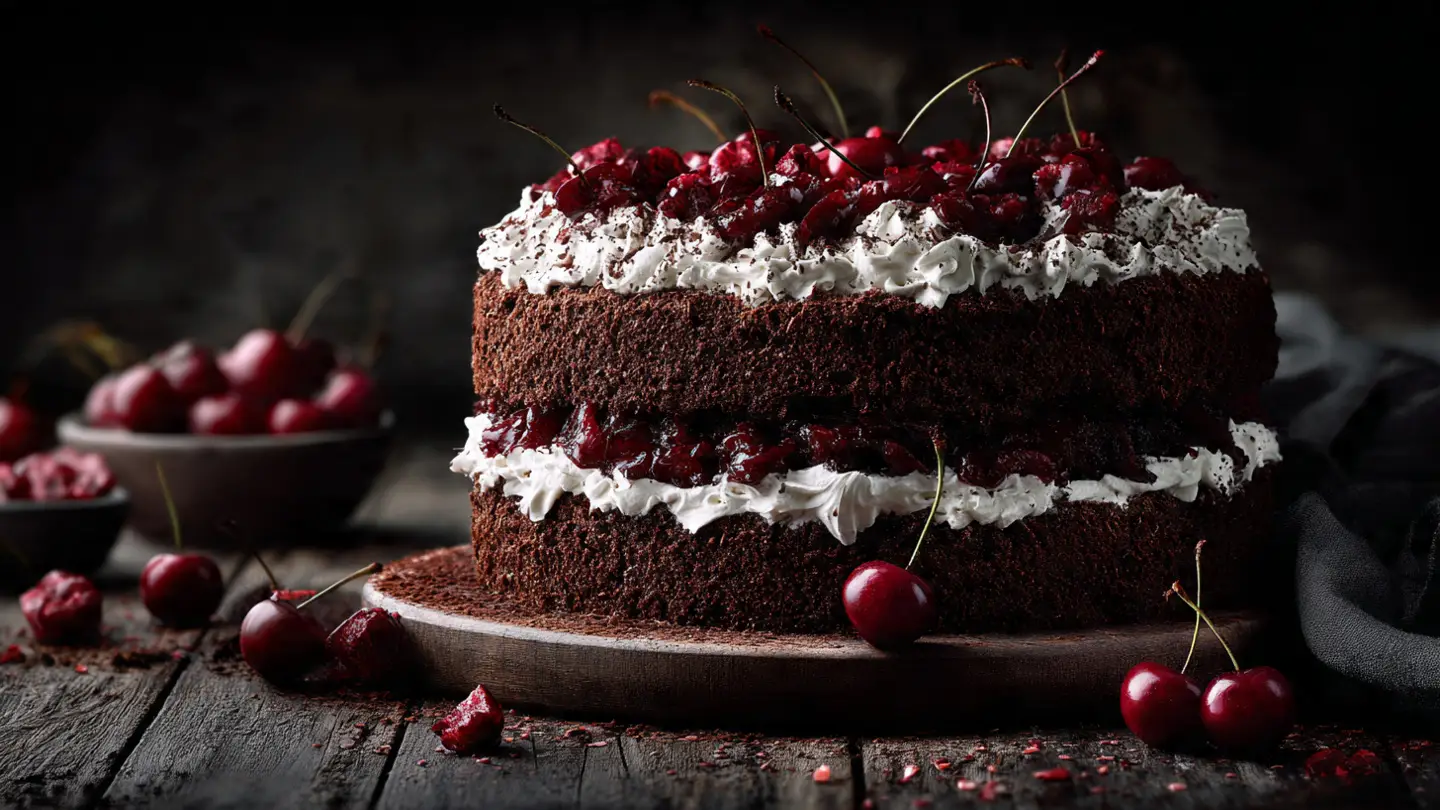
Decadent Black Forest Cake with Cherries and Whipped Cream
Black Forest Cake is a famous treat from Germany. It looks very fancy with its dark chocolate layers and bright red cherries. Many people think it is hard to make, but I promise it is not. I will show you how to bake a soft chocolate cake and fill it with fluffy cream and fruit. This cake is perfect for birthdays or any day when you want something special. It tastes like a dream and looks like it came from a bakery.
Today, you will learn the secrets to a perfect sponge cake that does not fall apart. I will also teach you how to make the cherry filling just right so it is not too runny. We will use real cream to make the frosting light and airy. By the time we finish, you will have a beautiful cake that your friends and family will love. Grab your apron and let us get started!
Ready to bake the best cake ever?
Starting with the Right Tools and Ingredients
Before we turn on the oven, we need to get everything ready. I learned a long time ago that hunting for a spoon while your cake is in the oven is a bad idea. You want your butter and eggs at room temperature so they mix well. If the eggs are cold, the cake might not rise as much. I once used cold eggs and my cake ended up flat like a pancake. It still tasted okay, but it was not the fluffy cake I wanted.
You will need basic baking pans and a good whisk. A hand mixer makes the whipped cream part much easier. IMO, having everything on the counter before you start makes baking much more fun. It keeps the kitchen from getting too messy while you work. Let us look at what goes into this delicious dessert.
The Ingredient List

To make this cake, you need things for the sponge, the filling, and the cream. For the cake part, get two cups of all-purpose flour and two cups of white sugar. You also need 3/4 cup of unsweetened cocoa powder. Make sure it is good quality cocoa because that is where the flavor comes from. You will also need two teaspoons of baking soda, one teaspoon of baking powder, and a pinch of salt. For the wet parts, grab two large eggs, one cup of whole milk, half a cup of vegetable oil, and two teaspoons of vanilla extract.
- 2 cups flour and 2 cups sugar
- 3/4 cup cocoa powder
- 2 teaspoons baking soda and 1 teaspoon baking powder
- 1 teaspoon salt
- 2 eggs and 1 cup milk
- 1/2 cup oil and 2 teaspoons vanilla
- 1 cup boiling water
- 2 cans of pitted black cherries or fresh ones
- 3 cups heavy whipping cream
- 1/2 cup powdered sugar
The secret ingredient is the boiling water at the end. It sounds strange to add hot water to cake batter, but it makes the chocolate taste stronger. For the cherries, you can use canned ones in syrup or fresh ones if they are in season. If you use fresh ones, you will need to take the pits out first. I prefer the canned ones because the syrup adds a lot of moisture to the cake layers.
The Best Equipment for Success

You do not need a professional kitchen to make this. Two 9-inch round cake pans are standard. I highly suggest using parchment paper on the bottom of the pans. This stops the cake from sticking. There is nothing worse than a cake that breaks when you try to take it out of the pan. I have cried over broken cakes before, so do not skip the paper!
A big mixing bowl and a sturdy whisk are great, but an electric mixer is better for the whipped cream. Whipping cream by hand takes a long time and your arm will get very tired. You will also want a cooling rack. This lets air get under the cake so it cools down fast. If you leave the cake in the pan too long, it can get soggy from the steam.
Baking and Building the Cake
Baking is like a science project that you can eat. You have to follow the steps in order to get the right result. First, we mix the dry things, then the wet things, and then we put them together. The oven should be hot before the pans go in. If the oven is still warming up, the cake will not rise the right way. This part of the process smells amazing and will make your whole house smell like chocolate.
Once the cakes are baked, they must be completely cool. This is the hardest part because you will want to eat them right away. But if you put whipped cream on a warm cake, it will melt into a puddle. I learned this lesson the hard way at a birthday party once. The cake looked like a melting ice cream cone! Patience is key here. While the cake cools, we can work on the cherry filling.
Recipe Quick Info
- Prep Time: 40 minutes
- Cook Time: 35 minutes
- Servings: 12 slices
- Difficulty: Medium
Step-by-Step Baking Instructions

- Heat your oven to 350 degrees. Grease your pans and put parchment paper in the bottom.
- Mix the flour, sugar, cocoa, baking soda, baking powder, and salt in a big bowl.
- Add the eggs, milk, oil, and vanilla. Mix it until it is smooth.
- Stir in the boiling water by hand. The batter will be very thin, but that is okay!
- Pour the batter into the pans and bake for 30 to 35 minutes.
- Check with a toothpick. If it comes out clean, the cake is done.
- Let the cakes cool in the pans for 10 minutes, then move them to a rack.
When you add the boiling water, do it slowly. You do not want to splash hot water on yourself. The batter will look like chocolate soup, but do not worry. It will bake into a very moist cake. This cake is very soft, so handle it gently when you move it. If you want a taller cake, you can even cut the two layers in half to make four thin layers.
Making the Cherry Filling

The cherries give this cake its classic taste. If you use canned cherries, drain the juice into a small pot. Mix a little cornstarch with the juice and heat it up. This makes a thick syrup that stays on the cake. If you just put plain juice on the cake, it will soak in and disappear. We want that gooey, fruity layer in the middle.
Let the cherry mixture cool down completely. It should be thick like jam. I like to save a few pretty cherries to put on top of the cake at the end. It makes the cake look very professional. FYI, if you like a bit of a kick, some people add a tiny bit of cherry juice or extract to the syrup to make it taste stronger. Just don’t add too much liquid or the cake will get mushy.
Whipping the Cream and Assembly

Now for the fun part! Pour the cold heavy cream into a bowl. Add the powdered sugar. Beat it with your mixer until it is stiff. This means when you lift the whisk, the cream stays in a pointy shape. Do not overmix it, or it will turn into butter! That would be a very different recipe. I usually stop as soon as it looks like thick clouds.
Place one cake layer on a plate. Spread a thick layer of whipped cream on top. Use a spoon to make a small well in the middle of the cream and fill it with the cherries. Put the second cake layer on top. Cover the whole cake with the rest of the whipped cream. You can use a knife to make it smooth or leave it messy for a home-made look. I think the messy look is quite charming!
Decorating Like a Pro

To make the cake look like the ones in the pictures, you need chocolate shavings. Take a bar of dark chocolate and use a vegetable peeler to scrape the side of it. Tiny curls of chocolate will fall off. Sprinkle these all over the top and sides of the cake. It covers up any bumps in the cream and looks great. Place your saved cherries on top in a circle.
This cake looks best when it has a lot of contrast between the white cream and dark chocolate. You can also use a piping bag to make little swirls of cream on top. If you do not have a piping bag, just use a plastic bag with the corner cut off. It works just as well. This is the stage where you can really be creative and make the cake your own.
Tips and Variations for Your Cake

If you do not like cherries, you can use strawberries or raspberries instead. It won’t be a traditional Black Forest Cake, but it will still be yummy. For a dairy-free version, you can use coconut cream instead of heavy whipping cream. Just make sure to chill the coconut milk can overnight so the cream gets hard. My sister does this and it tastes very tropical and sweet.
Another tip is to brush the cake layers with a little bit of the cherry syrup before you add the cream. This keeps the cake moist for days. This cake actually tastes better the next day because the flavors have time to mix together. Just keep it in the fridge so the cream stays fresh. I usually make it the night before I need it so I don’t have to rush on the day of the party.
Success Secrets
- Keep it Cold: Always use very cold cream for whipping so it gets fluffy.
- Parchment Paper: Always line your pans to avoid the cake breaking.
- Cooling Time: Never frost a warm cake or the cream will melt.
How to Serve and Store Your Creation

When you are ready to eat, use a sharp knife. To get clean slices, dip the knife in hot water and wipe it dry between each cut. This stops the cream from smearing all over the chocolate layers. Serve it with a cold glass of milk or a hot cup of coffee. It is a rich cake, so a small slice is usually enough for most people, though I always want a second piece!
Store any leftovers in the refrigerator. Since the frosting is made of real cream, it cannot sit out on the counter for long. It will stay good for about three to four days. You can also freeze the cake layers (without the cream) if you want to bake them ahead of time. Just wrap them tightly in plastic wrap. When you are ready to build the cake, let them thaw on the counter for an hour.
Common Questions About Black Forest Cake
People often ask me if they can make this cake without certain things or how to fix mistakes. Baking can be tricky, but most things have a simple fix. If your cake is too crumbly, you might have baked it a few minutes too long. If your whipped cream is flat, it might not have been cold enough. Here are some of the most common things people want to know when they try this recipe for the first time.
Can I use fresh cherries instead of canned?
Yes! Just remove the pits and cook them with a little sugar and water to make a syrup. They taste very fresh and delicious.
Why did my whipped cream turn into liquid?
The cream was likely too warm or you did not whip it long enough. Make sure the cream comes straight from the fridge.
Can I make this cake a day early?
Yes! It actually tastes better the next day. The cake soaks up the cherry juice and stays very moist in the fridge.
What if I do not have 9-inch pans?
You can use 8-inch pans, but the cake will be taller and might need a few more minutes to bake. Watch it closely!
Can I use butter instead of oil in the cake?
You can, but oil keeps the cake softer when it is cold. Butter cakes can get a bit hard in the refrigerator.
Enjoy Your Homemade Masterpiece
Making a Black Forest Cake is a great way to show off your baking skills. It looks hard but is very simple when you take it step by step. You now have a soft, chocolatey cake with sweet fruit and fluffy cream. Enjoy every bite of your hard work!