Easy Butterfinger Balls
I love a good candy bar. There is just something about that crunch and the salty peanut butter taste that makes me happy. But sometimes, buying a bag of candy from the store feels a bit boring. That is why I started making these Easy Butterfinger Balls at home. They taste just like the real thing but even better because they are fresh and covered in smooth chocolate.
You will learn how to make a sweet treat that only needs three things from the store. You do not need to turn on the oven or be a master chef to get this right. It is a simple project that kids can help with too. These little bites are perfect for birthday parties or when you just want a snack while watching a movie. Trust me, once you start eating them, it is very hard to stop!
Get your mixing bowl ready and let us look at how to make these delicious treats step by step.
Why This Candy Recipe Works
Making candy at home can sound scary. Some recipes ask you to use a candy thermometer or boil sugar to a specific heat. I tried that once and ended up with a sticky mess that looked like a science experiment gone wrong. This recipe is different. It is easy because we use ingredients that are already made and just mix them together. It saves time and prevents a lot of stress in the kitchen.
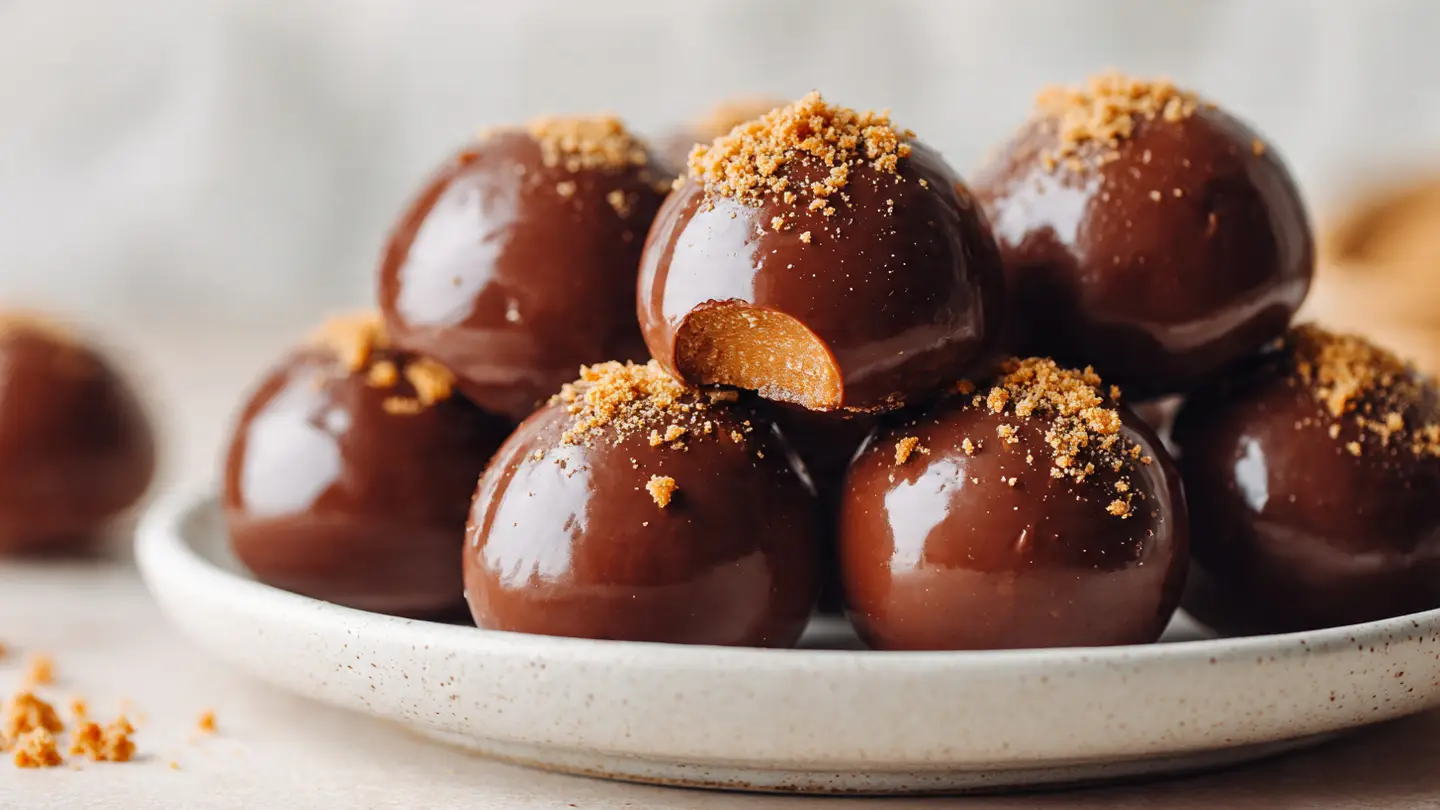
The secret is in the mix of peanut butter and crushed candy. When you blend them, they create a filling that stays soft but has a nice crunch. Then, you dip them in melted chocolate. The chocolate shell keeps the middle fresh and adds a rich flavor. It is a win for everyone who likes sweets. IMO, this is the best way to satisfy a sugar craving without spending all day in the kitchen.
The Short List of Ingredients

To make these, you only need three main things. First, you need Butterfinger candy bars. I usually buy the big ones and crush them up myself. You can also buy the small bite-sized ones if they are on sale. The second thing is smooth peanut butter. I find that the regular kind works better than the natural kind because it stays thick. If the peanut butter is too oily, the balls might fall apart.
- Butterfinger Bars: You need about 1 cup of crushed candy. This usually takes 4 or 5 full-sized bars.
- Peanut Butter: Use 1/2 cup of creamy peanut butter. Do not use the crunchy kind, as the candy already provides the crunch.
- Chocolate Coating: You can use chocolate chips or almond bark. I like using dark chocolate to balance the sweet candy.
Step by Step Instructions

First, you need to crush your candy bars. I put mine in a big plastic bag and hit them with a rolling pin. It is a great way to get some energy out! You want some small crumbs and some tiny chunks. Next, put the crushed candy and the peanut butter in a microwave-safe bowl. Heat it for about 30 seconds. This makes the peanut butter soft so it mixes easily with the candy.
- Mix the peanut butter and candy crumbs until they look like a thick dough.
- Put the bowl in the fridge for 15 minutes. This makes the mix firm so you can roll it.
- Take a small spoon and scoop out a bit of the mix. Roll it between your palms to make a ball.
- Place each ball on a tray with wax paper or parchment paper.
- Put the tray in the freezer for 20 minutes while you melt your chocolate.
- Dip each cold ball into the melted chocolate using a fork. Let the extra chocolate drip off.
- Place them back on the paper to let the chocolate set until it is hard.
Tools You Will Need

You do not need fancy gear for this. A good mixing bowl and a sturdy spoon are the most important things. I also recommend using a small cookie scoop if you have one. It helps keep all the balls the same size. If they are the same size, they look much nicer on a plate. It also helps you know exactly how many you will get from one batch.
Parchment paper is another must-have. If you put the chocolate-covered balls directly on a plate, they will stick. You will end up breaking the chocolate shell when you try to pick them up. FYI, wax paper works just as well if that is what you have in your cupboard. A microwave is the easiest way to melt things, but you can use a stove if you prefer.
Recipe Quick Info
- Prep Time: 15 minutes
- Cook Time: 0 minutes (No-bake!)
- Servings: 18-20 balls
- Difficulty: Very Easy
Tips for Success

One mistake I made the first time was not letting the balls get cold enough before dipping. If the peanut butter mix is warm, it will melt into your chocolate. Then you get a swirl of orange in your brown chocolate, which looks messy. Keep them in the freezer until the very second you are ready to dip. It makes the chocolate harden faster too!
Another tip is about the chocolate. If your melted chocolate is too thick, add a tiny bit of coconut oil or vegetable oil. Just a teaspoon will help it flow better. This makes a thinner shell that is easier to bite into. I also learned that using a fork to dip is better than a spoon. The fork lets the extra chocolate fall through the cracks so you do not get a big puddle at the bottom of your candy.
Fun Variations to Try

You can change this recipe to make it your own. If you do not like dark chocolate, use milk chocolate or even white chocolate. White chocolate makes them look like snowballs! You can also roll the wet chocolate balls in extra Butterfinger crumbs. This gives them a double crunch on the outside. It looks very professional and fancy.
If you want a salty and sweet mix, sprinkle a tiny bit of sea salt on top before the chocolate dries. This is one of my favorite ways to eat them. You could even use almond butter instead of peanut butter if someone has a peanut allergy, though the candy bars themselves have peanuts in them. Always check the labels on the candy bars if you are worried about allergies.
How to Store Your Treats

These treats keep very well. I put mine in a plastic container with a lid. It is a good idea to put a piece of wax paper between the layers. This stops them from sticking together if they get a little warm. You should keep them in the fridge. Because the middle is soft, they can get a bit mushy if they sit on the counter for a long time on a hot day.
You can also freeze these! They taste great straight out of the freezer. They stay fresh for up to three months if you keep the air out of the container. This makes them a great snack to make way before a party happens. You can just pull them out an hour before your guests arrive, and they will be perfect.
Better Than Store-Bought
I honestly think these taste better than a regular candy bar. When you make them yourself, you control how much chocolate goes on the outside. You also get that amazing creamy texture that you just cannot get from a bar that has been sitting on a shelf for months. It is a fun way to treat yourself or your family without spending a lot of money.
This recipe might not work well if you use a very runny, natural peanut butter. Those kinds of peanut butter often separate, and the oil will make the balls greasy. Stick to the classic brands for the best results. Also, make sure you don’t overheat the chocolate. If chocolate gets too hot, it becomes clumpy and hard. Go slow and stir often.
Pro Kitchen Tips
- Dipping Trick: Use a toothpick to dip if you want to avoid fork marks, then just dab a little chocolate over the tiny hole.
- Crushing Method: Use a food processor for a few seconds if you want a very fine powder instead of chunks.
- Holiday Spirit: Use colored candy melts (like red or green) to make these fit any holiday theme.
Serving Suggestions

These are great on their own, but you can serve them in fun ways too. I like to put them in tiny paper cupcake liners. It makes them look like expensive truffles from a candy shop. You can find liners in many colors to match your party theme. It also keeps people’s fingers clean when they pick them up.
You can also use these as a topping. Crushing up a few Butterfinger balls and putting them on top of vanilla ice cream is a total game-changer for dessert time. They also look great on top of a chocolate cake or cupcakes. I once put them on a dessert board with fruit and pretzels, and they were the first thing to disappear. Everyone loves the combination of peanut butter and chocolate!
Common Questions About Candy Balls
Can I use different candy bars?
Yes! You can use Heath bars or even crushed pretzels. Any crunchy candy will work well with this method. Just make sure the flavors match peanut butter.
How long do they last in the fridge?
They stay fresh for up to two weeks in an airtight container. Make sure the lid is tight so they do not pick up other smells from the fridge.
Why is my chocolate turning white?
This is called bloom. It happens when chocolate gets too cold or too warm. It is still safe to eat, it just does not look as pretty.
Do I have to use a microwave?
No, you can use a double boiler on the stove. This is just a bowl sitting over a pot of steaming water. It melts chocolate very gently.
Are these gluten-free?
Butterfinger bars are usually gluten-free in the USA, but always check the package. Some chocolate coatings might have gluten added.
Time to Start Making Candy
I hope you have a blast making these treats. They are so simple and taste amazing. Remember to keep things cold and have fun with the toppings. You now have a secret weapon for every party or late-night snack craving. Enjoy every bite!