Elegant Homemade Chocolate Truffles
Making your own fancy candy feels like magic. You take a big bar of hard chocolate and some liquid cream. You mix them together and something new happens. It turns into a soft, velvety treat that melts the moment it hits your tongue. Many people think you need to be a professional chef to make these. That is not true at all. I used to be scared of working with chocolate because it seemed too difficult. Then I tried it once and realized it is mostly about patience and using good ingredients. Once you learn the trick, you will never want to buy a box of store-bought candy again.
In this guide, I will show you exactly how to make chocolate truffles from scratch. We will talk about why some chocolate works better than others. I will share the steps to get that perfect round shape without making a giant mess. You will also learn how to add different flavors like vanilla or sea salt. By the end of this, you will have a tray of beautiful sweets that look like they came from a high-end shop. They make the best gifts for friends, or you can just keep them all for yourself. Ready to get sticky and have some fun in the kitchen?
Check out the simple steps below to start your chocolate adventure.
Setting Up Your Chocolate Kitchen
Before you start melting anything, you need to get your space ready. Chocolate is very sensitive to heat and water. If even a tiny drop of water gets into your melted chocolate, it will turn grainy and hard. This is called seizing. I learned this the hard way when I tried to wash a spoon and didn’t dry it all the way. My whole bowl of expensive chocolate turned into a chunky mess! Now, I make sure every bowl, spoon, and whisk is bone-dry before I begin. It saves a lot of money and a big headache later on.
Gathering Your Simple Ingredients

The best part about truffles is that they only need two main things. You need chocolate and heavy cream. Since there are so few items, each one needs to be high quality. Do not use chocolate chips from a bag if you can help it. Those chips have stuff in them to help them keep their shape in the oven. For truffles, you want chocolate that melts smoothly. Look for bars that say 60% or 70% cocoa. These will give you a deep flavor that isn’t too sweet.
The cream is just as important. You must use heavy whipping cream. Milk or half-and-half will not work because they don’t have enough fat. The fat is what makes the truffle firm enough to roll into a ball. If you use milk, you will just end up with a chocolate sauce. That might be good on ice cream, but it won’t be a truffle! I like to keep my cream cold until the very second I need to heat it up. This keeps it fresh and ready for the recipe.
Essential Tools for Success

You do not need fancy machines to make candy. A simple glass or metal bowl is perfect. You also need a small pot to heat the cream. I prefer using a rubber spatula because it can scrape every last bit of chocolate off the sides of the bowl. This means less waste and an easier time cleaning up later. If you have a kitchen scale, that is great for measuring. Chocolate bars come in different sizes, so weighing them helps you stay accurate. If you don’t have a scale, you can just use a measuring cup, but be careful to chop the chocolate very fine first.
Another tool that helps a lot is a small cookie scoop. This makes every truffle the same size. When they are all the same size, they look much more professional. If you use your hands, the heat from your palms will melt the chocolate quickly. A scoop keeps things moving fast. I also like to have a piece of parchment paper ready on a baking sheet. This gives the truffles a place to rest where they won’t stick to the tray. IMO, parchment paper is a lifesaver in any kitchen project.
Recipe Quick Info
- Prep Time: 20 minutes
- Chilling Time: 4 hours
- Servings: 24 truffles
- Difficulty: Easy
The Step-By-Step Truffle Process
Now that your tools are ready, it is time to start the actual cooking. The process is very calm and slow. You are making something called a ganache. This is just a fancy name for the mixture of chocolate and cream. The key here is not to rush. If you heat the chocolate too fast, it can burn. Burnt chocolate smells bad and tastes bitter. We want to use the heat from the cream to melt the chocolate gently. This keeps the texture silky and the flavor bright.
Chopping and Prepping the Base

The first step is chopping your chocolate. You want the pieces to be very small, almost like gravel. If the pieces are too big, the warm cream won’t be able to melt them all the way. You will end up with hard lumps in your soft truffle. I usually use a big knife and take my time. It is a bit of a workout for your arm, but it is worth it. Make sure the chocolate is at room temperature before you start chopping. Cold chocolate is hard to cut and can fly off the board.
Put all those tiny chocolate bits into your dry bowl. At this stage, you can also add a tiny pinch of salt. Salt might sound weird for a dessert, but it actually makes the chocolate taste more like chocolate. It brings out the sweetness without being sugary. Once the chocolate is in the bowl, give it a quick shake to level it out. This helps the cream cover everything evenly when you pour it in later.
Heating the Cream Perfectly

Put your heavy cream into a small pot on the stove. Turn the heat to medium. You do not want the cream to come to a big, rolling boil. If it gets too hot, it can separate or scorch. Watch the edges of the pot very closely. When you see tiny bubbles starting to pop around the sides, it is ready. This is called a simmer. The moment you see those bubbles, turn off the heat and take the pot off the stove. Timing is everything here.
Pour the hot cream directly over your bowl of chopped chocolate. Do not stir it yet! This is the part where people get impatient. You need to let the bowl sit for about five minutes. Cover the bowl with a plate or a lid to trap the heat inside. This lets the hot cream soften the chocolate all the way to the center. If you stir too early, the cream cools down too fast and won’t melt the remaining chunks. Just walk away for a few minutes and let the heat do the work for you.
Mixing into a Silky Ganache

After five minutes, it is time to stir. Start in the very center of the bowl with your spatula or a whisk. Use small circles at first. You will see the white cream and dark chocolate start to swirl together. It might look a little messy or broken at first, but keep going. Slowly move your circles toward the outside of the bowl. Suddenly, the mixture will turn into a thick, glossy, dark brown liquid. It should look like shiny silk. If you still see a few tiny lumps, keep stirring gently until they disappear.
If your chocolate didn’t melt all the way, don’t panic! You can put the bowl over a pot of steaming water for 30 seconds to give it a little boost. Just make sure no steam gets into the chocolate. Once it is perfectly smooth, you can add a teaspoon of vanilla extract if you like. Stir it in well. Now comes the hardest part: waiting. You have to let this mixture cool down. Put it in the fridge for at least four hours. It needs to be firm enough to scoop, like cold butter.
Scooping and Shaping the Truffles

Once the chocolate is firm, take it out of the fridge. Use your small scoop or a spoon to grab a piece about the size of a large marble. Drop it onto your parchment paper. If you want them to be perfect rounds, you can roll them between your palms. FYI, this gets very messy! Your hands will get covered in chocolate. To make it easier, you can dust your hands with a little cocoa powder first. This stops the chocolate from sticking to your skin. Work quickly so the heat from your hands doesn’t melt the ball.
If the chocolate gets too soft while you are working, just put the whole tray back in the fridge for ten minutes. There is no rush. I usually scoop all of them out first, then go back and roll them into circles later. This keeps the sizes consistent. You don’t have to make them perfect, though. Some people like the “rustic” look where they aren’t perfect circles. It shows that they are truly homemade. Whatever you choose, they will taste amazing.
Pro Tips for Perfect Truffles
- Don’t Rush the Chill: If you try to roll them too early, they will just turn into a puddle in your hand.
- Use a Fork: If you want to dip them in melted chocolate later, a fork helps you lift them without leaving big marks.
- Flavoring: You can soak an orange peel in the hot cream for ten minutes, then strain it out before adding the chocolate for an orange flavor.
Finishing Touches and Decorating
The final step is making your truffles look pretty. Plain chocolate balls are delicious, but adding a coating makes them special. A coating also makes them easier to pick up because your fingers won’t get messy. There are so many ways to finish these. You can be classic or get really creative with what you have in your pantry. This is the part where you can really show off your style.
Classic Coatings and Flavors

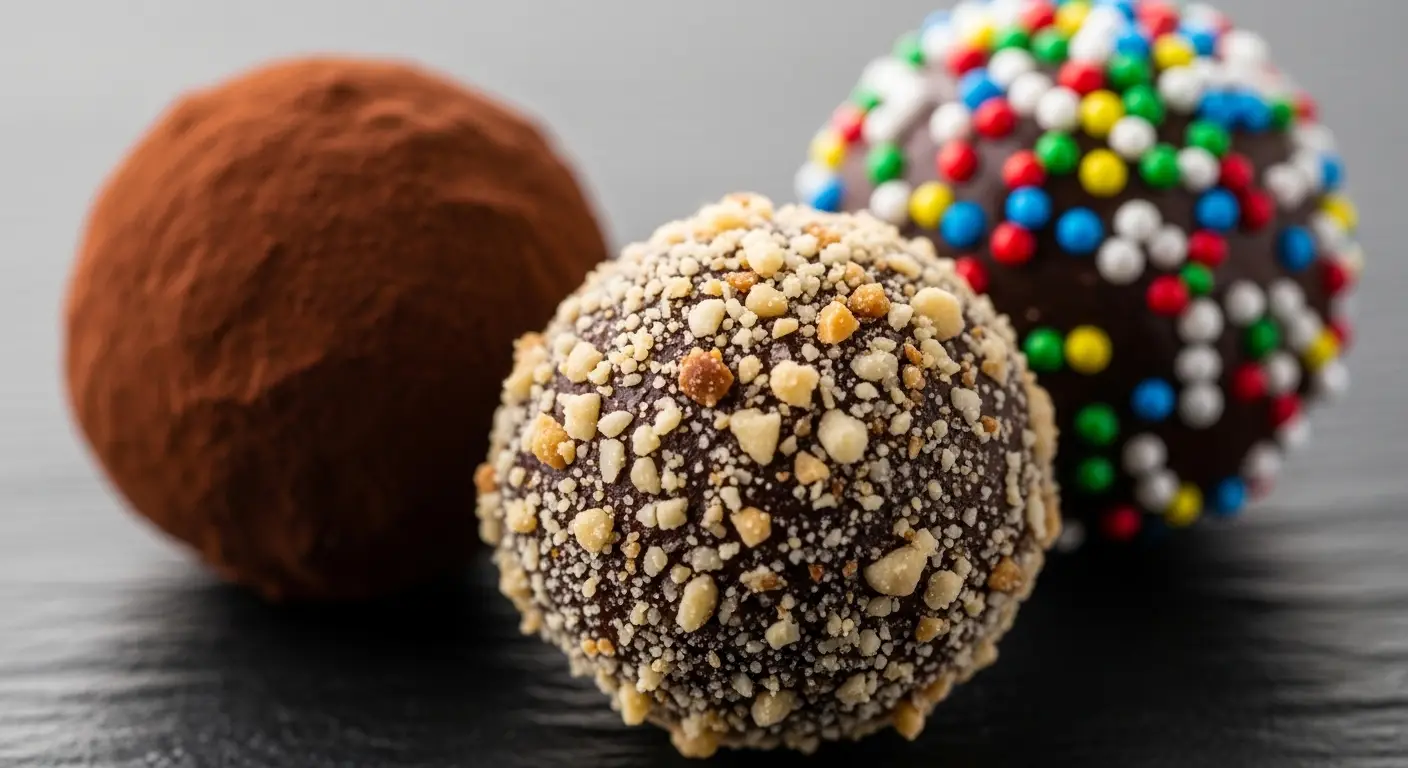
The most traditional way to finish a truffle is to roll it in unsweetened cocoa powder. It gives a slightly bitter crunch that balances the sweet center. Just put some cocoa powder in a small bowl and toss the truffle around until it is covered. Shake off the extra powder. Another great option is crushed nuts. Pecans, walnuts, or hazelnuts work beautifully. I like to toast the nuts in a pan for a minute first to make them extra crunchy. The smell of toasted nuts and chocolate is one of the best things in the world.
For a bit of color, you can use sprinkles or even dried fruit powder. If you like a mix of salty and sweet, try a tiny sprinkle of flaky sea salt on top. Just remember that the coating needs to stick to the truffle. If the truffle has been in the fridge too long and feels dry, roll it in your hands for one second to warm the surface. This creates a tiny bit of stickiness so your toppings stay put. It is a simple trick that makes a big difference in how they look.
Storing Your Homemade Treats

Since these truffles have fresh cream in them, they cannot stay out on the counter forever. They need to live in the fridge. Put them in an airtight container so they don’t pick up the smells of other food in your refrigerator. No one wants a truffle that tastes like leftover onions! You can stack them, but put a piece of parchment paper between the layers. This prevents them from squishing each other or sticking together.
Truffles will stay fresh for about two weeks in the fridge. If you want to keep them longer, you can actually freeze them! They last for up to two months in the freezer. When you are ready to eat one, let it sit at room temperature for about fifteen minutes. Chocolate tastes much better when it isn’t ice cold. It allows the cocoa butter to soften so the flavors can really fill your mouth. I usually take a few out of the fridge right before I start dinner so they are perfect by dessert time.
Your Chocolate Questions Answered
I know making candy can feel a bit scary at first. You might have some worries about the chocolate or the process. Here are some of the most common questions I get from people when they try this recipe for the first time. Don’t worry, most mistakes are very easy to fix!
Can I use white chocolate instead?
Yes, but use less cream. White chocolate is softer, so you only need about one-third as much cream to make it firm up properly.
Why is my ganache oily?
This happens if the cream was too hot or you stirred too fast. Try whisking in a splash of room-temperature cream to bring it back together.
How do I keep them round?
Keep your hands cool! Run your wrists under cold water before rolling, or use gloves to keep the heat away from the chocolate.
Can I use coconut milk?
Yes, use full-fat canned coconut milk for a dairy-free version. It won’t be as firm, but it still tastes very rich and delicious.
My truffles are too soft to roll!
Put them back in the fridge for another hour. If they are still soft, you can melt them back down and add a bit more chopped chocolate.
Enjoy Your Sweet Success
You have now created a batch of beautiful, handmade chocolate truffles. It is a skill that will always impress your friends and family. Remember that even if they aren’t perfectly round, they will still taste like a dream. Enjoy every bite!