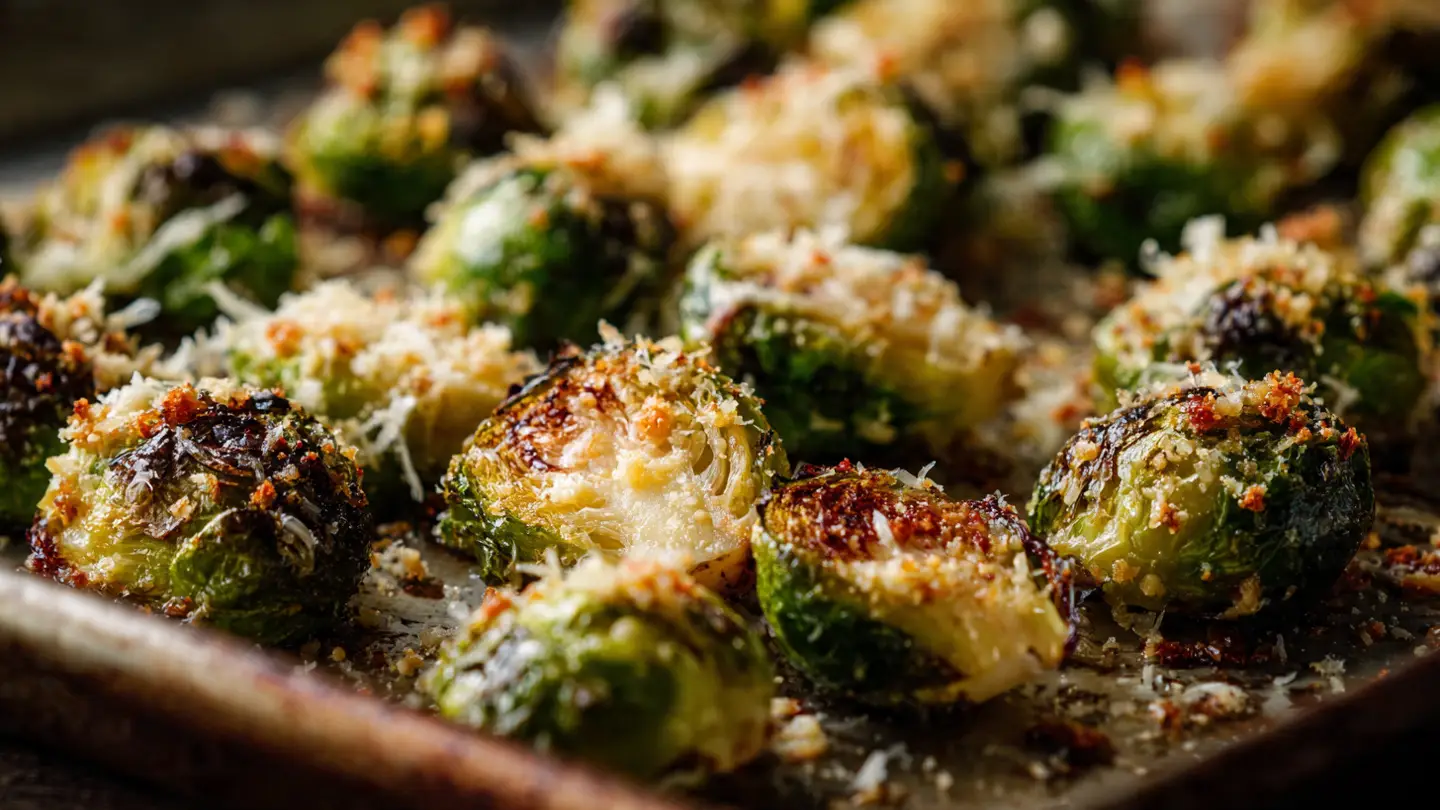
Garlic Parmesan Roasted Brussels Sprouts
Do you want to know a secret about little green vegetables? Many people think they taste bad. I used to be one of those people. My mom would boil Brussels sprouts until they were mushy. They smelled funny and tasted like nothing. But then I learned a new way to cook them. Now, these are my favorite things to eat for dinner.
I am going to show you how to turn these tiny cabbages into a treat. We will use heat, oil, garlic, and cheese. This makes them crispy on the outside and soft on the inside. You will learn the best way to cut them and how to make sure they do not get soggy. This guide helps you make a side dish that even kids will want to eat. Let’s get started on this tasty food journey.
Check out the steps below to make your kitchen smell amazing.
How to Get Ready for Cooking
Before we start the oven, we need to have everything in place. Cooking is much easier when you are organized. I like to put all my ingredients on the counter first. This way, I do not forget the salt or the garlic. Brussels sprouts need a few friends to taste good. You will need oil, spices, and a big pan. Picking the right sprouts at the store is also a big deal.
Choosing the Best Brussels Sprouts

When you go to the store, look for small or medium sprouts. The big ones can sometimes taste a bit bitter. You want them to feel firm when you squeeze them. If they feel soft, they are not fresh. Look for a bright green color. Avoid any that have yellow leaves or black spots on the bottom. IMO, the smaller ones get much crispier in the oven.
Freshness is key for this recipe. If you buy them on the stalk, they stay fresh longer. If you buy them in a bag, check the date. I once bought a bag that was old, and they tasted like dirt. It was a sad dinner. Make sure the leaves are tight and not falling off. Good sprouts lead to a good meal.
Washing and Cleaning Your Veggies

First, put your sprouts in a big bowl of cold water. Swish them around to get rid of any dirt. Sometimes little bugs like to hide in the leaves. After washing, shake them dry. This part is very important. If they are wet when they go in the oven, they will steam instead of roast. Steam makes them soft and soggy, which we do not want.
Use a clean towel to pat them dry. I spend a few minutes making sure every sprout is dry. Then, take a small knife and trim the brown end off the bottom. If any outer leaves look messy or loose, just pull them off. Now they are clean and ready for the next step. It takes a little time, but it makes a huge difference in how they taste.
Cutting for the Perfect Crunch

Now it is time to cut them. Most people just throw them in whole, but that is a mistake. I always cut my sprouts in half from top to bottom. This creates a flat side. When that flat side touches the hot pan, it gets brown and crispy. That brown part is where all the flavor lives! If you have very big sprouts, you can even cut them into four pieces.
Some leaves might fall off while you cut. Do not throw those away! I put them right on the pan with the rest. Those loose leaves turn into little chips in the oven. They are like healthy vegetable crackers. My kids always fight over the crunchy leaves. Cutting them evenly helps them all cook at the same speed too.
Mixing the Flavors and Baking
Now that the prep work is done, we get to the fun part. This is where we add the garlic and the cheese. We want every single sprout to be covered in flavor. If you just sprinkle things on top, some will be plain. We want every bite to be delicious. I use a big bowl to mix everything together before they go on the baking sheet.
Quick Kitchen Tips
- Oil Choice: Use olive oil or avocado oil. They handle heat well and taste great.
- Pan Space: Do not crowd the pan. If they touch too much, they will not get crispy.
- Oven Temp: High heat is best. I like to set my oven to 400 degrees.
The Best Oil and Seasoning Mix

Put your cut sprouts in a bowl and pour in some olive oil. You need enough oil to make them shiny. Next, add salt and black pepper. Use more salt than you think you need. Vegetables love salt. Then, add plenty of minced garlic. You can use fresh garlic or the kind from a jar. FYI, fresh garlic smells much stronger and tastes better here.
Stir everything with a big spoon or use your hands. Make sure the garlic bits stick to the sprouts. I like to add a tiny bit of red pepper flakes for a little kick, but that is optional. If you do not like spicy food, just leave them out. The oil helps the spices stay on the vegetables while they cook in the hot oven.
Arranging Them on the Pan

This is a practical tip most blogs skip: turn every single sprout so the flat side is touching the pan. It takes an extra minute, but it is worth it. If they are facing up, they won’t get that dark crust. I use a large metal baking sheet. Do not use a glass dish because glass does not get hot enough to make things crispy. You want that metal-to-vegetable contact.
Leave space between each piece. If you have too many sprouts for one pan, use two pans. If they are all piled on top of each other, they will just get soft. A crowded pan is the enemy of a crunch. I learned this the hard way when I tried to cook three pounds on one tiny tray. They came out like mushy grapes! Spread them out so the hot air can move around each one.
Adding the Parmesan Cheese

Wait to add the cheese! If you put the cheese on at the start, it might burn before the sprouts are cooked. I roast the sprouts for about 15 to 20 minutes first. When they start to look brown, take the pan out. Sprinkle a lot of grated parmesan cheese all over them. Use the real kind of cheese, not the stuff in the green can. The real cheese melts and gets crispy.
Put the pan back in the oven for another 5 minutes. Watch them closely now. The cheese will melt into the garlic and form a crust. It should look golden and smell like a pizza shop. This is the best part of the whole recipe. The cheese acts like a salty blanket for the little vegetables. Once the cheese is melted and bubbly, they are finished.
Final Touches and Serving
Once the timer goes off, your kitchen will smell like garlic heaven. But we are not quite done. A few small touches at the end can make this dish feel like it came from a fancy restaurant. Even though I am a regular person, I like my food to look and taste special. You can serve these right away while they are hot and at their best.
Adding a Splash of Lemon

After you take them out of the oven, I like to squeeze a little bit of fresh lemon juice over the top. The acid in the lemon cuts through the heavy oil and cheese. It makes the whole dish taste bright and fresh. You only need a little bit. If you use too much, it will be too sour. Just one small wedge is enough for a whole tray.
This is an alternative if you don’t have lemon: use a tiny bit of balsamic vinegar. It adds a sweet and tangy flavor. I usually stick with lemon because it looks cleaner. The green color of the sprouts looks great with the bright yellow lemon. It is a simple trick that makes people think you are a professional chef.
How to Serve and Pair

These sprouts go well with almost anything. I love eating them with roasted chicken or a juicy steak. They are also great with pasta. Sometimes, I just eat a big bowl of them for lunch by themselves. They are filling because of the fiber and the healthy fats from the oil. Serve them while they are still hot so the cheese stays crispy.
If you have leftovers, they will not be as crunchy the next day. You can heat them up in a frying pan to get some of the crunch back. Do not use the microwave if you can help it. The microwave makes them soft again. These are definitely best when eaten fresh off the baking sheet. I usually eat half of them before they even make it to the dinner table!
Common Mistakes to Avoid

One mistake I see people make is not using enough oil. If the sprouts look dry, they will taste dry. Another problem is the oven temperature. If it is too low, the sprouts will cook through but never get brown. Make sure your oven is hot before you put the pan inside. Also, this may not work if your sprouts are frozen. Frozen sprouts have too much water in them.
If you must use frozen ones, thaw them completely and dry them very well. But really, fresh is the way to go. Lastly, don’t forget to stir them or check on them. Every oven is different. Some ovens have hot spots that might burn one side of the pan. Rotate your pan halfway through if you know your oven is a bit moody. Staying close to the kitchen helps you catch any problems early.
Common Questions About Brussels Sprouts
Can I make these without cheese?
Yes! You can leave the cheese off. They will still be tasty with just garlic and salt. You can also use nutritional yeast for a cheesy flavor without dairy.
Why are my sprouts still bitter?
Big sprouts can be bitter. Try smaller ones next time. Also, make sure they get nice and brown. The browning process makes them taste sweeter.
Should I use parchment paper?
I don’t recommend it for maximum crunch. The vegetables get crispier when they touch the metal pan directly. If you hate cleaning, you can use it, but they might be softer.
How long do they stay fresh in the fridge?
They stay good for about 3 days. They lose their crunch, but they still taste good. Reheat them in a pan or oven to make them better.
Can I add bacon to this recipe?
Yes! Cut up some raw bacon and put it on the pan at the start. It will cook and release fat that makes the sprouts taste even better.
Time to Start Cooking
Cooking Brussels sprouts this way changed my life. It is a simple recipe that uses basic items from your kitchen. Just remember to dry them well, cut them in half, and use plenty of cheese. You will love how crunchy and salty they are. Now, go grab some green veggies and start roasting!