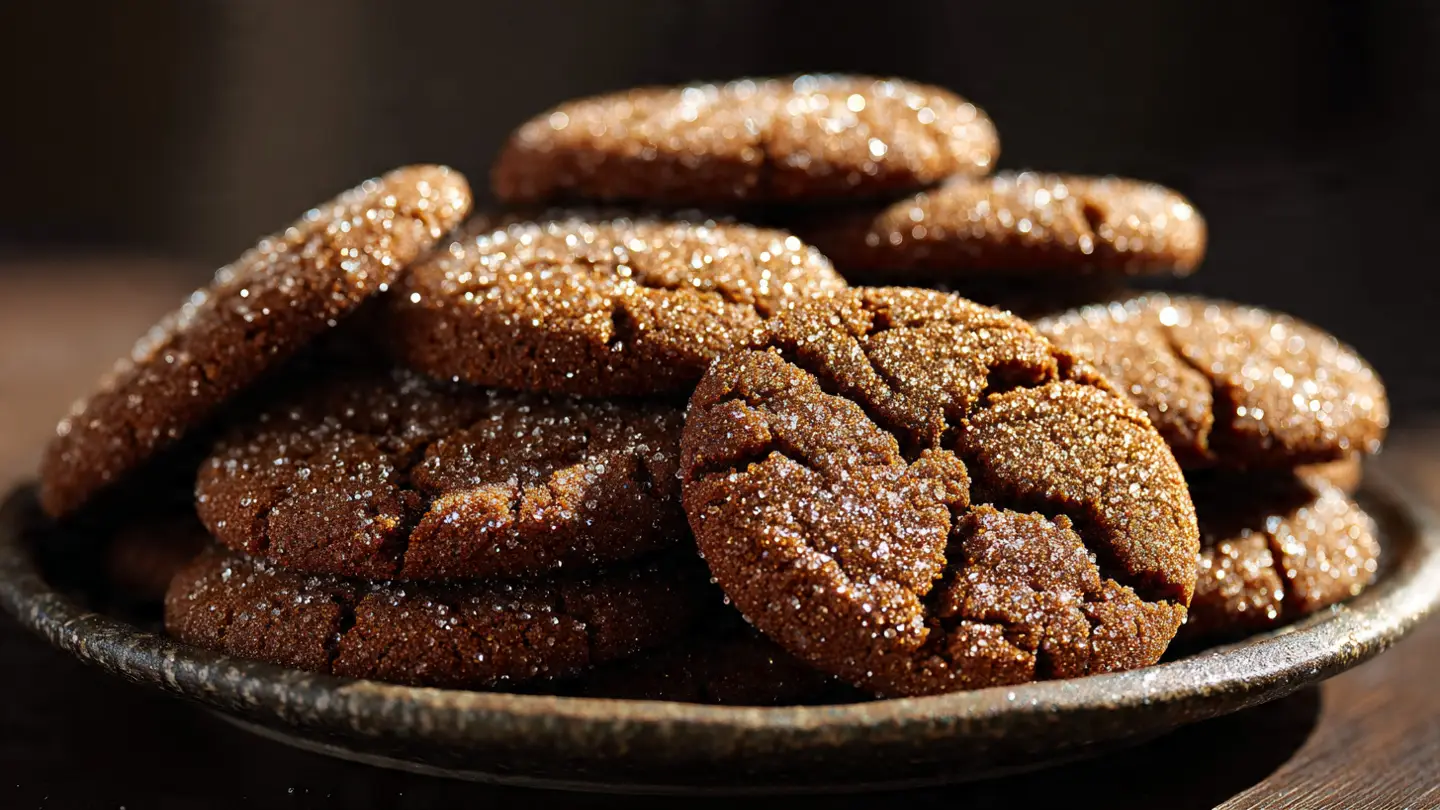
How to Bake Extra Thin and Crispy Ginger Snap Cookies
I love a cookie that fights back just a little bit. There is something so good about a ginger snap that actually snaps when you bite it. Most cookies you find are soft or chewy. Those are fine for some days, but today we want crunch. We want a cookie so thin that you can almost see through the edges. I have spent a lot of time in my kitchen trying to get this right. I used to make them too thick, and they would just be hard like rocks. That was a big mistake! Now, I know the secrets to making them light, dark, and very spicy.
In this post, I will show you exactly how to make these treats at home. You do not need any fancy tools or rare spices. You just need a few basic things from your store and a little bit of patience. We will talk about why thin cookies are better and how to make sure they do not turn into one giant pancake on your tray. My goal is to help you fill your cookie jar with the best ginger snaps your family has ever tasted. They are perfect for dipping in a glass of cold milk or a warm cup of tea.
Grab your apron and let us get started on this baking adventure!
Recipe Quick Info
- Prep Time: 15 minutes
- Cook Time: 10 minutes
- Servings: 36 cookies
- Difficulty: Easy
Gathering Your Baking Supplies
Before we turn on the heat, we need to make sure we have everything ready. Baking is like a science project. If you miss one thing, the whole thing might flop. I once forgot the baking soda, and my cookies looked like flat little coins that would not move. It was sad! For these cookies, you want ingredients that bring big flavor. Ginger snaps need to be bold. We use warm spices and dark liquids to get that deep brown color we all love. FYI, using fresh spices makes a huge difference in how these smell while they bake.
The Essential Ingredients List

- 2 cups of all-purpose flour
- 1 cup of white sugar (plus more for rolling)
- 3/4 cup of softened unsalted butter
- 1 large egg
- 1/4 cup of dark molasses
- 2 teaspoons of ground ginger
- 1 teaspoon of ground cinnamon
- 1/2 teaspoon of ground cloves
- 1 teaspoon of baking soda
- 1/4 teaspoon of salt
Each of these items plays a big role. The flour gives the cookie its body. The butter makes it rich. But the real star here is the molasses. Molasses is a thick, dark syrup. It gives the ginger snap its classic taste and helps it get that dark color. If you use honey instead, the taste will be very different and the cookie will stay too soft. Stick to molasses for the best crunch. I also like to use a lot of ginger because I want that spicy kick at the back of my throat. It warms you up from the inside out.
Why Molasses Matters for Texture

Molasses is not just for flavor. It is a very heavy liquid. In this recipe, it helps the cookies spread out while they are in the oven. Because it has sugar and moisture, it reacts with the heat to create a crisp edge. I learned the hard way that using too much molasses makes the dough too sticky to handle. You want just enough to get that snap. It also adds a slight bitterness that cuts through the sweet sugar. This balance is what makes people keep reaching for another one.
This recipe is great for people who like bold flavors. It is also very cheap to make. Most of these things are already in your pantry. If you do not have ground cloves, you can skip them, but the ginger and cinnamon are a must. The egg acts like a glue to hold the dry bits and the wet bits together. Make sure your egg is at room temperature so it mixes in easily. Cold eggs can make the butter clump up, and we want a smooth dough for thin cookies.
How to Mix and Bake the Perfect Snap
Now that we have our ingredients, it is time to get messy. Mixing the dough is the fun part. You get to see the light butter turn into a deep, spicy brown mix. I always tell people to take their time with the creamed butter and sugar. This is where you build the base of your cookie. If you rush this, your cookies might have big lumps of butter in them. Those lumps will melt and leave holes in your cookies. We want a smooth, even texture so every bite is exactly the same.
Mixing the Wet and Dry Ingredients

- Start by beating the butter and the 1 cup of sugar in a big bowl. Use a spoon or a mixer until it looks fluffy.
- Add the egg and the molasses. Stir it well until it looks like dark chocolate.
- In a separate small bowl, mix the flour, ginger, cinnamon, cloves, baking soda, and salt.
- Slowly pour the dry flour mix into the wet butter mix. Stir it until you do not see any white streaks of flour.
The dough should be soft but not too runny. If it feels too soft to roll into balls, put it in the fridge for 15 minutes. This is a pro tip that many people skip! Chilling the dough helps the butter firm up. This means the cookies will not melt instantly when they hit the hot oven. They will spread slowly, which gives them time to develop those beautiful cracks on top. I usually lick the spoon at this stage, but remember there is a raw egg in there, so be careful!
Rolling and Shaping for Maximum Thinness

To get extra thin cookies, you need to start with small balls of dough. I make mine about the size of a large marble. If you make them too big, they will be thick in the middle. Take a small piece of dough and roll it between your palms. Then, drop the ball into a small bowl of extra sugar. Roll it around until it is covered in white crystals. This sugar coating does two things. First, it looks pretty. Second, it helps the surface of the cookie dry out and crack while it bakes. That is how you get that classic “snap” look.
Place the balls on a baking sheet lined with parchment paper. Make sure you leave a lot of space between them. These cookies spread out a lot! I usually only put 12 cookies on a big tray. If they touch each other, they will turn into one big square cookie. That is still tasty, but it is not what we want today. Do not press them down with your hand. Let the heat of the oven do the work of flattening them out naturally.
The Importance of Oven Temperature

Heat is the secret to the snap. We bake these at 350 degrees Fahrenheit. If the oven is too cold, the cookies will just dry out and stay pale. If it is too hot, the edges will burn before the middle is cooked. I always use a timer. These only take about 8 to 10 minutes. You will know they are done when the edges look dark and the centers look set. They will still feel a little soft when you touch them, but they will harden as they cool down. IMO, it is better to take them out a minute early than a minute late.
Wait at least 5 minutes before moving them to a wire rack. If you move them while they are hot, they will bend or break. They need that time on the hot tray to finish crisping up. This is the hardest part because the house smells amazing and you will want to eat them right away! But trust me, the wait is worth it for that perfect crunch. A good ginger snap should sound like a little twig breaking when you snap it in half. That is the gold standard.
Tips for Success and Storage
Baking can be tricky sometimes. Even if you follow the steps, things can go wrong. Maybe your kitchen is too hot, or your baking soda is old. I have learned that old baking soda is a common reason why cookies do not spread. If your cookies stay like little domes and do not flatten out, check the date on your box! Also, make sure your butter is truly soft but not melted. Melted butter will make greasy cookies that do not have a good snap. It should be soft enough that your finger leaves a dent when you press it.
Pro Baking Secrets
- Sugar Choice: Use coarse sugar for the outside if you want extra crunch.
- Airflow: Do not crowd the oven. Bake one tray at a time for even heat.
- Measurement: Scoop flour into the cup with a spoon. Never pack it down tight!
Common Mistakes to Avoid

The biggest mistake is over-mixing the dough. Once you add the flour, only stir until it disappears. If you stir too much, you build up gluten. Gluten is great for bread, but it makes cookies tough and chewy. We want these to be crisp, not tough. Another mistake is using a dark baking sheet without adjusting the time. Dark metal gets hotter than light metal. If your pans are black, your cookies might burn in 7 minutes. Keep a close eye on that first batch to see how your oven behaves.
If your cookies come out too soft, you can actually put them back in a turned-off oven for a few minutes. The leftover heat will dry them out without burning them. This is a great trick if you live in a place with a lot of moisture in the air. Humidity is the enemy of the ginger snap. It makes them go soft very fast. If it is a rainy day, you might need to bake them a little longer than usual to get that snap you want.
How to Keep Cookies Fresh and Crunchy

Once your cookies are totally cool, you must store them right. If you leave them out on the counter, they will suck up moisture from the air and get soft. I use a glass jar or a plastic container with a very tight lid. Do not put them in the same jar as soft cookies like chocolate chip. The moisture from the soft cookies will move into the ginger snaps. Then you will have two types of soft cookies, which is not what we want! These ginger snaps can last for up to two weeks if kept dry.
You can also freeze the dough balls. I love doing this! Just roll them in sugar and put them in a freezer bag. When you want a fresh cookie, just pop a few onto a tray and bake them. You might need to add one or two minutes to the bake time if they are frozen. It is a great way to have a warm snack ready for guests. These cookies also travel very well because they are sturdy. You can mail them to friends in a box, and they usually arrive in one piece.
Creative Variations to Try

Once you master the basic recipe, you can get creative. Some people like to add a bit of orange zest to the dough. The smell of orange and ginger together is like magic. You could also dip half of the cooled cookie into melted white chocolate. This makes them look very fancy for a holiday party. Another idea is to add a tiny pinch of black pepper. It sounds crazy, but it makes the ginger taste even stronger and more spicy. I like to do this when I am making them for adults who love big flavors.
If you want a different texture, you can try using brown sugar instead of white sugar. This will make the cookie a little more chewy in the middle while keeping the edges crisp. However, for the ultimate thin snap, white sugar is the winner. It helps the cookie dry out more in the oven. No matter how you change it, the core recipe stays the same. It is a solid base that never fails me. Just remember to keep them thin and keep them spicy!
Frequently Asked Questions
Why are my ginger snaps soft instead of crunchy?
You might have taken them out too early. Try baking them for an extra minute or two. Also, make sure they cooled completely on a wire rack before you put them away.
Can I use fresh ginger instead of powdered ginger?
Fresh ginger has a lot of water. It can change the texture and make the cookies soft. It is best to use dried powder for that classic snap and sharp spice.
What is the best way to measure the flour?
Use a spoon to fill your measuring cup, then level it off with a knife. If you dip the cup into the bag, you will pack too much flour and get thick, dry cookies.
My cookies didn’t spread out. What happened?
Your dough might have been too cold, or your oven wasn’t hot enough. It could also be old baking soda. Make sure your ingredients are fresh and at room temperature.
How long do these cookies stay fresh?
In an airtight container, they stay crunchy for about 10 to 14 days. Keep them away from moisture to ensure they don’t get soft and bendy.
Happy Baking
Making ginger snaps is a great way to spend an afternoon. They fill your home with a warm, spicy scent that feels like a hug. By following these steps, you will have the thinnest, crunchiest cookies on the block. Enjoy every single snap!